Thursday, September 27, 2012

My Canadian Smocking pillow

The advantage of having a deadline is that I am forced to devote myself to complete the project. I finished my pillow and I love how it turned out. The most important thing for me is that I tried a technique that always caught my attention, the canadian smocking.  Here is the project with which I will participate to the challenge, a smockig canadian pillow.


I found this challenge while visiting Pam's blog ( Threading My Way ), is a blog I
visit regularly and that I love, I recommend it to you in case you have never
yet visited. From Pam's blog I went to visit the blog of Rikka (Ricochet and Away
and is another blog I discovered and that I love, I also recommend it to you, she
has nice projects and tutorials,  is on Rikka's blog that I found the challenge.
 
 
I want to show more photos I took, I tried to put in value the 3D effect that is
achieved with this technique. Here are more pictures


If you want to jump on the adventure of making a canadian smocking, Rikka has in
her blog the link to the tutorial, click here,   by reading her post you will find 
the link to the Canadian Smocking tutorial.
Thanks for your visit to my blog.
Have a nice day.
Marisa.


Monday, September 24, 2012

The Fab Fold Sewing Challenge

This is the first time that I will participate at The Sewing Fold Fab Challenge.
 
 
  The challenge is to: Successfully execute pleating, pin-tucking and / or smocking
in a finished piece.
 
After some reflection, I decided to learn to do  "Canadian Smocking". Luckily there
is a good tutorial, Ricochet has it on their website, click here, in her post
you are going to find the link to the Canadian Smocking tutorial.

To participate I decided to make a cushion. Today I want to share with you one of
the first pictures I took, I just finished doing the smocking on the front of the
cushion, on the back side I will add a zipper. When finished I will share with you
the rest of the photos.
 
 
The deadline to finish this project is September 30. If anyone is interested to participate in
this challenge or if you'd like to look at the blogs of people who will participate
click here.
 
Have a nice day!
Marisa.
 

Monday, September 17, 2012

Let's sew a textile cuff using a pair of old jeans.


Whenever I do the sewing hems of the jeans for me or for my family, I have the habit of saving those snippets, always with the idea that I'll use them for something. This time I decided to turn them into a textile cuff.


With this project we can use every little scrap of fabric that we have saved and do not really know what to do with, I think you already know me, so you know that I am able to use up the little ones to create something. This is a confession, yes! I love using scraps,  but I think you already  know that.

I found these pieces of hem jeans and decided to give them another life
 
I also decided to get my embellisher machine out of the closet and putting it to work.
The first thing I did was remove the side seam.
 
 
Right now I take my wrist measures, I add two inches and cut the ends.
If you are going to make one for you, you have to  decide whether you want a closed cuff or a loose cuff. You have to think what kind of closure will be placed and from there cut the required length
 
I chose two different pieces, I put up the smallest piece,  and I sat in front of my embellisher machine to start my creation.
 
I decided to add threads
 
Before starting the felting, I placed a small piece of watersoluble stabilizer above the threads
 
I started using my embellisher machine
 
I added other pieces of fabric on top and sides and continue felting
 
I started auditioning decorative elements, once I decided, which one I liked more, I've sewn in place
 
At the extremes of the cuff I decided to put a few pieces of leather scraps, leftovers that I have from an old coat .... I recycle everything
On those pieces of leather I'll add a button and a buttonhole and that will make my closure, but you could use snaps,a button and a loop, it is your choice.
 
I kept adding decorative elements


You can add what you want, beads, chains...,the secret is to auditioning the different materials,  one trick I have is that I select some elements and take a photo, change for others and took another shot, and finally, looking at the photos I took, I made ​​the decision to which of them  I like more.


To make the back side, I use the other half of the jeans, and I hand-stitched.


And here's my completed piece!! I'll show you some close up, I love the result and I'm ready to start making a few more!


I hope you've enjoyed these explanations and hopefully you will be encouraged to make one.
I would love to see your photos.
 
In the meantime I am finishing the pillowcase for my bedroom, I can not wait to finish them and share them with you, my only problem is time. Where does the time go?
 
I hope you enjoyed this tutorial, I always appreciate your comments and I always hope that this blog continues to grow with new followers, do not hesitate, you are welcome!!
 
I'm linking this textile cuff to Skip To My Lou , to Positively Splendid, Five Days...5 Ways, Threading My Way,  and to Creating my way to Succes, Link party.

Have a happy sewing day!!!!!
Marisa


Wednesday, September 5, 2012

Let's make a Sausage Pillowcase

I have to confess that for quite a certain time, I'm thinking of making covers for my pillowcase, I think it's a way to customize the decoration of a room.
The technique that I will use today to perform them, is called, the technique of the sausage pillowcase, and when you'll see the pictures then you will understand why it is called so.
These cases are sewn in a couple of hours, what actually took me longer was choosing the fabrics....


What is special about this type of case, is that when you finish it, we will not see any seams inside. To me this is magic, when I discovered this technique, I said to myself that I had to try to make a couple of them and see the result, I checked and I can confirm, when you finish the pillowcase,  the seams are not seen and especially,  these covers are beautiful!


Another thing before I start, I don't  know who created this technique, there is much information online, I'll put at the end of this post a link to a video on you tube that also explains this technique and that inspired me to do this tutorial.

That being said, I'll show you how we do.

These are the fabrics that I'm going to use,
 
 
1) Cutting the fabric
 
For a standard pillowcase you will need 3 different fabrics.
Body- 45" X 23"
Accent- 45" X 2"
Cuff- 45" X 11"
 
2) Place the fabric in order to sew
 
First we will prepare the accent fabric, fold the fabric in half lengthwise
and press wrong sides together.
Then you lay your fabrics down like this: first the body right side up,then place
the accent fabric matching raw edges, and finally the last fabric to add is the
cuff right side down, always matching raw edges.
 

3) Sewing
 
 
Now we will place pins along all these fabrics and we'll sew all three pieces using
1/8" seam allowance.


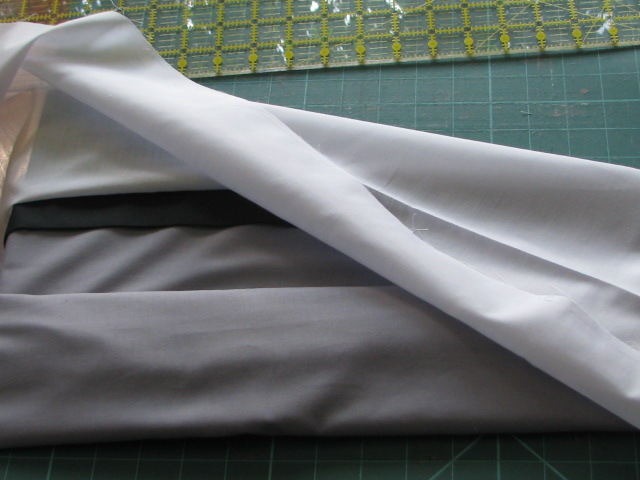
4) Rolling the body part


The next part is the most important, and is the reason why we call this technique,
the sausage pillow: begin to roll up the body part, we start to roll up from the bottom, to the cuff.


This is what we call the sausage.
5) Wrap the sausage
 
Is difficult to explain in words what follows, looking at the photos and you will
better understand what I'm trying to explain.
Now, take the bottom edge of the cuff,and we will wrap the sausage fabric that we
previously did,


this photo is to show that I turned the pillow,and the cuff is now down side


Take the bottom edge of the cuff piece and bring it to the top


Pin edges together and sew with 1/4" seam.


6) Pull the  fabric out
 
Once you have completed this portion pull the body out
 
 
7) Press


The most important thing now is to iron the fabric, Here is ready for ironing
 
 
8) Sew a French seam
 
 
Pin the pillow wrong sides together
 
sew the side and bottom  using a 1/4-inch seam.

Pay attention to the next picture
 In  the next picture there is an error,in the text we would have to read:

with wrong sides together

 I want to thank Madeleine, she was the person who advised me of this error, thanks Madeleine!
 
 
trim seam allowance to 1/8", don't cut into your stitches, press.
 
Turn the pillow inside out and, the fabrics will be rigth sides together, press and
stitch in a 1/4" seam, one more time all down the case and toward  the bottom, you
have to enclose the trimmed seam allowance.

Press, turn one more time inside out and you did it, you can admire your sausage
pillow case!


I made my pillows in colors that go with the colors of my bedroom, but the color
combinations that we can use are endless.
 
I've already said before that I belong to several yahoo groups, one of which is the  An   Embroidered Affair yahoo group, one of the group members is Linda, and she allowed me to share with you some pictures of the  pillowcase that she has done.


they are adorable!!!!


I asked her permission to upload these photos to the blog, because I wanted to share them with you. I love the combination of colors she has chosen and the detail with embroidered names that give personality to the project.
 I hope you enjoy these pictures, thank you Linda, for allowing me to share your photos on my blog.


I leave here a link to the you tube video that inspired me to make this tutorial.
 
I am currently making buttoned cushions, and certainly will be my next tutorial.
Do not forget to leave me comments, I always like to know if you liked the project.
 I also want to thank all the new followers who have joined our blog and remind you
that new followers are always welcome. 
 
I'm linking this tutorial to Threading My Way, Link Party.
 
I hope you have enjoyed this tutorial
 Marisa.

LinkWithin

Related Posts Plugin for WordPress, Blogger...