Pages

Monday, September 29, 2014

Easy Cosmetics Bag.

 
Hello dear friends of this beautiful  blogging world, I have some news to tell
you, next November I will participate in an exhibition of crafts, that was the
reason why I started looking for projects that were cute, quick and easy to do.
I found  one of my projects on Sew So Easy's  blog, she  had so beautiful
projects, also great tutorials, while watching her creations  I found this
cosmetic bag.
I decided to throw me in the adventure of making them. These are the first two
I did.


En el mes de noviembre voy a participar a una exposición de artesanía, esa fue
la razón por la cual empezé a buscar proyectos que fueran  lindos, fáciles y
rápidos de hacer. Fue así que descubrí en 
el blog de So Sew Easy  un hermoso
bolso para cosméticos y  decidí de lanzarme en la aventura de hacerlos. Estos
son los dos primeros que hice.


Obviously I added a flower, I think the flowers are part of my personality and
give a signature to my creations.
 
Evidentemente le agregué  una flor, creo las flores son parte de mi
personalidad y que le dejan mi firma a mis creaciones
.


In the coming days I will show the other cosmetics bags that  I'm doing right
now . The link where you found this excellent tutorial is here
 
There you will find a written pattern and for those who are visual, Deb has
made a beautiful video, so ... no excuses try to make one, is a beautiful gift
you could make for a special one at Christmas.
 
The link for the video is here.
.  Another very important detail, the author allows us to sell our creations.
Thank you Deby !!!!
 
 
En los próximos días les mostraré las otras bolsas para cosméticos  que estoy
haciendo. El enlace donde encontraran este excelente tutorial esta
aquí.
 
Allí encontrarán un patrón escrito y para los que son visuales, Deb ha hecho un
hermoso video, el enlace esta
aqui. Entonces...no hay excusas intenten hacer uno, es un lindo regalo
que ustedes podrían hacer para  alguien  especial en navidad.
 
Otro detalle muy importante, la autora nos permite vender nuestras creaciones.
Gracias Deby.
 
 
Estoy contenta de poder compartir con ustedes mis creaciones,  yo espero haber 
podido brindarles un poco de inspiración. Gracias por vuestra visita y
ojala me vuelvan a visitar pronto.


I'm always happy to share my creations with you , I hope that I given to you a
little inspiration.
Thanks for your visit and hopefully I'll see you  again soon.
Have a happy sewing day.
 
Marisa :)
 
 
I'm linking this project to Crafty Allie's blog .


Thursday, September 11, 2014

Repurposing an old pair of denim to a bag.

With great joy and enthusiasm I am again in this beautiful world of blogger. The summer has gone so fast, I have not had time to do what I like ... share my creations with you  and visit my blogger friends.
I  was knitting, crocheting and sewing. I have several projects in my camera, and I'll upload them to the blog in the coming days
Today I want to show you my new bag, I made ​​it from an old pair of denim.


I did it with the idea of selling it, I always have this dream of opening my Etsy shop, hopefully I can make that dream this year.
At the end of the photos, I'll give the link to a You Tube video that helped me make this beautiful bag. What you will need is a pair of jeans, a shirt and a bit of inspiration.
Here are the photos I  have taken  today to share with you, I hope you like them!


If you want more ideas for recycling jeans, my bloggy friend Pam from Threading my way's blog wrote a post in which there is a beautiful variety of projects, with much honor I can tell you that you will find three of my tutorials.
 
Here is the link to the post.


Con mucha alegría y entusiasmo estoy otra vez en este hermoso mundo de blogger.
El verano ha pasado  muy rápido,  no he tenido tiempo de hacer lo que mas me
gusta...compartir con ustedes mis creaciones y  visitar mis amigos bloggers.

Estuve tejiendo, haciendo crochet y también costura. Tengo varios proyectos en
mi cámara  de fotos,  y los voy a subir al blog en los próximos días.

Hoy les quiero mostrar a ustedes  mi nuevo bolso, lo hice a partir de un viejo par de jeans.


Lo hice con la idea de venderlo , yo siempre tengo ese sueño de abrir mi Etsy
shop,  ojala  ese sueño  lo pueda realizar este año.
Al final de las fotos,  les daré el enlace hacia un video de you tube que me
ayudo a confeccionar este hermoso bolso. Necesite un par de jeans, una camisa y
un poco de inspiración.
Aquí  van  las fotos que tome hoy para compartir con ustedes, ojala les  gusten!
 
Si quieren mas ideas para reciclar jeans, mi amiga Pam del blog Threading my
Way escribió  una publicacion en la  cual hay una hermosa variedad de proyectos, con
mucho honor les puedo decir que ustedes encontraran tres de mis tutorials en su publicacion.
 
El enlace hacia el video en You Tube esta AQUI


Les deseo un hermoso dia, les agradezco por su visita y espero con muchas ganas
sus comentarios.


I wish you a nice day, thank you for your visit and am looking forward to
your comments.
 
Have a happy sewing day!
 
Marisa


I'm linking to Crafty Allie Pinterest Party and Threading My Way( bags and totes link party).
I'm linking also to Patchouli Moon Studio, The button to visit the party is at the end.


Patchouli Moon Studio's Weekend Link Party

Friday, May 2, 2014

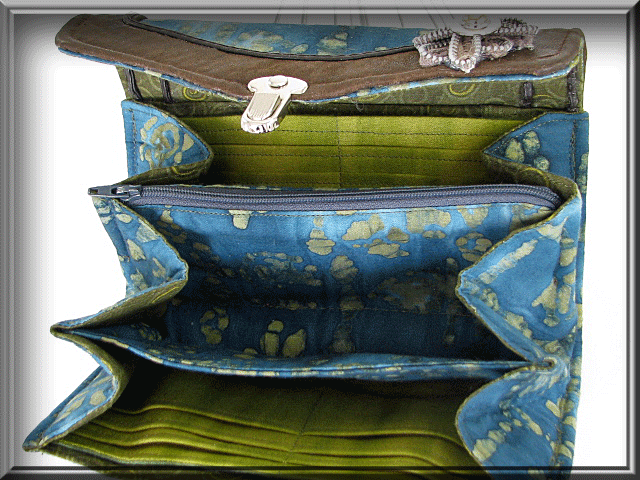
The Necessary Clutch Wallet.

Today I want to share with you one of my latest creations, this "Clutch
Wallet".


The designer is Emmaline, on her site you will find very cute patterns and 
something interesting is that she also sells the hardware necessary to make 
the bags.
While I have no affiliation with the designer, I can only say positive things 
about this pattern. The pattern comes in a pdf that you can print and the
instructions are  clear, only one thing to consider and is that the pattern is
suitable for an  intermediate sewer.


Hoy quiero compartir con ustedes una de mis últimas creaciones, este Monedero, 
su nombre "The Necessary Clutch Wallet".
La diseñadora es Emmaline y  en su sitio usted encontrará modelos muy lindos de
 patrones para hacer bolsos  y algo interesante es que ella también vende el 
material  necesario para hacer los bolsos.
 
Quiero que sepan que  no tengo ninguna afiliación con la  diseñadora, y que si bien   
sólo puedo decir cosas positivas sobre este patron, es mi opinion.
 
El patrón viene en un pdf y las instrucciones son
claras, sólo una cosa a tener en cuenta y es que el patrón es adecuado para un
 un nivel  intermedio, un principiante quizás encuentre dificultad, pero no es 
imposible!


The finished size is approximately:  Length: 8” (20 cm) across bottom, Height: 
4” (10 cm), Depth:  1” (25 cm) wide at bottom, is a beautiful wallet with many , many, many
compartments, I love it!!
 
El tamaño final es aproximadamente: Longitud: 8 "(20 cm) a través de la parte 
inferior, Altura:4 "(10 cm), Profundidad: 1" (25 cm) de ancho en la parte inferior.
Tiene una cantidad de compartimientos, me encanta!!!!


There is a fb group created by Emmaline. especially for those who create these 
clutch. In the fb group you'll find inspiration and also a lot off information 
, you will learn also how to modify the pattern.

I leave you all the links at the bottom of this post.


Hay un grupo FB creado por Emmaline, es un grupo para aquellos que crean estos
monederos. En el grupo de fb encontrarás inspiración y también una gran 
cantidad de información, allí aprenderás también cómo modificar el patrón.
Os dejo todos los enlaces al final de este post.


I made the flower with a zipper, if you do a search on Google there are 
plenty of tutorials on how to make zipper-flowers and if you want more 
information there are videos on you tube.
  
Hice la flor con una cremallera, si tú haces una búsqueda en Google vas a 
encontrar un montón de tutoriales sobre cómo hacer  este tipo de flores y si 
quieres más información hay videos muy buenos en you tube.


One more thing about this pattern:
COPYRIGHT AND LICENSING INFORMATION:
•You may sell items made from this pattern in your shop or market stall;
however this pattern is not to be used for mass production.
 
When a designer allows me to sell what I make from her pattern, makes me feel
good !!!!
 
 
Una cosa más acera de este patrón:
DERECHOS DE AUTOR E INFORMACIÓN DE LICENCIA:
• Usted puede vender artículos hechos de este patrón en su tienda o puesto en 
el mercado;
Sin embargo, este patrón no es para ser utilizado para la producción en masa.
 
Cuando una diseñadora me permite vender lo que fabrico a partir de su patrón, 
me hace sentir súper bien.
Espero poder empezar a subir los proyectos más a menudo, echo de menos estar en
 contacto con ustedes.


The link to the facebook group is here .


I hope to start uploading projects more often, I miss being in touch with you.
A thousand hugs :)
 
Marisa.

I'm linking this party to Weekend Link Party ( Patchouli Moon Studio) .


Friday, March 21, 2014

My bohemian style "Wrap Bracelet".

Although I have not been actively participating in online social groups, I 
assure you I was using every spare minute to create something. I like to vary 
my projects and that is why I have many projects at once and lack of time to finish all. The time will always be my worst enemy, I know I am not the only one to spread the hours of the day between the family, the house and certain obligations that comes with age. Even though I have no time this blog is my baby and allowed me to discover many new friends also  new  passions and I want to share with you new creations and tutorials, took me long time .. but here it is my new creation... I want to share the pictures of my wrap bracelet, with you.


What can I say .... I love it! From some time ago I wanted to make a bracelet 
with this bohemian style and after several hours of work ... I finished!  Once 
you understand the technique is fast to do.....ok I have to say relatively 
fast, I think it took me about 8 hours, no exaggeration!!!
There are several online tutorials that explain how to do it, you will be able
to find excellent videos on you tube.
They were the colors of the earth who gave me the inspiration to make this 
bracelet. I did it using 5mm beads that were hand sewn on a leather cord 1.5mm 
thick. The earth colors are my favorite colors and what else can I say .. this 
is my personal model from which I hope to do a few more to put them on sale!


Aunque no he estado activamente participando en los grupos sociales online, les
aseguro que estuve utilizando cada minuto libre para crear algo. En realidad  
me gusta variar en mis proyectos y es por eso que tengo a la vez varios 
proyectos que he comenzado y que voy terminando tranquilamente.

El tiempo será siempre mi peor enemigo, yo sé que no soy la única a repartir 
las horas del día entre la familia, la casa y ciertas obligaciones que vienen 
con los años. Pero este blog es mi bebe y me permitió descubrir muchos nuevos 
amigos y amigas así como nuevas pasiones y  quiero seguir compartiendo con 
ustedes mis creaciones y tutorials aunque me lleve tiempo. 
 
Hoy he subido fotos de mi más reciente creación, les gusta?
 
Que les puedo decir....me encanta! Hace tiempo que yo me quería hacer una 
pulsera  con este estilo, yo diría un estilo bohemio y luego de varias horas 
de trabajo...lo termine! Yo creo que me llevo unas 8 horas, no exagero. Una vez
que comprendemos la técnica se hace rápido, o sería mejor decir relativamente 
rápido!!!
Hay varios tutoriales online que explican cómo hacerlo, ustedes podrá encontrar
hasta en you tube  excelentes videos.
Fueron los colores de la tierra los que me dieron la inspiración para hacer 
esta pulsera.  Lo hice usando perlas de 5mm,  que fueron cosidas  a mano sobre
una cuerda de cuero de 1.5mm de espesor, los colores tierra son 
mis colores preferidos y que más les puedo decir..este es mi modelo personal  a
partir del cual espero hacer unos cuantos más para ponerlos a la venta!


I'll try to make a tutorial when I make the next wrap bracelet, I assure you 
it's easy to do! It's just a matter of patience.
 
 
Cuando yo haga el próximo wrap bracelet, voy a intentar a hacer un tutorial 
yo  se los aseguro ..... es fácil de hacer! Solo es cuestión de paciencia!
 
Have a beautiful and creative day!!!
A thousand hugs !!!
Marisa :)


 I'm linking this project to Crafty Allie.


Friday, February 21, 2014

Let's crochet Cables and learn the Lace Broomstick stitch.

This Month of February has passed very quickly and I haven't had time to
upload any project, have not had time to visit my blogging friends, also have
not had time to read my posts ... for all that, I apologize!!!
Today I will share with you this beautiful project and then I'm going to take
time to read my messages. With that said, and hoping that I have been
forgiven, here begins my post :)
 
 
Este Mes de febrero se ha pasado muy rapido y no he tenido tiempo de subir
ningun proyecto, tampoco he tenido tiempo de visitar mis amigos bloggers , asi
como no he tenido tiempo de leer mis mensajes...por todo eso, pido disculpas!
Hoy voy a compartir con ustedes este proyecto y luego me voy a dedicar  a leer
mis mensajes. Con esto dicho, y esperando que me hayan perdonado, aqui comienza
mi post :)
 
 
Cables and Lace Broomstick Hat.


This crochet hat shows us something, today's crochet creations are endless.
I discovered this hat, through the Crochet Along group on Google+.
 
 
This was the challenge for the month of September 2013, a little late, but wanted to do it 
and share with you my pictures and links for anyone who wants to try to do so.
Good news, the pattern to make this hat is free, having said that, I want you 
to know that this project is for those who have an intermediate to advanced 
level of knowledge in crochet.
 
 
You will find the pattern for this hat in an e Book from "Crochet Me" as I said
is  free, here's the link "8 Free Crochet Hat Patterns: Crochet Hats with Crochet  Me" and more good news in this eBook you have 8 patterns. You  have to register to download it, worth it, because there's always interesting projects and free e books.
 
 
http://www.crochetme.com/Crochet-Hat-Patterns/


Descubrí este hermoso sombrero en crochet, por intermedio del grupo
 
Este fue el challenge del mes de Septiembre del 2013, un poco
 en retraso, pero quería intentar hacerlo y compartir con ustedes fotos y 
enlaces para quien quiera intentar a hacerlo quiera intentar a hacerlo.
 
Una buena noticia, el patrón para hacer este sombrero es gratis, pero quiero 
que sepan que este proyecto es para aquellos que tengan un nivel 
intermediario ha avanzado de conocimientos en crochet.

El patrón para  este sombrero lo van a encontrar en un e Book de "Crochet Me" 
que como les dije es gratis,
aquí va el enlace " 8 Free Crochet Hat Patterns:  Crochet Hats with Crochet Me" y otra buena noticia en este e Book hay 8 patrones. 
Solo se tienen que inscribir  a "Crochet Me"  para bajarlo, vale la pe
na,  pues
allí siempre hay proyectos interesantes y e Books gratis.


Let me give you some links that for me was very useful:

For the cable band portion of the hat you need to know how to do the;
 

If you click on the name of the stitch it will take you straight to the tutorial I used .
The difference between the BPdc and the FPdc is the way you insert your hoop, 
the first two letters FP and BP, guide us in the direction we have to take 
with hook, the last two tell us the stitch that we have to do, in this case a 
double crochet ( dc).


Les voy a dar algunos enlaces, que para mi  fueron de mucha utilidad
para realizar estos  puntos.


Ustedes hacen clic en el nombre del punto  y los  llevara directo hacia el 
tutorial que yo use. El post esta en ingles, pero hay muchas fotos que les 
permitirá de comprender como hacer estos puntos.
La diferencia entre el BPdc y el FPdc es la manera que hay que dirigir el 
gancho de crochet para hacer el punto,
las primeras dos letras nos guían en la dirección que tiene que tomar el 
ganchillo y las dos últimas nos dicen cual es el punto que hay que realizar.


The second part is the Broomstick Lace stitch.
 
This crochet stitch is beautiful, but it was a little difficult to learn!
 
There is a video that helped me understand, and the video is on the site of 
Stitch Diva Studios


La segunda parte es el Broomstick Lace stitch.
Este punto de crochet  es hermoso pero para aprenderlo me costó un poco :(
 
Hay un vídeo que me ayudó a comprenderlo, y el video esta en el sitio de


I decided to add a flower and the pattern for the flower is also free and easy to do! The 
pattern is from Crochet today. Here is the link.
 
Decidí agregar una flor y otra buena noticia tambien es un patrón gratis, el patrón es 
de
"Crochet today", aquí está el enlace.


Hopefully you have enjoyed this project; it is a challenge to learn new crochet
 stitches, as I always like to learn something new, it was a victory to finish  it!
See you soon with new projects!
 
 
Ojala les haya gustado este proyecto, es un desafío para aprender nuevos puntos
 de crochet, como a mí siempre me gusta aprender algo nuevo, fue una victoria 
el terminarlo! Nos vemos pronto con nuevos proyectos!
 
 
Have a beautiful and creative day!
 
Marisa :)
 

This project was featured at Oombawka Design Crochet!!!


Friday, January 31, 2014

How to make easy "Paper Flowers"


Lately I've wanted to do something handmade! Are you remember the photo I 
took last year with the various objects I wanted to transform?


Últimamente estuve con ganas de hacer algo artesanal!   Se acuerdan de la foto 
que tomé el año pasado con los distintos objetos que yo quería transformer?


El primer proyecto que hice fue la transformación  de la corona.


The first project I did was the transformation of the crown


Now...I decided to give a new life to the basket, and today I want to share 
with you the flowers I made with napkins paper, so I'll try to describe the 
best that I can the steps, using photos that I took while I was working on this project.
 
First thing I did was to paint the basket with a white color, to do that, I 
used a spray paint called Krylon.
Light, camera, action!!
Now ... I'm going to show how I have done the paper 
flowers
 
 
Supplies
-napkins, but you can also use tissue paper, I have also made some flowers 
recycling paper from the sewing patterns!
- a ruler
- Scissors
- Wire, I used floral wire.
- Wire cutters


 Esta vez decidí darle una nueva vida a la canasta, es por eso que
hoy quiero compartir con ustedes  las flores que realicé con servilletas de 
papel.  Voy a tratar de  explicar los pasos lo mejor que pueda  usando  las 
fotos que  tomé mientras trabajaba en  este proyecto.
 
Lo primero que hice  fue  pintar  en color  blanco la canasta, para ello usé 
una pintura blanca en aerosol. Luz, cámara, acción! ! ...ahora les voy a 
mostrar cómo he hecho las flores de papel
 
Material necesario
 
-servilletas o también ustedes pueden usar papel para regalos, me refiero a ese
 papel finito como de seda, también he hecho algunas flores reciclando el papel 
que viene en los patrones de costura!
- una regla
- tijeras
- alambre
- pinzas para cortar alambre


I cut out the napkins into squares, these  are 6 inches square, you can make 
them larger or smaller depending on the size of the flower you want to do.
 
 
Corté las servilletas en cuadrados , los míos miden 6 pulgadas, son unos 15 cm,
 ustedes los pueden hacer más grandes o más pequeños según el tamaño de la flor 
que quieran hacer.


I used two napkins for each flower, which will result in 8 sheets of paper for 
each flower.


 En mi caso he usado dos servilletas lo que va a dar como resultado  8 hojas de 
papel para cada flor 


Let's put all the papers together so they are evenly matched edges and fold it 
accordion style, making sure that you crease each fold.


Vamos a poner todos los papeles juntos de manera que queden  los bordes 
parejos, doblar como si estuviéramos haciendo un acordeón o un abanico, y 
asegurarse bien que quedan los pliegues bien marcados.


Wrap a piece of wire around the middle.

 
Sujete  un pedazo de alambre alrededor del medio.


Round off the ends the best that you can.


Redondear los extremos  lo más que ustedes puedan.


With great care and patience now we have to separate the layers of the napkin 
or tissue paper from one another, one by one, on each side by lifting each 
piece of paper up, takes patience and.... begin pulling them apart.


At the same time we shape the flower.


Le vamos dando forma a la flor.


Then we shall assemble the bouquet and give it the personal touch!
 
 Here I leave some photos of my beautiful basket, I love it!
 

 Luego nos queda armar el bouquet y dar  el toque personal a esta canasta!
Aquí les dejo algunas fotos más de mi hermosa canasta,  me encanta.


Have a beautiful day and creative day !!!


Thanks for taking the time to visit me.
We'll be seeing soon.
 
 
Gracias por haber tomado el tiempo de visitarme. Nos estaremos  viendo pronto!
 
Marisa :)


I'm linking this project to The DIY'ers Party and to Crafty Allie.


This project was featured at Crafty Allie!!!!


Friday, January 24, 2014

The Sling Bag...is a free pattern!

 
I want to show you my new creation!
 
Les quiero mostrar mi nueva creación!


Some elements were necessary in order to make it, a pattern and a designer who 
allow me to change its pattern, a pair of jeans and my imagination.
I was lucky to be part of Samantha's pattern testers because this time Samantha 
gave us freedom to modify her pattern, it was then, that I decided to recycle a 
pair of jeans.
 
Samantha is a wonderful designer; you can find her on her blog At Home with Mrs.  H, where she shares with us interesting articles, sewing tips, and much 
more.
 
Good news!!! The pattern is free and I'll give you the link at the end of my 
post.
 
 
Varios elementos fueron indispensables para hacerla, un patrón  y una diseñadora
 que me permitiera modificar su patrón,   un par de jeans y mi imaginación.
 
 
Estoy contenta de formar parte del grupo de personas que prueban los patrones 
de Samantha en particular esta vez,  pues   Samantha nos dio libertad de 
modificar su  patrón, fue así que yo decidí  transformar un par de jeans en un 
bolso.
 
Samantha es una magnifica diseñadora, ustedes la pueden encontrar  en su blog
At  Home with Mrs H, donde comparte con nosotros artículos interesante, trucos de 
costura,  y muchísimo  más.
 
Este patrón es gratis y les dejare el enlace al final de mi post.

Todo comenzó con este par de jeans.


It all started with this pair of jeans.
 
About the pattern:
I added 2" to the length to  the pattern Top pattern.


Acerca del patron:
 Lo primero que hice fue agregar 2 pulgadas a la parte superior del patrón A.


Then position the pattern on the jeans to determine the length needed to make 
the bag.


Luego posicione el patrón para determinar el largo que necesitaba para hacer el 
bolso.


On the back I drew the cut lines, one in the middle of the leg and another   to 
determine the length I needed.


En la parte de atrás yo dibujé  las líneas de corte, una en el  medio de la 
pierna y la otra linea para determinar  la parte de arriba.


Here I show you pictures of the section I cut and how I have positioned the 
pattern.


Aquí les muestro fotos de la sección que corté y como posicioné el patrón.


Then I followed the instructions of the pattern, up the time when we need to 
attach the side tabs.
 I placed my tab 5 " from the top and I also moved the tab about 3" from the 
side, I hope that with my picture you will understand!


Luego fui siguiendo las instrucciones del patrón, hasta el momento en el cual 
tenemos que colocar las pestañas de los costados ( the side tabs) yo las 
desplace y las coloque a 5 pulgadas del borde superior y las corrí hacia el
frente del 
bolso, más o menos 3 pulgadas de las costuras laterales. Espero que con la foto 
lo vean todo más claro.


Then I followed all instructions to the end.


Luego seguí con todas las instrucciones hasta el final.
 
 
 In the end I decided to make a flower to give a focal point, I used the same 
fabric as the inner lining to keep the same theme in the colors.


 Al final decidí hacer una flor para dar un punto focal, usé la misma tela que el
 forro interior  para guardar el mismo tema en los colores.


Here is the final result!
Aquí está el resultado final!


Make this bag was an experience that gives me a great pleasure.
Something else... this pattern is free, Samantha generously shares it with us 
and it's available for download now, only from Craftsy. Here is the link.
 
It is a pattern created for beginners, where you can learn various sewing 
techniques, how to create a zipped pocket, how to sew a slip pocket, how to 
install a magnetic snap and how to do an adjustable strap.
I would advise you to visit Samantha's blog, here is the link, and you will be
able  to see the creations that has been made by other testers and also my bag.
 
I hope you have enjoyed this post and that you liked my recycling project,
transforming old jeans in an original bag.


Otra cosa este patrón es gratis, Samantha lo comparte generosamente con nosotros
 y lo pueden obtener aquí en su Cratsy store.
Se trata de un modelo creado para los principiantes, donde se puede aprender 
diversas técnicas de costura, cómo crear un bolsillo con cremallera, cómo coser 
un bolsillo, cómo instalar un broche magnético y cómo hacer una correa 
ajustable.
Yo les aconsejo visitar el blog de Samantha, aquí queda el enlace, allí podrán 
ver las creaciones que han hecho los otros testers.
 
 
Espero que hayan disfrutado de este post y que les haya gustado mi proyecto de
reciclaje,  transformando viejos jeans en  un bolso original.


Nos vemos pronto.
 
See you soon!!!
 
 
Marisa :)
(One day I will create a beautiful signature to my posts)
(Un dia voy a crear una linda firma para mis publicaciones)


 I'm linking this bag to Fluster Buster and Crafty Allie .


Fluster Buster