Showing posts with label sewing. Show all posts

Monday, July 6, 2015

Easy Cosmetic Bag.

 
I could not resist the temptation to make this cosmetic bag again, I was looking for an idea for a gift for my cousin's birthday, when I remembered this beautiful
pattern. It is absolutely easy to do. I used Deby's tutorial, from the blog So Sew Easy, she did also a great video, here is the link.

If it is your first visit to Deby's blog, prepare a cup of the, or coffee and get ready to spend some time enjoying the projects and tutorials that Deby gives us.


Returning to my cosmetic bag, what I did in my case  was use two fabrics to create the exterior pattern, sew them together and then cut the pattern. The important
thing is that the fabrics (exterior front and Back) are aligned exactly in the same position  before cutting the front and back pattern.
Then when  we have two identical outer fabrics, we must pay attention that are properly aligned before sewing them.


What I liked about this tutorial, is that we end with a cosmetic bag identical to the one she proposes to do. I added a flower to give a more feminine touch and you
know I love decorating with fabric flowers.
 
 
Something important, we can use this pattern to make bags to sell without restriction, no credit needed! Thank you Deby :)
 
 
Hopefully you have enjoyed this cosmetic bag and you dare to make one.
Have a happy sewing day.
Marisa :)


Friday, March 27, 2015

Stuffed animals, sewing pattern.

I was looking for ideas to make a gift to two little princesses. They are the
nieces of my oldest son, and they  came to visit me for the first time last
summer and of course I wanted to create something special.


I thought to myself that a soft toy would be ideal. So I had another excuse to
visit a fabric store,  we always need to find an excuse to not feel guilty,
right? in this case I needed a pattern!!!! It was there that I found this pattern.
 
http://mccallpattern.mccall.com/m6485-products-15255.php?page_id=909

These animals are so lovely, and something that I liked was the ability to
combine various fabrics and of course use my scraps. It is not a
project for beginners, some places are hard to sew, but worth the effort.
These stuffed animals will sure please the little ones.


As a gift for sisters, I wanted to make the them as similar as possible with
some details that might differentiate one from another. It occurred to me that
I could change the position of the eyes and added them collars for cats in different colors,
which I found at the dollar store.
 
I love those paws!!!

 
Now I want to sew the rest of the animals that are in this pattern, but I have
begun so many projects that I will leave this project in my drawer to do it later.

Hopefully you have enjoyed this project, see you soon with other creations
and ideas.
 
Here is the link to the pattern.  I have no affiliation is only a
link to anyone who is interested to do so. On the site you will find more
details about these beautiful soft animals.


Thank you for your visit.
I wish you a beautiful and creative day :)
 
 
Estaba buscando ideas para hacer un regalo a dos pequeñas princesas. Ellas son
las sobrinas de mi hijo mayor, y vinieron a visitarme por primera vez el verano
pasado.....y por supuesto que quería crear algo especial.
 
Se me ocurrió  que un juguete en tela sería ideal. Como no tenia ningún patrón,
tuve otra excusa para visitar  una tienda de telas, siempre hay que encontrar
una excusa para no sentirse culpable ¿verdad? en este caso;  necesitaba un
patrón !!!! Fue allí donde encontré lo que buscaba

Estos animales son preciosos, y algo que me gustó fue la posibilidad de
combinar varios colores de telas y por supuesto utilizar mis  restantes.
No es un proyecto para principiantes, en realidad algunos lugares son difíciles
de coser, pero vale la pena el esfuerzo.
Con estos muñecos de peluche estaremos  seguros de complacer a los más
pequeños.


Como era un regalo para dos hermanas, quería que ellos fueran lo más similares
posible, pero con algunos detalles que podrían diferenciar un perrito  del otro.
Se me ocurrió que cambiar la posición de los ojos y les añadi  collares para
gatos, que conseguí en la tienda del dólar.
 
 
Ahora quiero coser el resto de los animales que se encuentran en este patrón,
pero tengo comenzadas tantas cosas que voy a dejarlo de lado por el momento   y
lo  haré más tarde.
Ojala  que hayan disfrutado de este proyecto, nos vemos pronto con otras
creaciones y mas ideas!!!
 
Aquí está el enlace para este  patrón, en este caso no tengo ninguna afiliación
es sólo un enlace para cualquier persona interesada en hacerlo.
En el sitio encontrarás más detalles acerca de estos hermosos animalitos.

Gracias por la visita!!!


Thursday, September 11, 2014

Repurposing an old pair of denim to a bag.

With great joy and enthusiasm I am again in this beautiful world of blogger. The summer has gone so fast, I have not had time to do what I like ... share my creations with you  and visit my blogger friends.
I  was knitting, crocheting and sewing. I have several projects in my camera, and I'll upload them to the blog in the coming days
Today I want to show you my new bag, I made ​​it from an old pair of denim.


I did it with the idea of selling it, I always have this dream of opening my Etsy shop, hopefully I can make that dream this year.
At the end of the photos, I'll give the link to a You Tube video that helped me make this beautiful bag. What you will need is a pair of jeans, a shirt and a bit of inspiration.
Here are the photos I  have taken  today to share with you, I hope you like them!


If you want more ideas for recycling jeans, my bloggy friend Pam from Threading my way's blog wrote a post in which there is a beautiful variety of projects, with much honor I can tell you that you will find three of my tutorials.
 
Here is the link to the post.


Con mucha alegría y entusiasmo estoy otra vez en este hermoso mundo de blogger.
El verano ha pasado  muy rápido,  no he tenido tiempo de hacer lo que mas me
gusta...compartir con ustedes mis creaciones y  visitar mis amigos bloggers.

Estuve tejiendo, haciendo crochet y también costura. Tengo varios proyectos en
mi cámara  de fotos,  y los voy a subir al blog en los próximos días.

Hoy les quiero mostrar a ustedes  mi nuevo bolso, lo hice a partir de un viejo par de jeans.


Lo hice con la idea de venderlo , yo siempre tengo ese sueño de abrir mi Etsy
shop,  ojala  ese sueño  lo pueda realizar este año.
Al final de las fotos,  les daré el enlace hacia un video de you tube que me
ayudo a confeccionar este hermoso bolso. Necesite un par de jeans, una camisa y
un poco de inspiración.
Aquí  van  las fotos que tome hoy para compartir con ustedes, ojala les  gusten!
 
Si quieren mas ideas para reciclar jeans, mi amiga Pam del blog Threading my
Way escribió  una publicacion en la  cual hay una hermosa variedad de proyectos, con
mucho honor les puedo decir que ustedes encontraran tres de mis tutorials en su publicacion.
 
El enlace hacia el video en You Tube esta AQUI


Les deseo un hermoso dia, les agradezco por su visita y espero con muchas ganas
sus comentarios.


I wish you a nice day, thank you for your visit and am looking forward to
your comments.
 
Have a happy sewing day!
 
Marisa


I'm linking to Crafty Allie Pinterest Party and Threading My Way( bags and totes link party).
I'm linking also to Patchouli Moon Studio, The button to visit the party is at the end.


Patchouli Moon Studio's Weekend Link Party

Friday, May 2, 2014

The Necessary Clutch Wallet.

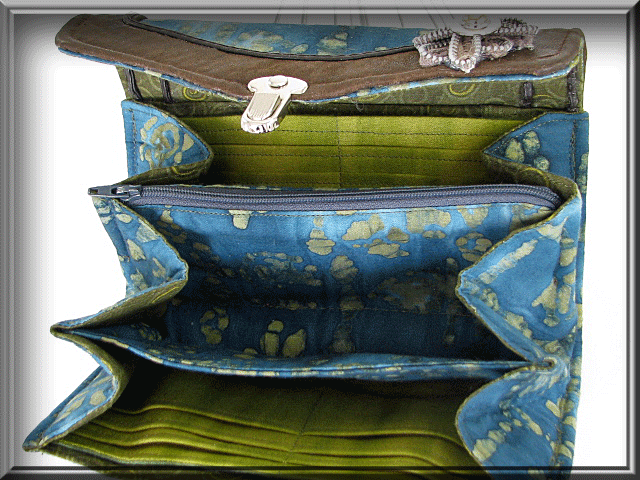
Today I want to share with you one of my latest creations, this "Clutch
Wallet".


The designer is Emmaline, on her site you will find very cute patterns and 
something interesting is that she also sells the hardware necessary to make 
the bags.
While I have no affiliation with the designer, I can only say positive things 
about this pattern. The pattern comes in a pdf that you can print and the
instructions are  clear, only one thing to consider and is that the pattern is
suitable for an  intermediate sewer.


Hoy quiero compartir con ustedes una de mis últimas creaciones, este Monedero, 
su nombre "The Necessary Clutch Wallet".
La diseñadora es Emmaline y  en su sitio usted encontrará modelos muy lindos de
 patrones para hacer bolsos  y algo interesante es que ella también vende el 
material  necesario para hacer los bolsos.
 
Quiero que sepan que  no tengo ninguna afiliación con la  diseñadora, y que si bien   
sólo puedo decir cosas positivas sobre este patron, es mi opinion.
 
El patrón viene en un pdf y las instrucciones son
claras, sólo una cosa a tener en cuenta y es que el patrón es adecuado para un
 un nivel  intermedio, un principiante quizás encuentre dificultad, pero no es 
imposible!


The finished size is approximately:  Length: 8” (20 cm) across bottom, Height: 
4” (10 cm), Depth:  1” (25 cm) wide at bottom, is a beautiful wallet with many , many, many
compartments, I love it!!
 
El tamaño final es aproximadamente: Longitud: 8 "(20 cm) a través de la parte 
inferior, Altura:4 "(10 cm), Profundidad: 1" (25 cm) de ancho en la parte inferior.
Tiene una cantidad de compartimientos, me encanta!!!!


There is a fb group created by Emmaline. especially for those who create these 
clutch. In the fb group you'll find inspiration and also a lot off information 
, you will learn also how to modify the pattern.

I leave you all the links at the bottom of this post.


Hay un grupo FB creado por Emmaline, es un grupo para aquellos que crean estos
monederos. En el grupo de fb encontrarás inspiración y también una gran 
cantidad de información, allí aprenderás también cómo modificar el patrón.
Os dejo todos los enlaces al final de este post.


I made the flower with a zipper, if you do a search on Google there are 
plenty of tutorials on how to make zipper-flowers and if you want more 
information there are videos on you tube.
  
Hice la flor con una cremallera, si tú haces una búsqueda en Google vas a 
encontrar un montón de tutoriales sobre cómo hacer  este tipo de flores y si 
quieres más información hay videos muy buenos en you tube.


One more thing about this pattern:
COPYRIGHT AND LICENSING INFORMATION:
•You may sell items made from this pattern in your shop or market stall;
however this pattern is not to be used for mass production.
 
When a designer allows me to sell what I make from her pattern, makes me feel
good !!!!
 
 
Una cosa más acera de este patrón:
DERECHOS DE AUTOR E INFORMACIÓN DE LICENCIA:
• Usted puede vender artículos hechos de este patrón en su tienda o puesto en 
el mercado;
Sin embargo, este patrón no es para ser utilizado para la producción en masa.
 
Cuando una diseñadora me permite vender lo que fabrico a partir de su patrón, 
me hace sentir súper bien.
Espero poder empezar a subir los proyectos más a menudo, echo de menos estar en
 contacto con ustedes.


The link to the facebook group is here .


I hope to start uploading projects more often, I miss being in touch with you.
A thousand hugs :)
 
Marisa.

I'm linking this party to Weekend Link Party ( Patchouli Moon Studio) .


Monday, December 2, 2013

24 days to Xmas! My first "Guest Post" is today!!!!

 
This is a short note to remind you that today is the day in which I participate
as a guest on the blog "Creare per r'ESISTERE". The first part of the post is
written in Italian, but if you keep rolling towards the end, you will find the
tutorial in Spanish.
 
 
I want to show you a picture of the project I did. The theme to participate
it had to be something related to Christmas, so I decided to create a Christmas
card with fabric. Here is the direct link to the post where you will find my
tutorial, I hope you will find time to visit Elisabetta, and discover her
beautiful blog.


( now in spanish)

 Este es un breve mensaje para recordarle que hoy es el día en el que participo
como invitado en el blog "Creare por r'ESISTERE". La primera parte del mensaje 
está escrito en italiano, pero si se mantienen bajando  hacia el final, allí  
Encontraran  el tutorial en español.
 
Les quiero mostrar a ustedes una foto del proyecto que hice. El tema para 
participar tenía que ser algo relativo a la Navidad, entonces decidí crear una 
tarjeta para navidad  con tela. Les dejo el enlace directo hacia donde 
encontraran el post con mi tutorial, ojala ustedes encuentren tiempo de visitar 
a Elisabetta, y descubrir su hermoso blog.


Hope you like the project and I look forward to your comments !

Ojalá les guste el proyecto y espero ansiosamente vuestros comentarios! 
 
Marisa :)


Wednesday, October 16, 2013

Let's do some fabric flowers!

As I promised in my last posting, here I bring the tutorial showing you how to 
make these fabric flowers, as I did for my necklace. 
I made them, recycling one t-shirt I had in my pile of clothes to recycle, I 
found that the jersey fabric gives a nice effect to the flower, now we have to 
try to make them with other fabrics.
Let's start with the tutorial.


Como Les he prometido en mi ultima publicación, aquí les traigo el tutorial 
mostrando a ustedes  cómo hacer estas flores en tela, como la que hice para mi 
collar.
Yo las hice, reciclando un t-shirt que tenía en mi pila de ropa a reciclar, 
encontré que la tela de jersey le da un lindo efecto a esta flor, ahora nos 
queda intentar de hacerlas con otras telas.
Bueno, aquí va el tutorial.
 
 
Cut a strip of fabric 1.5 inches wide from the bottom of the t-shirt.
 

Cortar una franja de tela de 1.5 pulgadas de ancho de la parte de abajo del t-
shirt.
 
 
I folded it in half, and made a straight seam.
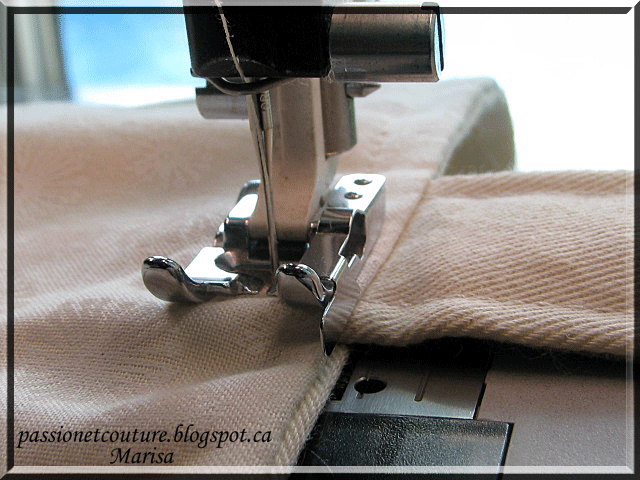
The important thing for me is to keep the same width between the place where is 
the fold of the fabric, and where I do the stitching line. To achieve this I put
attention to the left side of the fabric. The left side of the fabric is always 
at the same height as the left side of the foot.
I'll adjust the needle position to the right. If you do not have the ability to 
move the needle to the right, you can move the fabric strip to the left, so you 
get 1 inch or 3/8 inch between the edge and the seam line.


La doblé al medio  y hice una costura en línea recta todo a lo largo de la 
banda.
Lo importante para mí, es guardar el mismo ancho entre el lugar donde se 
encuentra el doblez de la tela  y el lugar donde hago la costura. Para lograr 
ello pongo atención a que el lado izquierdo  de la tela se encuentre  siempre a 
la misma altura que el lado izquierdo del pie  de la máquina de coser. De esa 
manera tendré el mismo ancho todo a lo largo de la banda de tela. Ajusto la 
posición de la aguja hacia la derecha. Si usted no tienen la  posibilidad de 
desplazar la aguja de su máquina de coser hacia la derecha, usted puede   mover 
la  banda de tela hacia la izquierda, de manera a  obtener 1 cm, o 3/8 de 
pulgadas entre el borde y la línea de costura.


Then we need a pair of scissors.


Luego necesitamos un par de tijeras.
 
 
We're going to cut along the edge, making a fringed strip like this. According 
to the distance at which you cut the fringes, will give different look to the 
flower.


Nosotros vamos a cortar a lo largo del borde, haciendo como una franja con 
flecos, como ven en esta foto. Según la distancia a la cual ustedes cortan los 
flecos, le dará una apariencia distinta a la flor.


At this moment we need to cut a circle of cloth, on which we will paste, our
band fabric, I use a piece of denim. My circle is almost 2 inches (is 5 cm) in
diameter, you will choose the measure that best suit you, according to your
project.


Luego necesitamos  cortar un círculo de tela, sobre la cual  pegaremos, nuestra 
banda de tela, yo use un pedazo de tela de jeans. Mi círculo mide casi 2 
pulgadas (son 5 cm) de diámetro,  usted elegirá la medida que más  le 
conviene, según su proyecto.


Now, begin to glue the strip of fabric along the edge of the circle here I put
some pictures. I  using a hot glue gun to do this.


Ahora, empezamos a pegar la franja de tela siguiendo el borde del círculo aquí 
les pongo unas fotos. Yo lo pegué usando una pistola de silicona caliente.


Last detail, add a decorative element in the center, in my case I added a
button.


Ultimo detalle, agregar un elemento decorativo en el centro, en mi caso le 
agregué un botón.


Here I show you another flower I made.


Aquí les muestro otra flor que hice. 
 
 
I hope you have enjoyed this tutorial and if you do some flowers following my
explanation, I'd love to see photos. Thanks for your visit, as always, I am
looking forward to read your comments.
 
 
Espero que les haya gustado este tutorial y si ustedes hacen flores siguiendo 
mis explicaciones, me encantaría  ver sus fotos. Gracias por vuestra visita y 
como siempre espero con muchas ganas  leer  vuestros comentarios.
 
 
Cheers and see you soon!
Saludos y nos vemos pronto!
 
Marisa:)
 
http://passionetcouture.blogspot.ca/2013/10/thinking-of-making-necklace.html


Friday, October 4, 2013

Today I want to share with you a beautiful and fast project, also the result of the giveaway...

 
And  the winner of the little bow pleat pattern is...
 
 
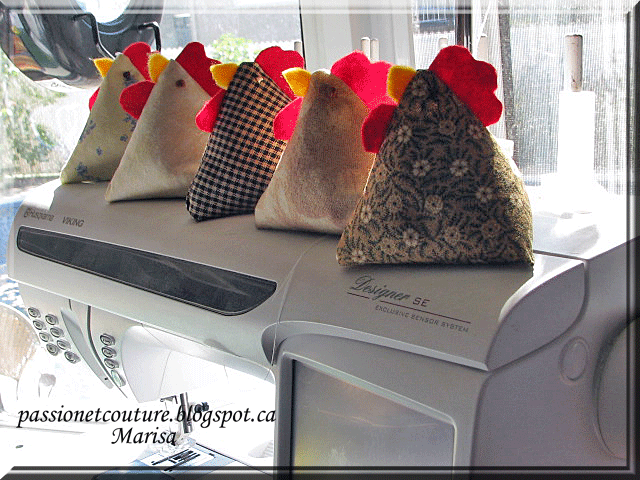
But before giving the result I want to show the little chickens I've been doing.
Actually they are juggling chooks, but I
want to use them  as decoration in my sewing room. 
I filled them with  oat seeds, so as the cooler days begin, I'm going to heat
them  in the microwave and warm my hands with them.
Here I show the pictures I've taken.


Un proyecto hermoso y rapido, tambien  comparto con ustedes el resultado del
sorteo, el ganador del patron de el bolso "the  little bow pleat"  es..

Un momento por favor, antes de darles el resultado del sorteo, quiero mostrarles las gallinitas que he estado  haciendo.
En realidad son para jugar y hacer malavarismo , pero yo las quiero usar como decoración en mi sala de costura. Yo las rellené con semillas de avena, de esta manera cuando los dias frios comiencen, las voy a calentar en el microondas y podré calentar mis manos con ellas.
 Aqui les muestro las fotos que he tomado.


This project is not my idea, I found this project  when I visited
 
As I said earlier is a project that is done very fast, is a way to use fabric
scraps, you only need a rectangle of 10 x 20 cm of fabric ( 4"x8"inches)
The tutorial is well explained, with many pictures that facilitate the
realization of the project, the link to the Red Ted Art's blog is here.
  Here I leave you with more pictures and with the draw.


Este proyecto no es una idea mia, la inspiracion la encontré mientras estaba
visitando el  sitio Red Ted Art's blog 
Como dije anteriormente es un proyecto que se realiza muy rápido, es una manera
de usar restos de tela, solo se necesita un rectangulo de 10 x 20 cm de tela o
4"x8" pulgadas .
El tutorial esta muy bien  explicado, con muchas fotos que facilitan la
realización del proyecto, el enlace hacia the Red Ted Art's blog, esta aqui. 
Aqui los dejo con mas fotos y con el resultado del sorteo.


The winner of the beautiful little bow pleat pattern is...

El ganador de este hermoso patron es ...


I have the honor to congratulate Julie Corbisiero , you are the one who left the comment number 2  !!!!!

"CONGRATULATIONS "

 Julie I will get in contact with you via email, congratulations again!


La ganadora de este sorteo es Julie Corbisiero, tu has sido la persona que dejo el comentario numero dos.
FELICITACIONES
 
Julie voy a entrar en contacto contigo via email !


I want to say thanks again to everyone who participated!!
Gracias a todos aquellos que han participado, les deseo a todos un hermoso dia!!!
Have a nice day!

Marisa:)


Friday, June 7, 2013

Let's do a Ruffle Tote .


After a week, it is only today that I have been able to raise this second part of the tutorial.
Prepare the post it takes time, especially when it's a tutorial.
Maybe you're not going to believe me, but every time I write a post, the first thing I'll do is write all my text in Spanish and then, translate it into English.


In my previous post that you'll find it here, we finished the exterior of the tote and the handles. Also in another previous post, I showed how I made the fabric flowers, the link is here. Today we will continue with the rest, that is, make the lining and see how we do to attach the lining and the handles to the outer fabric of the tote.


Create a label
 
Before we start I want to tell you something, one of the things that I was trying to do last week was, make labels to add to my projects, I made many tests, I took several photos and I have the intention to prepare a tutorial to show you how to do custom labels.
Today I'll show you what I decided to do, although I created several varieties of labels, after several attempts, trying to make labels for this tote, I decided to do a transfer of my label directly to the fabric, instead of making the transfer to a ribbon and then have to sew it into the tote.
Look how it turned out.


Prepare the lining

The liner measures the same as the outside, for my tote I used  the following
measures:


I cut

 1 (14 x 36" ) exterior fabric, so...
 1 (14x 36")   for the lining.


The lining can be made ​​simple without pockets.
For my tote I decided to add two
types of pockets, on one side, I added a pocket  with a metal closure.


On the other side I did something simple like this.


Pin lining right sides together, aligning row edges  and sew together, leaving
7" of one side open
Don't sew the upper side


Attach the handles to the exterior fabric

In my previous post we saw how to do the handles, I finally cut them and the
final measure is 27 "long,


At this time, I'll put the two handles on the right side of the tote.

Usually, at this moment, I'll  sew by hand the handles , I use basting stitches, just to be sure that they will not move on the next steps.

With right sides together place the exterior fabric, inside the lining.


Aligning the row edges, pin,  and sew together
sew along the top edge of the tote, I did several rounds with the sewing
machine, a first seam 1/2 "from the edge, other seam closer and another 3/4"
from the edge. This part is where you have the handles and it must be really
hard.


Turn right side out by pulling the exterior fabric through the opening


We have to sew the opening by hand or with the sewing machine.


Place the lining inside the tote, and topstitch through all layers! 


Add the fabric flowers


At the end I added the flowers fabrics, I could not decide which one.


I finally decided to add the two, the back side of these flowers have a brooch,
so that we can put one or the other, according to the mood of the day.


We did it!


I want to tell you something, I have wanted to open an Etsy shop for a while, I
said to myself that if I could create 10 items I will do it, ok this is just the first.

 This ruffle tote is my first item for my future Etsy shop, yes!!! 


I just hope that my dream comes true this year!

I would like to do, necklaces, bracelets and wool accessories such as hats and
scarves. I have a goal, I have ideas , but what I'm missing is always time!!!

 But there is always a beginning and for me to have finished this ruffle tote is the beginning, I have other projects already begun, apart from a number of ideas that I'll share with  you all ,
 in the next posts.

For today, I just wish that you have enjoyed my explanations, I tried to do the best that I can.

 I will be waiting anxiously for your comments, it is a pleasure for me to read every one of your comments! Thanks for your visit, I hope you come back soon!
 Greetings to you all.
Enjoy!


Marisa.


I'm linking this project to  Mod Vingtage Life, Creating My Way to Success,  Threading My WaySew Many Ways,  Dolly's designs ( The Creative Blog Hop), The Chicken Chick, One Artsy Mama( Shine on Friday) , Sew Chatty ( Made With Love), Pieced Pastimes, All  Things Pretty , Petals to Picots, Dear Creatives, Happy Hour Friday, Crafts a la mode, Inspiring Creative Moments  and Sew Crafty Angel .
I'm linking also to Plucky's Blog Hop , Night Owl Venting ( Blog Hop) , My Turn ( for us) , Fun Friday Blog Hop, The Pin junkie and Let's get Social Sunday.


LinkWithin

Related Posts Plugin for WordPress, Blogger...