Showing posts with label embroidery. Show all posts

Thursday, June 7, 2012

How to Sew a gift bag

Do you remember the bibs that I made some time ago? My mother in law asked me if I could make one but adding the name of the baby. Obviously she only asked me one and I end up doing two bibs. I also decided to make a gift bag where she could put these bibs in, and that gave me the idea to create this tutorial.This was the result.


The finished dimension of the gift bag is 8" wide x 11" tall.


If you want more information on the bibs,I invite you to visit my publication HERE.


Now let's start with the different steps that will lead to the accomplishment of
this gift bag. This is how I did it:

First step, cut the fabric :
for the outer fabric:
   - cut 10" x 8 1/2 " (front)
   - cut 11 1/2 " x 8 1/2"  ( back)

Tip: I cut the fabric for the exterior 2 "longer than the final measure, I did the
buttonholes and the embroidery  and then I cut to the measures that I have just
given you.

for the lining:
   -11 1/2" x 8 1/2" ( cut 2 )
  (I cut these pieces of fabric   with the measures listed )

for the patchwork:
   - cut two strips of fabric 1 1/4 " x 12"(one white and one blue )

You will need also a bias tape or a ribbon  that you will thread through the buttonholes, I used  36" and the wide of the bias tape is up to you.

The second step is preparing the exterior of the bag, the buttonholes and the embroidery design.


I started with the front fabric, I decided to sew a few  buttonholes and use them to thread a rubban. The buttonholes can be made either by hand or by sewing machine, I wanted to do it  using my 4D software and my embroidery machine. The lenght of the buttonhole is determined by the wide of the ribbon, in my case the ribbon mesures 2/8" (0.5 cm) so my buttonholes mesures 5/8" ( 15mm )
Whatever the way you want to do it, the distance between the buttonholes is 2 "(5 cm) and they are located 1 1/4" from the top edge. I did the embroidered design with the baby's name, 2 1/2 "away from the buttonholes.

If you do click  HERE you will find a sheet with the drawing that I did, you can download the pattern to your computer, is not the exact pattern but just gives you an idea of how I have positioned my items (buttonholes, embroidery, patchwork).

If you have a digitizing software read this, if not you can skip this and go to the next step. I know there are readers of my blog that have the 3D, or 4D or 5D software, so I will share with you what I used to program my embroidery ( I have the 4D Pro software).


I opened my 4D software, I started by choosing a hoop of 240 x 150 mm, for the buttoholes, I used the buttonholes that come with the 4D, after choose the one that I liked, I just copy and paste the buttonhole and I place them at a distance of 50mm between each one.

The embroidery design that  I used is from Husqvarna, Labels and Frames ( disk 76) 
and I use the design number 17.
To create the name, first I cilck on the letter tab,

I used the letters Script / ADINA.


My software is in French but I think the names of the fonts is the same or very
similar.
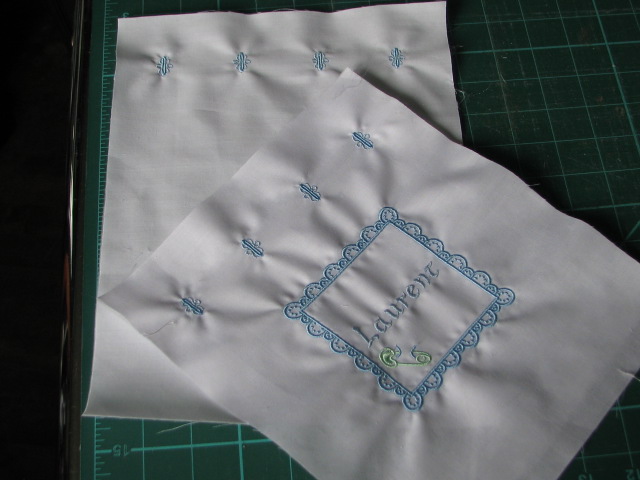
Here is the front of my gift bag with the embroidery


To the back side, I made the buttonholes, always at a distance of 1 1/4" from the
edge.
This is a picture that I want to show you, you can see I cut the piece of fabric larger
than the final measures.


 After I finished my embroidery, I cut the front and back with the measures that  I have
given at first.

Now let's make the patchwork (not sure if you call it so). First cut two strips
 of fabric 1 1/4 " x 12"(one white and one blue )


Place them with the right sides together, aligning the row edges and sew.
                                                     ( I always use a 1/4 seam allowance)


expose the right side and press


Now let's cut bands of 1 1/4 "

When you are ready to sew, flip each band, so that it looks this way .

Place the bands rigth side together and sew.


We will continue joining bands  until we reach more than 11 1/2"


Now, put togther the rigth sides of the front and the patchwork, aligning the row
edges and sew

To finish sewing the outside of the bag, place the front and back fabrics right
sides together and sew all arround the edges leaving the top open.

I align the side seam with the seam of the base and sew (I used also 1/4 seam
allowance),

so the corners are more beautiful.

Turn right side out, now is time to thread the rubban.
 We are going to sew the lining in the same way. Place the front  and the back with
right sides facing, sew the sides and base, but this time we will allow an opening
of 3 "on the base.
 

Next step,  attach the lining to the exterior fabric.
                       To do this we are going to slide the exterior of the gift bag towards the inside of
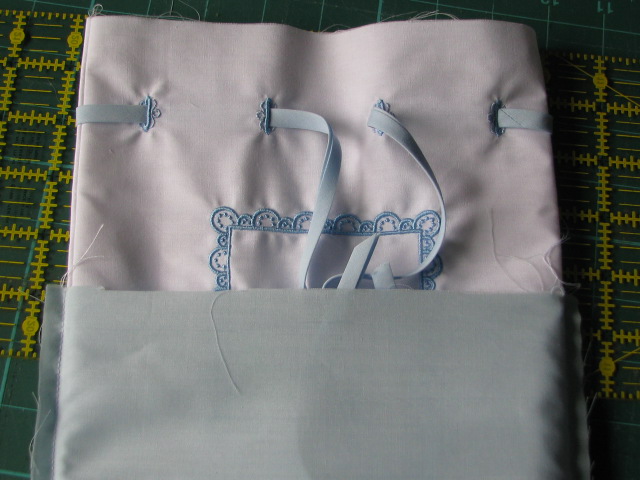
the lining, so that both right sides are facing each other.
Now we have to sew the top, aligning the row edges of the outside and lining and
sew together.

Pulling the exterior fabric through the opening

Now we are going to sew the opening that we leave earlier in the lining.


When you are ready, push the lining inside of the gift bag...now is time to enjoy
our gift bag.


I hope you liked this tutorial, I wish I would have given you some inspiration. I used my embroidery machine and my 4D software to create this gift bag, but from here you can create a gift bag, adding an applique or doing embroidery by hand. The buttonholes can be done by hand or using the buttonholes that come with the sewing machines.

I love it when you leave me messages, remember that I always hope to have new followers. I wish to take this post to say thanks to the new followers who have joined my blog, for me to have followers is a way to give me motivation to create more and more projects. I am currently working on a quilt that will probably be the topic of my next post.

Have a nice day!
ENJOY!!!!
Marisa.

Wednesday, February 29, 2012

An embroidery using Angelina fibers

As promised in my previous post here are the photos I took while I was doing the embroidery of the cover for my Brittany bag. I used the 235 disc from Husqvarna, yes again!!!  I have to admit that I love using this disc because it has so beautiful embroidery designs, but this time I wanted to go a little further and I used the yarn couching feet and some Angelina fibers, I have to say that everything was sew on vinyl, and fortunately the couching foot has not caused me  problems.
The Angelina that I have used is from Embellishments Galore. Genene owns that site and she  is the moderator of another yahoo group I belong and whom I adore, this is the link if you want to join the embellishment galore yahoo group click here .
Comme promis dans mon précédent post voici  les photos prises pendant que je faisais la broderie pour mon sac. J'ai utilisé le disque 235 de Husqvarna, oui, encore! Je dois admettre que j'aime utiliser ce disque parce qu'il a des de si beaux motifs de broderie , mais cette fois je voulais aller un peu plus loin et j'ai utilisé le yarn couching et quelques fibres d' Angelina, je dois dire que tout a été cousus sur vinyle, et heureusement le yarn couching feet ne m'a pas causé aucun problème.
L'Angelina que j'ai utilisée est de  EmbellissementsGalore.  Genene possède ce site et elle est le modérateur d'un autre Yahoo groupe  que je fais partie et que j'adore, si vous voulez rejoindre le Yahoo groupe  Embellissement Galore  cliquez ici
Je vais vous montrer comment j'ai fait pour utiliser les fibres d'Angelina, mais gardez à l'esprit qu'il existe de nombreux tutoriels sur le web qui expliquent comment l'utiliser, il vous suffit d'écrire Angelina Fibers tutorial dans Google bar et vos aller trouver d'excellents renseignements.Un site que je conseille est Embellishment Village, ils ont plusieurs vidéos très intéressantes.


I'm just going to show you how I did to use the Angelina fibers, but keep in mind that there are many tutorials on the web that explain how to use it, you just have to write Angelina Fibers tutorials in Google bar and go to some great information. One site that I would advise is EmbellishmentVillage, they have some very interesting videos.
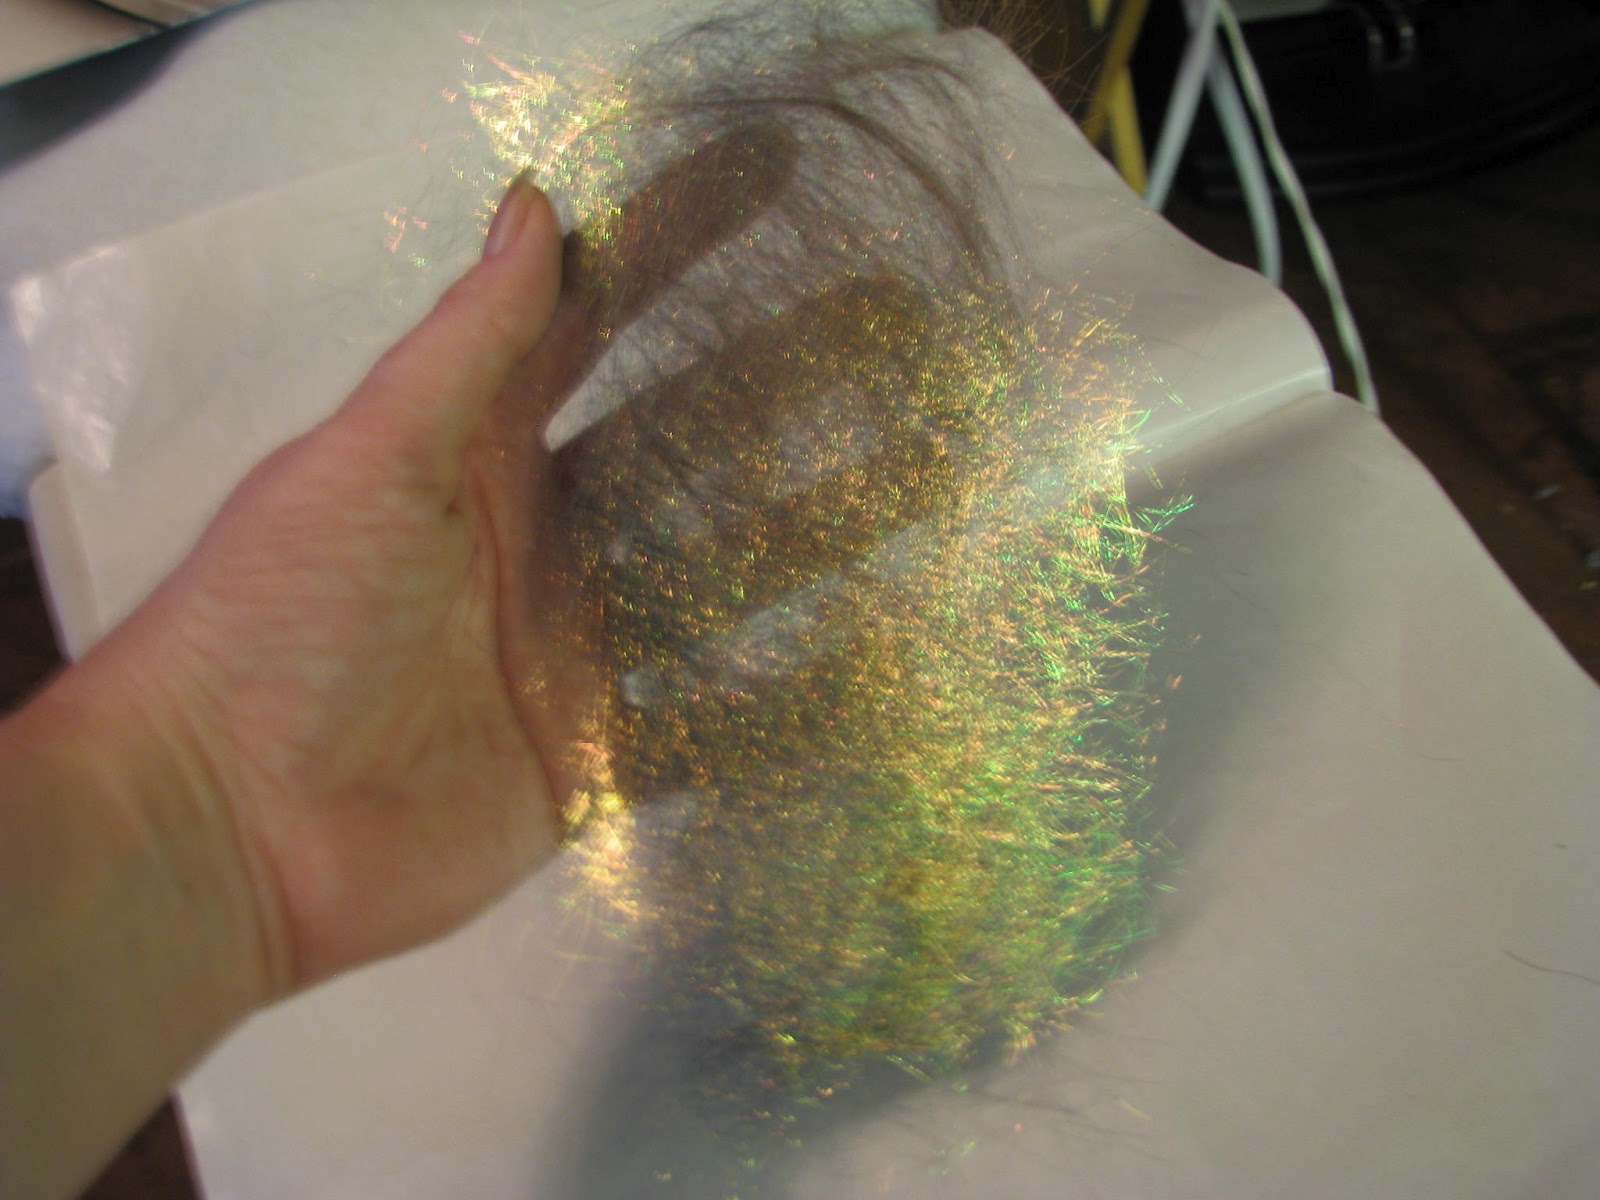
 I started using a Teflon sheet, inside I put some Angelina fibers, and then I used the iron at low temperature to merge all, for this embroidery design you need to create a piece of 20x10 cm with the Angelina.


J'ai commencé avec une feuille de téflon, à l'intérieur j'ai mis quelques fibres d' Angelina, puis j'ai utilisé le fer a repasser à basse température pour fusionner tout, pour ce motif de broderie vous avez besoin de créer un morceau de 20x10 cm avec les fibres Angelina.
Ici sont mes fibres de Angelina fusionnées et prêt à être utilisés comme un appliqué
Here are my Angelina fibers, ready to be used as an appliqué.
 What I find when I work with  the  Angelina is that according to the temperature of the iron and according to the time that we are ironing, is going to be the end result. I discovered that the longer we stay with the iron on the Angelina  , is going to be brighter. I encourage you to looking inside the Teflon sheets often to see how everything is merging and stopping as soon as we like the result.
Ce que je trouve quand je travaille avec l'Angelina, c'est que selon la température du fer a repasser et en fonction du temps, ça va être le résultat final. J'ai découvert que plus longtemps nous restons avec le fer sur le Angelina, plus elle va devenir brillant. Je vous encourage à regarder à l'intérieur des feuilles en téflon souvent pour voir  la fusion des fibres et arrêter dès que nous aimons le résultat.

Let's start
 First I Hoop 1 layer of tear away stabilizer and then to attach the vinyl to the stabilizer I used a   temporary spray adhesive (I always use the 505 Temporary fabric adhesive, I like it because the needle is not sticky when I use this type of adhesive), then I put the hoop in the machine and I'm ready to star.

Commençons
Pour commencer mettre un entoilage de type cut away  dans le cerceau  et puis pour attacher le vinyle au entoilage j'ai utilisé un adhésif temporaire (j'ai toujours utiliser la colle 505 , je l'aime parce que l'aiguille n'est reste pas collante quand j'utilise ce type de colle) , puis j'ai mis le cerceau dans la machine et je suis prêt à commencer.
Color 1
Skip it. L'ignorer, nous passons à la couleur  2
Color 2
I started my embroidery by skipping the first point, a matter of avoiding holes in the vinyl. When the machine finishes this color, we will have a guide that will tell us where to position the fabric, in our case the Angelina.


J'ai commencé ma broderie en sautant le premier point, une question d'éviter les trous dans le vinyle. Lorsque la machine termine cette couleur, nous aurons un guide qui nous dira où positionner le tissu, dans notre cas, la Angelina.


 Now remove the hoop from the machine. Let's put the  Angelina ( a piece of 20x10 cm ) on the hoop (to hold the Angelina in place I use some tape).


Maintenant retirez le cerceau de la machine. Nous allons mettre l'Angelina (un morceau de 20x10 cm) sur le cerceau, pour maintenir le Angelina en place-je utilisé du ruban adhésif.


Color 3
The machine will return to do a running stitch. When the embroidery with this color   is finished, remove the hoop and trim the excess of Angelina as close as possible to the line you just created .


La machine va faire une autre fois le  point droite. Quand le couleur 3 est terminé, retirez le cerceau et coupez l'excédent d'Angelina aussi près que possible de la ligne que  vous venez de créer avec la machine.


Color 4
It will repeat the same steps but on the other side, first the machine will create a guide with the running stitch and then we remove the hoop to trim the excess


permettra de créer un guide avec le point droite, puis on enlève le cerceau pour couper l'excédent. Il répète les mêmes étapes, mais de l'autre côté, tout d'abord la machine


Color 5
At this stage the machine will fix the angelina on vinyl, remove the hoop and then trim the excess .


A ce stade, la machine va fixer le angelina sur le vinyle, retirer le cercle, puis coupez l'excédent.


Color 6

                                                It does all the rest of the embroidery.
                              
                                            La machine  fait tout le reste de la broderie.
Color 7
It's time to install the accessories to use the  yarn couching feet. To know something more about this feet I invite you to look at my previous publication, click  here

Il est temps d'installer les accessoires pour utiliser le yarn couching feet. Pour en savoir quelque chose de plus à propos de cette pieds je vous invità regarder ma publication précédente, cliquez sur ici.


The embroidery is already finished, I hope you liked the tutorial. I always try to make it as clear as possible. I make my tutorials in English and French since I live in Montreal,  Quebec and our language is French and I want to share my blog with  many people as possible. When I started using my embroidery machine  I was fortunate to have classes with my dealer and over the years I took more classes to be able to learn different techniques, I learned from a lot of people around me, and that is why I decided to create this blog, because I thought that I received so much that  now it is my turn to give and share what I have learn.

Thanks for visiting my blog, I hope you liked the tutorial.
Do not forget to leave comments, I love receiving them!!!!!
I wish you all a happy sewing day!!!!!


La broderie est déjà fini, j'espère que vous avez aimé le tutoriel. J'essaie toujours de la rendre aussi claire que possible. Je fais mes tutoriels en anglais et en français puisque je vis à Montréal, au Québec et notre langue est le français et je veux partager mon blog avec beaucoup de gens que possible. Lorsque j'ai commencé à utiliser ma machine à broder j'ai eu la chance d'avoir des classes avec mon vendeur et au fil des ans j'ai pris plus de classes pour pouvoir apprendre différents techniques , j'ai appris à partir d'un grand nombre de gens autour de moi, et c'est pourquoi j'ai décidé de créer ce blog parce que je pensais que j'ai reçu tellement que c'était maintenant mon tour de donner et de partager avec vous.
Merci pour avoir visité mon blog, j'espère que vous avez aimé ce tutorial .
Je vous souhaite de passer une belle journée et à la prochaine.

LinkWithin

Related Posts Plugin for WordPress, Blogger...