Showing posts with label my projects. Show all posts

Friday, May 2, 2014

The Necessary Clutch Wallet.

Today I want to share with you one of my latest creations, this "Clutch
Wallet".


The designer is Emmaline, on her site you will find very cute patterns and 
something interesting is that she also sells the hardware necessary to make 
the bags.
While I have no affiliation with the designer, I can only say positive things 
about this pattern. The pattern comes in a pdf that you can print and the
instructions are  clear, only one thing to consider and is that the pattern is
suitable for an  intermediate sewer.


Hoy quiero compartir con ustedes una de mis últimas creaciones, este Monedero, 
su nombre "The Necessary Clutch Wallet".
La diseñadora es Emmaline y  en su sitio usted encontrará modelos muy lindos de
 patrones para hacer bolsos  y algo interesante es que ella también vende el 
material  necesario para hacer los bolsos.
 
Quiero que sepan que  no tengo ninguna afiliación con la  diseñadora, y que si bien   
sólo puedo decir cosas positivas sobre este patron, es mi opinion.
 
El patrón viene en un pdf y las instrucciones son
claras, sólo una cosa a tener en cuenta y es que el patrón es adecuado para un
 un nivel  intermedio, un principiante quizás encuentre dificultad, pero no es 
imposible!
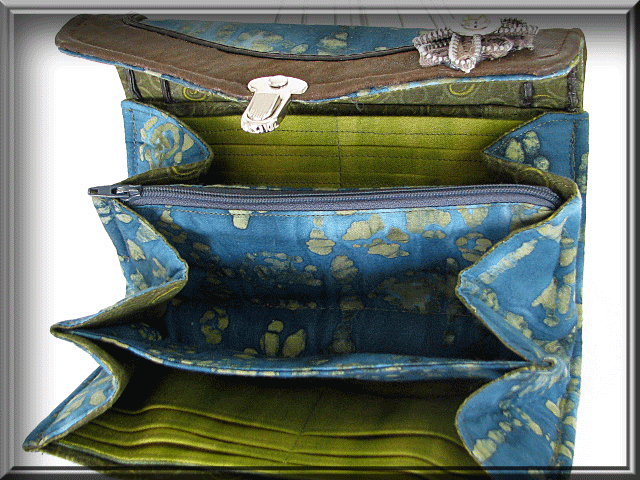


The finished size is approximately:  Length: 8” (20 cm) across bottom, Height: 
4” (10 cm), Depth:  1” (25 cm) wide at bottom, is a beautiful wallet with many , many, many
compartments, I love it!!
 
El tamaño final es aproximadamente: Longitud: 8 "(20 cm) a través de la parte 
inferior, Altura:4 "(10 cm), Profundidad: 1" (25 cm) de ancho en la parte inferior.
Tiene una cantidad de compartimientos, me encanta!!!!


There is a fb group created by Emmaline. especially for those who create these 
clutch. In the fb group you'll find inspiration and also a lot off information 
, you will learn also how to modify the pattern.

I leave you all the links at the bottom of this post.


Hay un grupo FB creado por Emmaline, es un grupo para aquellos que crean estos
monederos. En el grupo de fb encontrarás inspiración y también una gran 
cantidad de información, allí aprenderás también cómo modificar el patrón.
Os dejo todos los enlaces al final de este post.


I made the flower with a zipper, if you do a search on Google there are 
plenty of tutorials on how to make zipper-flowers and if you want more 
information there are videos on you tube.
  
Hice la flor con una cremallera, si tú haces una búsqueda en Google vas a 
encontrar un montón de tutoriales sobre cómo hacer  este tipo de flores y si 
quieres más información hay videos muy buenos en you tube.


One more thing about this pattern:
COPYRIGHT AND LICENSING INFORMATION:
•You may sell items made from this pattern in your shop or market stall;
however this pattern is not to be used for mass production.
 
When a designer allows me to sell what I make from her pattern, makes me feel
good !!!!
 
 
Una cosa más acera de este patrón:
DERECHOS DE AUTOR E INFORMACIÓN DE LICENCIA:
• Usted puede vender artículos hechos de este patrón en su tienda o puesto en 
el mercado;
Sin embargo, este patrón no es para ser utilizado para la producción en masa.
 
Cuando una diseñadora me permite vender lo que fabrico a partir de su patrón, 
me hace sentir súper bien.
Espero poder empezar a subir los proyectos más a menudo, echo de menos estar en
 contacto con ustedes.


The link to the facebook group is here .


I hope to start uploading projects more often, I miss being in touch with you.
A thousand hugs :)
 
Marisa.

I'm linking this party to Weekend Link Party ( Patchouli Moon Studio) .


Friday, March 21, 2014

My bohemian style "Wrap Bracelet".

Although I have not been actively participating in online social groups, I 
assure you I was using every spare minute to create something. I like to vary 
my projects and that is why I have many projects at once and lack of time to finish all. The time will always be my worst enemy, I know I am not the only one to spread the hours of the day between the family, the house and certain obligations that comes with age. Even though I have no time this blog is my baby and allowed me to discover many new friends also  new  passions and I want to share with you new creations and tutorials, took me long time .. but here it is my new creation... I want to share the pictures of my wrap bracelet, with you.


What can I say .... I love it! From some time ago I wanted to make a bracelet 
with this bohemian style and after several hours of work ... I finished!  Once 
you understand the technique is fast to do.....ok I have to say relatively 
fast, I think it took me about 8 hours, no exaggeration!!!
There are several online tutorials that explain how to do it, you will be able
to find excellent videos on you tube.
They were the colors of the earth who gave me the inspiration to make this 
bracelet. I did it using 5mm beads that were hand sewn on a leather cord 1.5mm 
thick. The earth colors are my favorite colors and what else can I say .. this 
is my personal model from which I hope to do a few more to put them on sale!


Aunque no he estado activamente participando en los grupos sociales online, les
aseguro que estuve utilizando cada minuto libre para crear algo. En realidad  
me gusta variar en mis proyectos y es por eso que tengo a la vez varios 
proyectos que he comenzado y que voy terminando tranquilamente.

El tiempo será siempre mi peor enemigo, yo sé que no soy la única a repartir 
las horas del día entre la familia, la casa y ciertas obligaciones que vienen 
con los años. Pero este blog es mi bebe y me permitió descubrir muchos nuevos 
amigos y amigas así como nuevas pasiones y  quiero seguir compartiendo con 
ustedes mis creaciones y tutorials aunque me lleve tiempo. 
 
Hoy he subido fotos de mi más reciente creación, les gusta?
 
Que les puedo decir....me encanta! Hace tiempo que yo me quería hacer una 
pulsera  con este estilo, yo diría un estilo bohemio y luego de varias horas 
de trabajo...lo termine! Yo creo que me llevo unas 8 horas, no exagero. Una vez
que comprendemos la técnica se hace rápido, o sería mejor decir relativamente 
rápido!!!
Hay varios tutoriales online que explican cómo hacerlo, ustedes podrá encontrar
hasta en you tube  excelentes videos.
Fueron los colores de la tierra los que me dieron la inspiración para hacer 
esta pulsera.  Lo hice usando perlas de 5mm,  que fueron cosidas  a mano sobre
una cuerda de cuero de 1.5mm de espesor, los colores tierra son 
mis colores preferidos y que más les puedo decir..este es mi modelo personal  a
partir del cual espero hacer unos cuantos más para ponerlos a la venta!


I'll try to make a tutorial when I make the next wrap bracelet, I assure you 
it's easy to do! It's just a matter of patience.
 
 
Cuando yo haga el próximo wrap bracelet, voy a intentar a hacer un tutorial 
yo  se los aseguro ..... es fácil de hacer! Solo es cuestión de paciencia!
 
Have a beautiful and creative day!!!
A thousand hugs !!!
Marisa :)


 I'm linking this project to Crafty Allie.


Friday, January 31, 2014

How to make easy "Paper Flowers"


Lately I've wanted to do something handmade! Are you remember the photo I 
took last year with the various objects I wanted to transform?


Últimamente estuve con ganas de hacer algo artesanal!   Se acuerdan de la foto 
que tomé el año pasado con los distintos objetos que yo quería transformer?


El primer proyecto que hice fue la transformación  de la corona.


The first project I did was the transformation of the crown


Now...I decided to give a new life to the basket, and today I want to share 
with you the flowers I made with napkins paper, so I'll try to describe the 
best that I can the steps, using photos that I took while I was working on this project.
 
First thing I did was to paint the basket with a white color, to do that, I 
used a spray paint called Krylon.
Light, camera, action!!
Now ... I'm going to show how I have done the paper 
flowers
 
 
Supplies
-napkins, but you can also use tissue paper, I have also made some flowers 
recycling paper from the sewing patterns!
- a ruler
- Scissors
- Wire, I used floral wire.
- Wire cutters


 Esta vez decidí darle una nueva vida a la canasta, es por eso que
hoy quiero compartir con ustedes  las flores que realicé con servilletas de 
papel.  Voy a tratar de  explicar los pasos lo mejor que pueda  usando  las 
fotos que  tomé mientras trabajaba en  este proyecto.
 
Lo primero que hice  fue  pintar  en color  blanco la canasta, para ello usé 
una pintura blanca en aerosol. Luz, cámara, acción! ! ...ahora les voy a 
mostrar cómo he hecho las flores de papel
 
Material necesario
 
-servilletas o también ustedes pueden usar papel para regalos, me refiero a ese
 papel finito como de seda, también he hecho algunas flores reciclando el papel 
que viene en los patrones de costura!
- una regla
- tijeras
- alambre
- pinzas para cortar alambre


I cut out the napkins into squares, these  are 6 inches square, you can make 
them larger or smaller depending on the size of the flower you want to do.
 
 
Corté las servilletas en cuadrados , los míos miden 6 pulgadas, son unos 15 cm,
 ustedes los pueden hacer más grandes o más pequeños según el tamaño de la flor 
que quieran hacer.


I used two napkins for each flower, which will result in 8 sheets of paper for 
each flower.


 En mi caso he usado dos servilletas lo que va a dar como resultado  8 hojas de 
papel para cada flor 


Let's put all the papers together so they are evenly matched edges and fold it 
accordion style, making sure that you crease each fold.


Vamos a poner todos los papeles juntos de manera que queden  los bordes 
parejos, doblar como si estuviéramos haciendo un acordeón o un abanico, y 
asegurarse bien que quedan los pliegues bien marcados.


Wrap a piece of wire around the middle.

 
Sujete  un pedazo de alambre alrededor del medio.


Round off the ends the best that you can.


Redondear los extremos  lo más que ustedes puedan.


With great care and patience now we have to separate the layers of the napkin 
or tissue paper from one another, one by one, on each side by lifting each 
piece of paper up, takes patience and.... begin pulling them apart.


At the same time we shape the flower.


Le vamos dando forma a la flor.


Then we shall assemble the bouquet and give it the personal touch!
 
 Here I leave some photos of my beautiful basket, I love it!
 

 Luego nos queda armar el bouquet y dar  el toque personal a esta canasta!
Aquí les dejo algunas fotos más de mi hermosa canasta,  me encanta.


Have a beautiful day and creative day !!!


Thanks for taking the time to visit me.
We'll be seeing soon.
 
 
Gracias por haber tomado el tiempo de visitarme. Nos estaremos  viendo pronto!
 
Marisa :)


I'm linking this project to The DIY'ers Party and to Crafty Allie.


This project was featured at Crafty Allie!!!!


Thursday, July 18, 2013

My Ruffled Lacy Shrug.

Is not beautiful?
 
No es hermoso?


I found this pattern in my search for something original where I could start
creating something, combining knitting and crochet. It is not free form, but for
me, this shrug  starts to look like a free form creation. I found this project on Etsy, here


Encontré este patrón en mi búsqueda de algo original, buscaba un proyecto donde
pudiera empezar a crear combinando el tejido y el crochet. No es free form,
pero desde mi punto de vista , esta pieza empieza a parecer a una creación free
form. Este proyecto lo encontré en Etsy. Aqui esta el enlace.


Discovering this Etsy shop was exciting for me, I found something else, it's
true, not everyone has the same tastes and we do not have the same style, but to
me, particularly I enjoy every creation of this shop.

The pattern was designed by the fiber artist, Janice Rosema, and is for sale
in the "simple patterns" Etsy shop. I did not use the yarn they recommend, but
I used  one that I like a lot, is the Amazing yarn  from  Lion Brand .
I leave here a link to the Lion Brand site, so you can see  the wool that I used


El descubrir este Etsy shop fué estimulante para mi , encontré algo distinto, es
verdad , no todos tenemos los mismos gustos y tampoco tenemos el mismo estilo,
pero a mi, en particular me gustan todas las creaciones de este shop.

El patrón fué diseñado por la artista Janice Rosema y el patrón esta a la
venta en
"simple patterns" Etsy shop. Yo no usé la lana que ellos recomiendan,
pero use una que se parece mucho, es la lana Amazing de Lion Brand.Les dejo aquí un enlace hacia el sitio de Lion Brand, para que ustedes vean la
lana que usé


This shrug is made by combining two techniques knitting and crochet, but there
is a version on the pdf to do it only in crochet.
I did some modifications at the end, but that's the beauty, give the personal
touch. I decided to add a brooch, this flower says something to you?
 
 
Este shrug se hace combinando dos técnicas tejido y crochet, pero hay una
versión para realizarlo solo en crochet.
Yo le hice algunas modificaciones al final, pero eso es lo lindo, darle el toque
personal. también  decidí agregarle un broche, esta flor les dice algo a
ustedes ?


I found this photo original, as it enables you to see who is behind the camera
taking photos.
 
Esta foto la encontré original, pues les permite ver a ustedes quien esta
detrás
de la cámara  tomando las fotos


Before concluding this post I want to let you know that I have no affiliation
with Lion Brand or with the "simple patterns" Etsy Shop. I just want to share
with you the materials and the pattern that I used to make my shrug.
When I bought this pattern I asked permission to the shop owner  to use  a photo
of the original pattern  on this blog, and she accepted.
 
Here I show you the original pattern. 


Antes de terminar esta publicación les quiero dejar saber que no tengo ninguna
afiliación  con Lion Brand ni con the "simple Patterns ". Solo quiero compartir
con ustedes los materiales y el patrón que usé para realizar mi shrug. 
Cuando
compré este patrón le pedí permiso a la propietaria  del shop para usar en este
blog ,  una foto de el patrón que yo compré y ella acepto.
 
En la foto que esta aqui arriba  les  muestro el
patrón original .

Aqui esta mi creación!
Me encanta, estoy deseando que la
temperatura baje un poquito para poder usarlo..


Here is my creation!
I love, I'm hoping that the temperature drops a little to use it ....


Hugs!
Marisa 


Sunday, July 7, 2013

What to do with pearls, beads and wire.

Well....using pearls, beads and wire, we can create a number of accessories, today I
want to show you a necklace, a bracelet and a ring I made to give to my
mother in law.


Que hacer con perlas, cuentas   y alambre ?
 
Usando perlas, beads y alambre, podemos crear una cantidad de accesorios , yo
hoy  quiero  mostrarles un collar, una pulsera y un anillo que hice para regalarle
a mi suegra.


I visited one of my favorite stores, Club Beads Plus in Montreal, I felt like a
kid in a warehouse of toys! I bought enough material to start creating something
 unique, the store is in Montreal but has an online site, if you want to visit this is the link.

As I decided to give a ring , a bracelet and a necklace to my mother in law,
this was a good excuse to go shopping. I don't know if you would feel the same
as me, but when I have an excuse to buy, I feel less guilty to go shopping!


Estuve de visita en uno de mis almacenes favoritos, Club Beads Plus en
Montreal, me sentí como un niño en un almacén de juguetes! Compré bastante
material para empezar a crear algo unico, haber decidido a  hacerle un anillo , un collar y
una pulsera  a mi suegra  fué un buen pretexto para salir de compras.
la tienda Club Beads esta situada en Montreal pero tiene un sitio online, si lo quieren visitor este es el enlace
Yo no sé si a ustedes les pasa lo mismo que a mi, pero cuando tengo una excusa para comprar, me siento menos culpable !!!!!


I'm really a beginner in this topic and the person responsible for my new
passion for creating jewelry is my mother in law. Since long ago I see her
create jewelry of all types and give them as a gift, and a couple of months ago
she began teaching me the basic principles of creating these pieces .
 
To create these pieces I used pearls and wire, the pearls that I used for this
necklace are glass pearls 12mm in diameter and in gray color. I didn't know
which wire to buy to make the ring, I asked one of the employees and advised me
to use 18 gauge wire.
To make the ring I watched several videos on you tube, this is the link to one
of them. If you write " How to do  wire rings" on you tube, you will be amazed
at all the tutorials that are available online 


En realidad soy una principiante en este tema y la persona  culpable de mi nueva
pasión por crear joyas   es mi suegra ( Hola Pepi). Desde hace tiempo que yo la
veo crear joyas de todo tipo y darlas en regalo, y   hace un par de meses que
ella me comenzó a enseñar los principios de base de la creación de estas joyas y aquí
estoy mostrando a ustedes  lo que  he creado.
 
Para crear estas piezas usé perlas, cuentas  y alambre,  las perlas que yo usé para este
collar  son perlas de vidrio de  12mm   de diámetro y de color gris,. Yo  no
sabia cual  alambre comprar para hacer el anillo, le pregunté a una de las
empleadas y me aconsejo de usar alambre calibre 18.
Para hacer el anillo estuve mirando varios videos en you tube, este es el enlace
hacia uno de ellos. Si ustedes escriben Como hacer anillos de alambre" en
you tube, se van a sorprender de todos los tutoriales que hay disponibles online.


Hope you like my creation, I have intended to write a tutorial to show you how I
make these necklaces, they are easy to make when we have taught the technique
and the tools needed. These tutorials are on my list of things to do for the
blog, you can not imagine how long it is my list, but gradually I will show
things that I finished.

Thanks for your visit, I love to receive your comments, now back to my passion

..... "create", I think I would have to be called my blog, passion and creation,
I discovered that I love to create with everything that falls into my hands and
I love it!


Ojala les guste mi creación, tengo como objetivo de escribir un tutorial para
mostrar como hago los collares, son fáciles de hacer cuando nos han enseñado la
técnica y los útiles necesarios . EStos tutoriales están en mi lista de cosas a
hacer para el blog, no se imaginan lo larga que es mi lista, pero poco a poco
les voy mostrando cosas que voy terminando.
Gracias por vuestra visita, me gusta mucho recibir vuestros comentarios, ahora

de vuelta a mi pasión....."crear" ,  creo que yo tendría que haber llamado mi
blog , pasión  y creación,  he descubierto que me encanta crear con todo lo que
cae en mis manos y me encanta!


Thursday, February 7, 2013

Let's make a Shopping Bag for Valentine's Day


I just finished this shopping bag a few days ago, I've done this kind of bags before but this time I took pictures to share with you the tutorial.


Actually I don't know whether to say Shopping bag or if there is another
name for this type of bag, the fact is that is a bag unlined but where the
interior is neat, to achieve this I used the French seam. It is a bag that
is quick to make, is practical, and we can carry this practical bag in our
handbag.
 
 
There are two ways to do it, either by cutting two fabric rectangles or one.

First you have to determine the final measure of your shopping bag, my
shopping bag measures 13 "wide by 17" in length. If these measures are
appropriate to you, then you can follow the steps that I used in my
tutorial, but I want you to know that with my explanations you can make a
shopping bag with the measure you want.


1) Cutting the fabric
 
If we do it with a single rectangle of fabric


a) The width
 
The width of your bag +1"
 For  my shopping bag, my final measure is 13" +1" = 14 "
 
b) The  length
 
the length of your bag, two times + 4"
My measures , 17"+ 17" + 4"= 38"
 Briefly I will cut a piece of fabric of 14 "x 38"


If we do it with two rectangles of fabric
 
a)The width
 
The width of your bag +1"
My final measure, 13" +1" = 14 "
 
b) The  length

The length of your bag + 3"
In my case, 17" + 3"= 20"
I will cut two rectangles of fabric that measure 20" x14"
 
 
2) Ironing the top edge
 
Fold the top edge 1" down, iron, fold again and iron.
Leave as it and move to the next stage.


3) Sewing ( the French seam)
 
Lay your fabrics wrong sides together  matching raw edges.
Do not forget to open the top edge that we had previously ironing, I just
ironed it for future reference later, when I will do the sewing of the
straps, make sure that all the raw edges matching!!
Pin edges together and sew with 1/4" seam, then trim seam allowance to
1/8", don't cut into your stitches, press.

 
I decided to use my serger


4)Turn inside out

Turn the bag inside out , now  the fabrics will be right sides together,
press and stitch in a 1/4" seam,  you have to enclose the trimmed seam
allowance. Since I decided to use a serger, I have no need to trim the
edges


I want to share a tip with you , look at this photo, is the Edge Stitching
Foot, this is a foot that I use regularly. This foot has a flange on the
side for guiding the fabric, we just have to adjust the needle position and
we will get perfect seams along the edges of the fabric.In this case I
position it to sew, to 1/4'' from the edge.
 
 
I have to confess that I use this foot  all the time !
 
(Back to our project) 
Turn the bag right side out.
I cut two straps of 21 ", and fold at 3/4" from the edge.


Now the explanation it will be easier with the photos, remember that we had
ironed the top edge twice, ok, now that the french seam is finished, we will
re-fold the top edge twice and secure it with pins.


The next pictures will show you , how I put the straps on the top edge:


I put the straps 3 "from the sides
 
 
Once both straps are fastened to the front and the back, we will sew.


While this shopping bag is easy to do, try to write a tutorial for two ways
to do it, it  was a bit difficult for me. I added several photos to help you to
understand, hope I succeeded!
 
These shopping bags were a commission for the deaf center who frequent my
parents, that's why I embroidered the letters of the sign language. They
are red because they are a gift to people who frequent the center, on
valentines day.
I decided to give them a festive touch and made ​​some tags to decorate them.
 
 
I do not want to bore you with more explanations, but I want to share with
you the way I did the tags, here are photos I took , I think it will give
you an idea about the steps that I did.
To begin, I used the corrugated board, which comes in boxes to protect
fragile materials and here you will see the steps...


In the other hand ,I'm having fun with my memories scrapbooking software, I
made another photo montage.
Do not forget that the giveaway for this software remains open until
February 13, it is so easy to use and when it's free why not take
advantage?
 
 
The link where you will find the information  for this giveaway is here.
 
 
I hope you enjoyed this tutorial, I tried to do the best I could. If there
are spelling mistakes, I apologize, I also tried to do my best, my first
language is Spanish and I learn English with all of you.
I look forward to your comments.
Have a nice day!

Marisa :)


LinkWithin

Related Posts Plugin for WordPress, Blogger...