Monday, May 27, 2013

My springtime ruffle tote bag, the beginning...


I have to admit ,the hours of the day are not enough, now that here in Quebec is spring after a hard winter, the need to go outside is intense, which makes me
split the time between being inside and in the garden. The fact is that I have
several projects in which I am working on, and they progress quietly. One of my
projects is a ruffle tote  that I am sewing, at this moment I just finished the
exterior  of my tote , the handles and the fabric flowers ( you have seen them in my previous post) with which I will decorate the front of the tote.


To make the outside of my tote and the lining, I  cut two pieces of fabric that measure 18 by 36 inches, I preferred to use a piece of fabric instead of two, the reason is simple, the presence of ruffles at the bottom, it looked like it would be
easier to just sew on the sides, and avoid sewing what will be  the bottom of the
tote.
 
 
So, my main body piece measures 14 x 36 inches,  you can adapt it to your taste!
 You will need:
1 (14 x 36" ) exterior fabric
 1 (14x 36")   lining
 
I also prepared the handles of the tote.
cut  29 x 2" fabric ( 4 times)
cut  29x 1.5" of fleece ( 2 times)
Today I want to share with you  how to make the outer body of the tote with the ruffles and the handles.


So, let's do the ruffles

First step to make ruffles, is the selection of fabrics
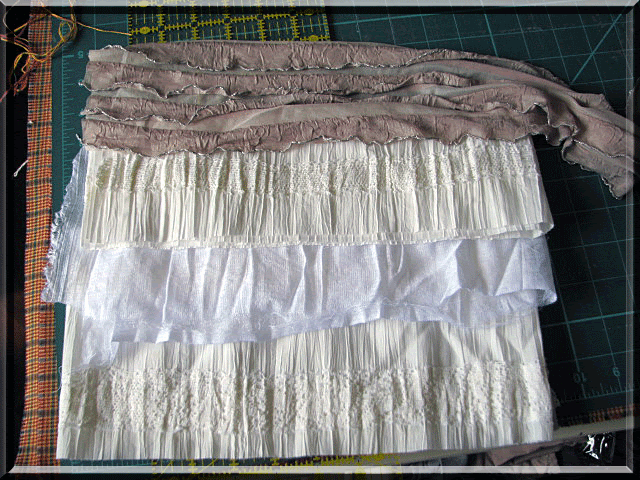


Second : Deciding the width, length and the edges of the ruffles


Before cutting the fabric to make the ruffles, you have to decide which will be
the width of the ruffles. The ruffles that I have done range from 3 to 4 inches.
On the other side to decide which is the length of fabric needed, that depends
on the thickness of the fabric and how ruffly, you want your ruffles, then you
will cut double or triple the width of your tote. In my case to do all my
ruffles I cut twice the width of my tote.


The edges of the fabric vary, there are edges where I did a zig zag to prevent
the fabric from fraying in others I made a hem and in others edges I left them
as is to give a shabby style to my tote.


You can do your ruffles by hand or by machine. I used my machine, I set up my
machine to use a  basting stitch,  or set your sewing machine to a 5 or 6 mm
stitch length, leave a good amount of thread at the beginning of the stitching,
sew along the edge of the fabric ( 1/2 inch from the edge), before cutting the
thread leave a good amount of thread (5 or 6 inches of thread at the beginning
and at the end)


Now start to push the fabric by moving the fabric along the line of stitching...
your ruffles are ready!!!


Lay out your ruffles to decide where you want them to remain, which up, which
down, it's time to decide and then sew the ruffles onto your tote.


I folded the main fabric in half, and placed the first ruffle, scored the
position I wanted with pins , I started by sewing the bottom ruffle, the top and
 I also sewed the sides.


 Ad the next ruffle


...continue adding the amount of ruffles that you want, I decided to make four
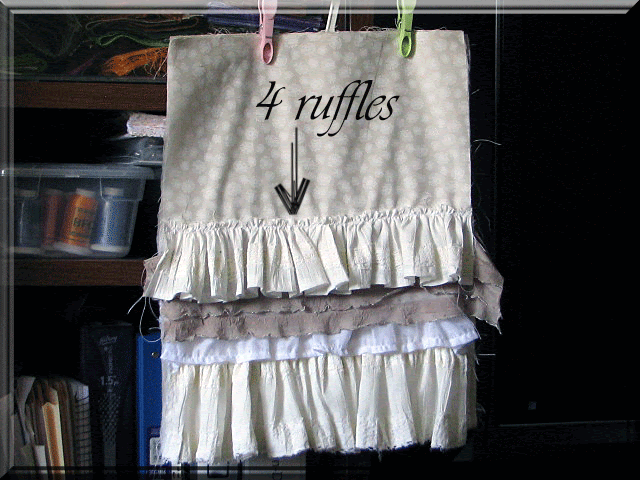


Then cut off the excess fabric on the sides.
 
 With right sides together, fold the exterior fabric in half and  sew the sides.


Turn right side out


I also prepared the handles of the tote. 

cut  29 x 2" fabric ( 4 times)
cut  29x 1.5" of fleece ( 2 times)


Place the strips of fabric right sides together and add  one strip of fleece.


sew using a 1/4" seam allowance


 Turn the handle right side  out, pulling through the fabric "not the fleece" .
Press the handle flat. Top stitch close to the edge


So far we have made ​​the ruffles and the outside of the tote, the handles and the
fabric flowers. In the next days needs to be done the inside ( the lining) and sew all the parts together.

 I am also trying to make fabric labels, I will tell you  if I
succeeds as I am in the stage of experiment!!


I hope that the explanations were clear enough, I always try to complete the explanations with photos, this time when I started to do the ruffles I forgot to take more pictures, I apologize, I hope you have understood anyway the steps .


See you soon.
Have a happy and creative day!
Enjoy!


Hugs Marisa !!!!!!


I'm linking this project to  Memories by the Mile , Dear Creatives Inspiration, Fluster Buster , The Pin Junkie, Shine on Friday, The Country Homemaker, Hookin On Hump Day,  and  The Creative Blog Hop.
I'm also linking with Fun Friday Blog Hop.


Monday, May 20, 2013

Let's do some fabric flowers.


Do you like these fabric flowers? I'm in love with them.


I want to create all kinds of flowers, fabric flowers, flowers made in crochet,
and also flowers using zippers, this obsession obviously must be a consequence
of the spring. There are many uses for flowers; to decorate bags, to create
ornaments, making pillows, pictures, everything is in the imagination.
 
 
I searched online tutorials to make them. From  all the places I have visited,
the ones that I found and I loved  are these one:
 
 
It was by using the tutorials of this blog that I could create my fabric flowers.
 
The Decorated House  is a blog where you will find great inspiration, all the  creations that you will find  are terrific, we can spend a beautiful time there.
 
 
To make this flower


I used this fabric edge


This edge is usually cut and then removed it, but I liked this edge, so I said
to myself that I was going to use it to make one of the flowers.
 
Finally, I decided to do two flowers of different sizes;
 
 
 To make the center of the flower I used a strip of fabric ( the same strip that
I use often to do the strips of my totes) that is one inch wide.

 
As a final touch, I added three pearls !
 
 
 Looks beautiful!!!!

I really liked how it turned out!

I want to show you a few more photos...

This is another flower that I did;


I made them to decorate a ruffle tote  that I am doing right now, I am taking
pictures of this ruffle tote while I'm working on it. Actually, I finished  the
outside, so the next post will be how to make ruffles and sew them to the outer
fabric.
I hope that  you have enjoyed these flowers; I'm in love with them.


See you soon.

Marisa.

I'm linking this project to dolly's design The Creative Blog Hop , The Chicken Chick, Made to be a Momma ( Home made By  You ) , Favorites Things ( from Katherines Corner), Take it on Tuesday, Sew Crafty Angel , Lillies and Silk, Can I get a Whoop Whoop?,  and Fluster Buster .
I'm also linking to The Pin Junkie, Shine on Friday , My Turn for us( Freedom Fridays) , Free Motion By The River, The Country Homemaker, Let's Get Social Sunday,   Sew Darn Crafty, Sew Chatty, Pretty Little Dahlia, Saturday Sparks  and  Fun Friday Blog Hop.

Wednesday, May 8, 2013

My good news !!!

When I write a post, I have always the impression that it has to be a tutorial or a post about a creation that I just finished. Actually, this day I will share with you some good news that I received and that they will allow you, at the same time to discover other sites that I frequent.
 
The first good news, do you remember the table runner that I made to participate to the "Fancy Feet Sewing Challenge"?
 
 
...ok after a month of votes ... my table runner was the project that had more votes, allowing me to add a new badge on my side bar.


To do this table runner I used the Pintuck Foot, if you want more info about this feet and how I did my table runner using this foot,  click here


I invite you to visit  Rikka's blog, and see the other projects. For me visiting other blogs is always a source of inspiration. Here is the link to her blog , if anyone wants to see the other creations that have made the other participants in this challenge.


On the other hand I received a message from  Pam (from Threading My Way), to tell me that she have showcased my tutorial "Let's make a Sausage Pillowcase "
 
 
...my tutorial is among the top 10 Pillow and Cushion Tutorials that she chose to featured!!!!
 Thank you Pam!!!!


This is the link to the wonderful, Threading My Way  blog, and here is the link to the page with the Ten Pillow and Cushion Tutorials. What I like , when I visit Pam's blog is the variety of projects, tutorials, and the all Ongoing Link Parties that allow us to  discover other blogs.
I propose to you something, get comfortable, prepare something to drink and enjoy Pam's blog, you will be spending a few hours there, there's a bit of everything for everyone , you will love it!!!!


More news... I just saw that one of my tutorials was published on Fave crafts. Yes!!!!!
 My "Let's sew a needle case using recycled jeans" was published!!!
 
 
What  beautiful news!  I know that some of you have already  seen this tutorial  before , but maybe it's a new project for the new visitors, well I give you the direct link to my post here, this post  is a tutorial that I did showing how to create this needle case using a pair of old jeans . If you click Here you can see the publication of my post, and at the same time you can visit Fave crafts where you will find a variety of tutorials.


But I can not end this post without showing something I've done lately, I know that I always show you my sewing projects and creations made with wool, but  today I have a novelty, I made this necklace and I'm really proud. I have intentions to expand a bit my creations and maybe I will starts to show you some jewelry creations with some tutorials. What do you think of this?
 
 
I end my post with some pictures I've taken from my necklace, hope you like it. 


As always, I remind you that I love getting your comments, you are the ones that feed my urge to create!
Have a nice day!
Marisa


I'm also linking up with


Aloha Friday Blog Hop

Let's Get Social Sunday

Friday, April 26, 2013

My new hat made in crochet.

Lately I've been playing with wool; I had several projects in mind and had
bought wool for each of them. I was doing a bit of crochet and knitting, every
night, for me, after dinner is the ideal time to get to knit while "listening" to
a television broadcast. I've said it well, as I " listen" and non watching,
my husband always sits next to me, and always says the same thing "I do not know
how you do for knitting, reading a book and look at the television" and to
surprise him , I make some comments about the emission we are seeing together.


Lately I have made several models of hats, today I'll show you a hat I made, following the instructions from a book I bought, and to use with that hat... I decided to
make my first scarf using two knitting needles. It's rare that I learned to
crochet before knitting, but so happened, I liked to do crochet more than knitting
from my earliest childhood , maybe the reason is because I was lucky to have the best teacher in the world, my grandmother.


I bought the book, "Clever Accessories Crocheted" and I loved it, there are several
interesting projects, very nice photos and my first project was perfect. I
bought it on Amazon and here I leave a link to Amazon where you will be able to
find the book, click here.
I want you to know that I have no affiliation with Amazon, I just want to share
with you  the link and the information about this book.


For the scarf, I decided to try something more complicated than the Stockinet
stitch, reading a book that I bought this time in French, I managed to make this
point.


This is the book I bought and it is written in French:
A L'École Du Tricot.

Here is the link if you want to see more information on the Amazon's site

Here I show more pictures, now I will add this hat to my crochet projects tab.
Hope you liked it.


I hope you enjoyed my creation, I will have more hats and scarves to share with you soon. Thanks for visiting my blog, I wish you to spend a beautiful day.
Marisa.


Sunday, April 14, 2013

April Mug Rug Blog Hop, Day 15!

Today is my day to participate to the  Mug Rug April Showers Blog Hop before I show you my mug rug, I want to thank Mdm Samm for hosting this blog hop and Erin at Sew at home Mummy because she is our cheerleader!
 
 
In my case the month of April, it is the season of spring and when I think of spring, I think of flowers.That's why I decided to make a mug rug using a photo of a flower from my garden. I took several photos to share with you the steps I followed to create an appliqué from my picture and then create  my mug rug.


The photo that inspired me to make this mug rug was this photo.


Since I'm not good at drawing, and I needed  to find a way to determine the
outline of the petals from this photo  that would allow me to create an
appliqué, I decided to use Photoshop Elements to do the job for me.
 

I decided to play around with Photoshop Elements and managed to define the
contours of the flower , after playing for a while I got this image, I
decided to use it to create my appliqué. I had to find a way to determine
the outline to create a form, from which to make an appliqué.


I decided to do the appliqué using fusible web.


For my project I needed:

1-the fusible web,
2-fabric
3- the outline drawing of the petals


I will try to explain what I did, hopefully with the pictures I've taken
will be clearer to understand.
 
The fusible web is a  paper that  has a smooth side and a sticky side,
where is the glue.
I fused the fusible web ( the sticky side)to the wrong side of the fabric.


I cut with scissors the outline of the petals and the center of my flower , from my picture
and I have kept them apart to use in the next steps.
 Using the pattern that I created, I traced    the outline of the petals on the smooth side of the fusible web.


Cut out the design on the line that I have traced
 
 
Peel away the fusible paper from the fabric
 
 
Position the applique onto the mug rug and iron. To give relief to this
flower, I decided to do Free Motion, to have a guide, I drew on the fabric
with a pencil the  petals of the flower, and carefully observing the
picture that I had, I tried to reproduce the drawing, the best I could
 
 
Then I used the   Free Motion foot, and  using the running stitch I followed
the lines that I had drawn.


To do the center of the flower I did the same


I thought I could add these leaves already printed on a canvas


Following the same steps, I added fusible web on the wrong side of the
fabric, cut, separated the fusible web from the fabric, placed it on the fabric,
ironed and finally
I added some details to the leaves, with black thread and Free Motion.


I did the binding and here is my mug rug!


 There are other blogs that are participating in this blog hop, here I give
you the list of the other participants to this day, I invite you to visit
them.
 
                                  MONDAY, APRIL 15th
                                  Cathy @ Cate's Linens
                                    Nicola @ Sunshine Reflections
                              Martina @ Sunshinequilting
                          Judith @ Frimart
                       Anita @ Anita's quilts en handwerken
                 Linda @ Sew Nicely
                        Kris @ krislovesfabric
                         Laura Ann @ The Fuzzy Hat Quilter
                             Carol @ Just let me Quilt
                          Selina @ Selina Quilts
                          Mary @ Crooked Gulley Art Quilts
                          Marisa @ Passion et Couture


Have a happy sewing day!
Marisa

 
I'm linkink this project to Fluster Buster, Creative Crafts Thursday, Katherines Corner (Thursday Favorite Things), Sew Many Ways and Creating my way to Succes.
I'm also linking up with Crafty Spices and Find  a Friend.


LinkWithin

Related Posts Plugin for WordPress, Blogger...