
young).. Here are the pictures of my quilt.


The first thing I bought was this batting, I do not know if it is called so, but

this is the picture.
As the batting measures 36 "x 45", these were the measures I used to make the
quilt. I cut the flannel about 4 "to 5" longer than the length and width of the
batting, then I place on the table a piece of flannel wrong side up, then the
batting and the other piece of flannel right side up. The result is a kind of
sandwich where the stuffing it is batting.


I chose different colors of flannels and cut into squares of 3 1/2 ", I started
to put them over the quilt at a distance of 1 1/2" between them and I secure them
with pins and I sewed over all the squares vertically and horizontally using a running stitch.


I wanted to add a decorative stitch to the edges of the squares, my machine as well
as many sewing machines of today have a variety of decorative stitches, I decided
to use this point ( stippling) and I put it all over the squares.


line of squares, I marked and cut using a rotary cutter through all the layers.

In this photo you can see that everything is cut and ready for the final stage
which is the binding.
FINISHING THE QUILT
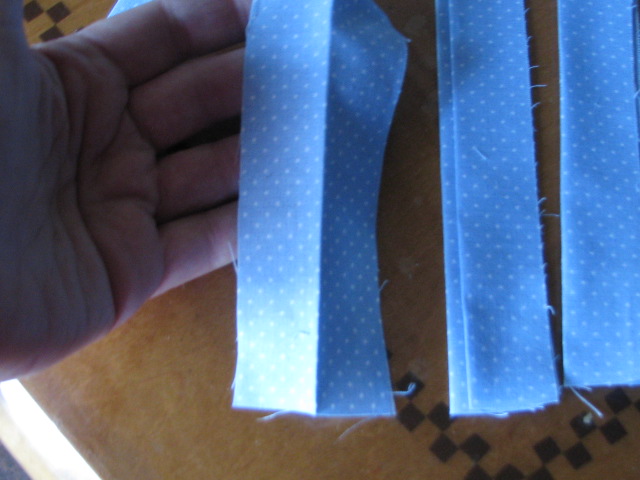
For this baby quilt I cut five, 3" strips along the width of the fabric.

Don't forget to trim the selvage ends of the strips.

Fold the strip in half lengthwise, wrong sides together, and press.
between the strips of fabric, marking a line of 45 degrees on the diagonal of the square that is formed, and sew along this line using a running stitch.


Then you need to cut using a 1/4 seam allowance and press your seam open.


We start with the last stage: Add the binding to the quilt.
I would recommend to use a walking foot, if you have one this is the time to installing
it on the sewing machine. Take your strip and starting in the midle of one side of the front quilt,
with raw edges of the binding and quilt top even, start to sew with a 3/8" seam
allowance, starting 4 " from the begining of the strip


As you approach a corner of the quilt, stop sewing 3/8" from the corner of the
quilt. I marked with an erasable pen where I have to stop sewing.


Remove the quilt from under the presser foot, flip the binding strip up, creating a

45 degree angle,
then fold the binding down even with the raw edge of the quilt.
Begin sewing at the upper edge 3/8" from the corner, I also marqued with an
erasable pen where to start. Mitre all four corners in this manner.

I stopped sewing about 4 "from the end of the binding, remove the quilt from under
the presser foot and did the following :


Bring the quilt back to the machine to finish sewing the binding

Turn the folded edge of the binding over the raw edges and to the back of the quilt
so that the stitching line does no show. Hand sew the binding in place, folding in
the mitre corners as you stitch. To hand sew the binding I used a blind stitch.
First, bring the needle through the bottom edge of the biais strip

then slide the needle,right in front of the place where we did the first point and
bring the needle out the bottom edge of the biais strip again.

This is how I did to sew the mitered corner


Here is my finished quilt!!!!!!!

I could not resist the temptation to show you this picture of my quilt with my dog!!!

I hope that my tutorial has been useful for those who want to try to make a quilt
for the first time. It is a quilt that can be done quickly, we can also recycle
fabric remnants from other projects and ultimately gives great satisfaction. Thanks
for visiting my blog and I look forward to your feedback. If someone makes this
quilt I'd like you send me a link to your blog to see the project and I will visit your blog.
My next project is a clothespin bag made with the crazy quilt technique, for some time now I want to do one and since here in Quebec, it's summer ... I have no more excuses, it will be my next project to share with you.
I hope you enjoyed this tutorial, I always appreciate your comments and new followers.
Have a happy sewing day!!!!!
Marisa.
I'm linking this tutorial to Threading Your Way ~ Quilting and Patchwork ~ Link Party .
15 comments:
Marisa your quilt is beautiful. Love the method you used to make it. New to me and like the way you finished off your bias ends. I've been wanting to make a clothespin bag for months now and still haven't got round to making it so hopefully when you post yours I'll do it then. Look forward to seeing it.
You did a wonderful job. It was brilliant to add squares to the fabric and top stitch. You have inspired me to try it.
Thank you for putting up this blog.
First quilt???? Beautiful job. Very clever! Like the look it makes me want to cuddle in the quilt. Also like your blog. Will follow you!!!
Keep on stitchin'
Pat from Flat Rock
A great tutorial and very easy to follow.well done. I am a seasoned quilter but really loved the idea of this quilt. Thanks for sharing
Heather
Fa !!! Que laburo!!! Nunca me imaginaría qeu hacer esa mantita diera tanto trabajo. Te que dó preciosa .Ojalá la mamá del bebé la valore!!!
Felicitaciones.
Beso grande
Tu hermana,
Ana
Hi there, I always read your post but most of the time I have trouble leaving messages so I usually dont comment then. But I am gonna try again, I love this post, I have been wanting to do a quilt and of course so many things are puzzling. I am also a vision person rather than read. This has helped me a whole he__ of a lot. Thanks
Jackie
WOW great technique. I love it and I am sure that I am going to try this method.
Thanks for the great tutorial
Usha
love this quilt I will make my greatgranddaughter one.
LOVE the colours you have used, Marisa!!! It's a really beautiful quilt!!! Great job on making this for your first quilt.
Stacy
This a beautiful baby's quilt. You did an excellent job on the quilt and binding for your first time. I am a new quilter, just started in February this year. I also love doing baby and childrens quilts.
I will give this a try.
This is an awesome quilt! Can't believe it's your first....I would never have thought to use the scraps this way. It's a great way to recycle some favorite fabric scraps that you just couldn't throw away and someone gets a new quilt out of it! Thanks for the ideas.
Thanks for giving such clear instructions and great photos! I am inspired to try this new-to-me technique.
Great job. For a first quilt with a different method, it was excellent. Your binding was outstanding. What a great and fun way to use the blocks without the sizing of the strips etc. I liked it!
Claire
Hi there superb website! Does running a blog similar to this require a large amount
of work? I've absolutely no understanding
of coding however I had been hoping to start my own blog soon. Anyways, should you have any ideas or techniques for new
blog owners please share. I know this is off topic but I just
had to ask. Thanks a lot!
my site ... Prosolution Pills
Marissa, this quilt is so cuddly and easy to make that I made two for the twins in half the usual time fussing around matching corners etc, this was a breeze! Thank you so much for the photos that was so easy to follow!
Post a Comment