
I have to admit ,the hours of the day are not enough, now that here in Quebec is spring after a hard winter, the need to go outside is intense, which makes me
split the time between being inside and in the garden. The fact is that I have
several projects in which I am working on, and they progress quietly. One of my
projects is a ruffle tote that I am sewing, at this moment I just finished the
exterior of my tote , the handles and the fabric flowers ( you have seen them in my previous post) with which I will decorate the front of the tote.


To make the outside of my tote and the lining, I cut two pieces of fabric that measure 18 by 36 inches, I preferred to use a piece of fabric instead of two, the reason is simple, the presence of ruffles at the bottom, it looked like it would be
easier to just sew on the sides, and avoid sewing what will be the bottom of the
tote.
So, my main body piece measures 14 x 36 inches, you can adapt it to your taste!
You will need:
You will need:
1 (14 x 36" ) exterior fabric
1 (14x 36") lining
I also prepared the handles of the tote.
cut 29 x 2" fabric ( 4 times)
cut 29x 1.5" of fleece ( 2 times)
cut 29x 1.5" of fleece ( 2 times)
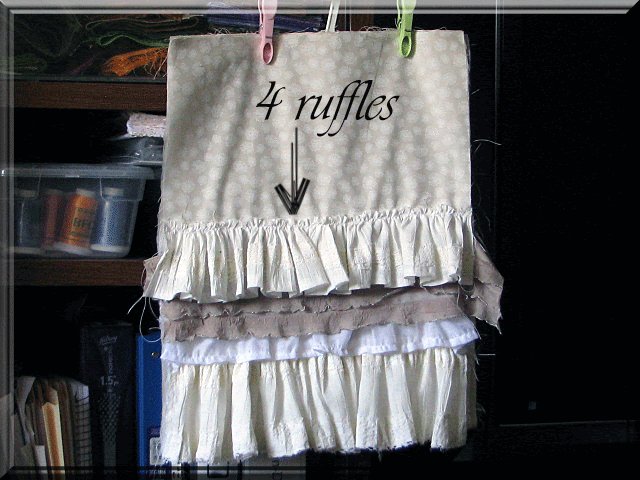
Today I want to share with you how to make the outer body of the tote with the ruffles and the handles.
So, let's do the ruffles
First step to make ruffles, is the selection of fabrics

Second : Deciding the width, length and the edges of the ruffles
Before cutting the fabric to make the ruffles, you have to decide which will be
the width of the ruffles. The ruffles that I have done range from 3 to 4 inches.
On the other side to decide which is the length of fabric needed, that depends
on the thickness of the fabric and how ruffly, you want your ruffles, then you
will cut double or triple the width of your tote. In my case to do all my
ruffles I cut twice the width of my tote.
The edges of the fabric vary, there are edges where I did a zig zag to prevent
the fabric from fraying in others I made a hem and in others edges I left them
as is to give a shabby style to my tote.
You can do your ruffles by hand or by machine. I used my machine, I set up my
machine to use a basting stitch, or set your sewing machine to a 5 or 6 mm
stitch length, leave a good amount of thread at the beginning of the stitching,
sew along the edge of the fabric ( 1/2 inch from the edge), before cutting the
thread leave a good amount of thread (5 or 6 inches of thread at the beginning
and at the end)
Now start to push the fabric by moving the fabric along the line of stitching...
your ruffles are ready!!!
Lay out your ruffles to decide where you want them to remain, which up, which
down, it's time to decide and then sew the ruffles onto your tote.
I folded the main fabric in half, and placed the first ruffle, scored the
position I wanted with pins , I started by sewing the bottom ruffle, the top and
I also sewed the sides.


Ad the next ruffle

...continue adding the amount of ruffles that you want, I decided to make four
Then cut off the excess fabric on the sides.


Turn right side out

I also prepared the handles of the tote.
cut 29 x 2" fabric ( 4 times)
cut 29x 1.5" of fleece ( 2 times)
Place the strips of fabric right sides together and add one strip of fleece.


sew using a 1/4" seam allowance

Turn the handle right side out, pulling through the fabric "not the fleece" .
Press the handle flat. Top stitch close to the edge

So far we have made the ruffles and the outside of the tote, the handles and the
fabric flowers. In the next days needs to be done the inside ( the lining) and sew all the parts together.
I am also trying to make fabric labels, I will tell you if I
succeeds as I am in the stage of experiment!!

I hope that the explanations were clear enough, I always try to complete the explanations with photos, this time when I started to do the ruffles I forgot to take more pictures, I apologize, I hope you have understood anyway the steps .
See you soon.
Have a happy and creative day!
Enjoy!
Hugs Marisa !!!!!!
I'm linking this project to Memories by the Mile , Dear Creatives Inspiration, Fluster Buster , The Pin Junkie, Shine on Friday, The Country Homemaker, Hookin On Hump Day, and The Creative Blog Hop.
I'm also linking with Fun Friday Blog Hop.
20 comments:
Oh, I just love this! It is way too much thinking and work for me....I'd rather just buy one! Are you selling them at all? Looking forward to the finished tote!
Ha! Marisa, I have started making a ruffle tote as well....just started the ruffles. Using shades of cream, beige. Can't wait to see yours!!! I will post mine when it is done. I have a few projects going at the moment! anyways, love the way yours is coming together!
Linda
mysewwhatblog
Hi Marsia
This is to cute. I love those flowers.
Angel
I sure wish sewing machines and I got along! Im jealous, this is too cute! You are soo very talented!
newest follower!
Shelly- Cohost Pin Hop
minettesmaze.blogspot.com
Very nice!Good job!
hugs
Your flowers are going to be perfect with those gorgeous ruffles, Marisa!!!
From the first picture I thought it was a skirt! :) I love those ruffles!
Thanks for the detailed tutorial!
So lovely Marisa.
Hi Marissa, If you didn't link up your tutorial there is still time @ DearCreatives.com link party. So pretty!
Looks like you are up to pretty things again Marisa!
Would you like to sew a set of crib bumper pads for me? lol I'm having performance anxiety about them.
Tracy
www.crochethappy.
Thank You for joining the party! what a lovely bag! Have a fantastic week1
Lizy co-host of the Fluster Buster party!
It's so gorgeous, the flowers are going to look amazing on it :)
Marissa your ruffle tote is adorable - you are so clever! Thanks for sharing.
Marisa, I love the ruffles. The tote has kind of a bohemian feel to it. Thanks for sharing on Fluster's Creative Muster Party.
Robin
Fluster Buster
This is going to be such a pretty, feminine bag. I may have to make one for a niece who loves frilly, ruffled girly things. I'm a new follower and really enjoy your writing.
You are the Featured Creative Crafter, Please stop by for your featured button if you wish and thanks so much for participating!
Dolly
http://dollysdesigns.blogspot.com/2013/06/the-creative-blog-hop-15.html
Jolie ;-)
Thanks for visiting my blog and leaving a comment..the flowers and ruffles are gorgeous
So cute :)
Hi Marisa: I just found your blog. Yippee. It is so inspiring. I love this ruffle tote. Beautiful. I'm your newest following fan.
Post a Comment