Showing posts with label quick project. Show all posts

Friday, October 4, 2013

Today I want to share with you a beautiful and fast project, also the result of the giveaway...

 
And  the winner of the little bow pleat pattern is...
 
 
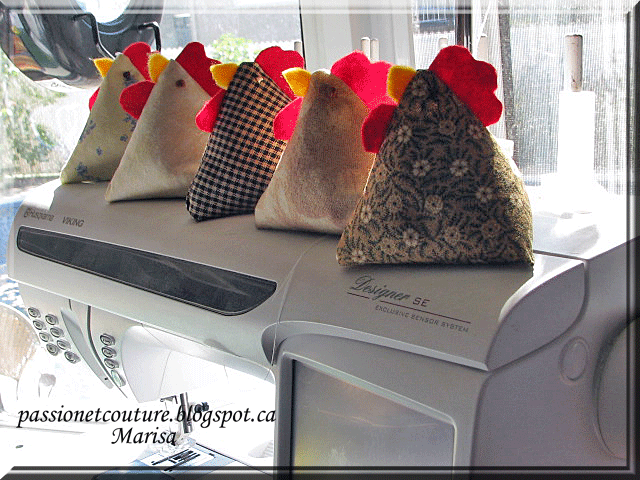
But before giving the result I want to show the little chickens I've been doing.
Actually they are juggling chooks, but I
want to use them  as decoration in my sewing room. 
I filled them with  oat seeds, so as the cooler days begin, I'm going to heat
them  in the microwave and warm my hands with them.
Here I show the pictures I've taken.


Un proyecto hermoso y rapido, tambien  comparto con ustedes el resultado del
sorteo, el ganador del patron de el bolso "the  little bow pleat"  es..

Un momento por favor, antes de darles el resultado del sorteo, quiero mostrarles las gallinitas que he estado  haciendo.
En realidad son para jugar y hacer malavarismo , pero yo las quiero usar como decoración en mi sala de costura. Yo las rellené con semillas de avena, de esta manera cuando los dias frios comiencen, las voy a calentar en el microondas y podré calentar mis manos con ellas.
 Aqui les muestro las fotos que he tomado.


This project is not my idea, I found this project  when I visited
 
As I said earlier is a project that is done very fast, is a way to use fabric
scraps, you only need a rectangle of 10 x 20 cm of fabric ( 4"x8"inches)
The tutorial is well explained, with many pictures that facilitate the
realization of the project, the link to the Red Ted Art's blog is here.
  Here I leave you with more pictures and with the draw.


Este proyecto no es una idea mia, la inspiracion la encontré mientras estaba
visitando el  sitio Red Ted Art's blog 
Como dije anteriormente es un proyecto que se realiza muy rápido, es una manera
de usar restos de tela, solo se necesita un rectangulo de 10 x 20 cm de tela o
4"x8" pulgadas .
El tutorial esta muy bien  explicado, con muchas fotos que facilitan la
realización del proyecto, el enlace hacia the Red Ted Art's blog, esta aqui. 
Aqui los dejo con mas fotos y con el resultado del sorteo.


The winner of the beautiful little bow pleat pattern is...

El ganador de este hermoso patron es ...


I have the honor to congratulate Julie Corbisiero , you are the one who left the comment number 2  !!!!!

"CONGRATULATIONS "

 Julie I will get in contact with you via email, congratulations again!


La ganadora de este sorteo es Julie Corbisiero, tu has sido la persona que dejo el comentario numero dos.
FELICITACIONES
 
Julie voy a entrar en contacto contigo via email !


I want to say thanks again to everyone who participated!!
Gracias a todos aquellos que han participado, les deseo a todos un hermoso dia!!!
Have a nice day!

Marisa:)


Thursday, February 7, 2013

Let's make a Shopping Bag for Valentine's Day


I just finished this shopping bag a few days ago, I've done this kind of bags before but this time I took pictures to share with you the tutorial.


Actually I don't know whether to say Shopping bag or if there is another
name for this type of bag, the fact is that is a bag unlined but where the
interior is neat, to achieve this I used the French seam. It is a bag that
is quick to make, is practical, and we can carry this practical bag in our
handbag.
 
 
There are two ways to do it, either by cutting two fabric rectangles or one.

First you have to determine the final measure of your shopping bag, my
shopping bag measures 13 "wide by 17" in length. If these measures are
appropriate to you, then you can follow the steps that I used in my
tutorial, but I want you to know that with my explanations you can make a
shopping bag with the measure you want.


1) Cutting the fabric
 
If we do it with a single rectangle of fabric


a) The width
 
The width of your bag +1"
 For  my shopping bag, my final measure is 13" +1" = 14 "
 
b) The  length
 
the length of your bag, two times + 4"
My measures , 17"+ 17" + 4"= 38"
 Briefly I will cut a piece of fabric of 14 "x 38"


If we do it with two rectangles of fabric
 
a)The width
 
The width of your bag +1"
My final measure, 13" +1" = 14 "
 
b) The  length

The length of your bag + 3"
In my case, 17" + 3"= 20"
I will cut two rectangles of fabric that measure 20" x14"
 
 
2) Ironing the top edge
 
Fold the top edge 1" down, iron, fold again and iron.
Leave as it and move to the next stage.


3) Sewing ( the French seam)
 
Lay your fabrics wrong sides together  matching raw edges.
Do not forget to open the top edge that we had previously ironing, I just
ironed it for future reference later, when I will do the sewing of the
straps, make sure that all the raw edges matching!!
Pin edges together and sew with 1/4" seam, then trim seam allowance to
1/8", don't cut into your stitches, press.

 
I decided to use my serger


4)Turn inside out

Turn the bag inside out , now  the fabrics will be right sides together,
press and stitch in a 1/4" seam,  you have to enclose the trimmed seam
allowance. Since I decided to use a serger, I have no need to trim the
edges


I want to share a tip with you , look at this photo, is the Edge Stitching
Foot, this is a foot that I use regularly. This foot has a flange on the
side for guiding the fabric, we just have to adjust the needle position and
we will get perfect seams along the edges of the fabric.In this case I
position it to sew, to 1/4'' from the edge.
 
 
I have to confess that I use this foot  all the time !
 
(Back to our project
Turn the bag right side out.
I cut two straps of 21 ", and fold at 3/4" from the edge.


Now the explanation it will be easier with the photos, remember that we had
ironed the top edge twice, ok, now that the french seam is finished, we will
re-fold the top edge twice and secure it with pins.


The next pictures will show you , how I put the straps on the top edge:


I put the straps 3 "from the sides
 
 
Once both straps are fastened to the front and the back, we will sew.


While this shopping bag is easy to do, try to write a tutorial for two ways
to do it, it  was a bit difficult for me. I added several photos to help you to
understand, hope I succeeded!
 
These shopping bags were a commission for the deaf center who frequent my
parents, that's why I embroidered the letters of the sign language. They
are red because they are a gift to people who frequent the center, on
valentines day.
I decided to give them a festive touch and made ​​some tags to decorate them.
 
 
I do not want to bore you with more explanations, but I want to share with
you the way I did the tags, here are photos I took , I think it will give
you an idea about the steps that I did.
To begin, I used the corrugated board, which comes in boxes to protect
fragile materials and here you will see the steps...


In the other hand ,I'm having fun with my memories scrapbooking software, I
made another photo montage.
Do not forget that the giveaway for this software remains open until
February 13, it is so easy to use and when it's free why not take
advantage?
 
 
The link where you will find the information  for this giveaway is here.
 
 
I hope you enjoyed this tutorial, I tried to do the best I could. If there
are spelling mistakes, I apologize, I also tried to do my best, my first
language is Spanish and I learn English with all of you.
I look forward to your comments.
Have a nice day!

Marisa :)


Wednesday, November 28, 2012

Let's make a scarf using water soluble stabilizer, threads, ribbons and yarn.

This month Rikka from Ricochet and Away is hosting another challenge, this time the challenge is to make a scarf. There are several guide lines to respect in order to participate in this challenge, that's what I like!
One thing is certain again: in this challenge  I will be out of my comfort zone, I love this!
While there are several guide lines  to respect, I'll just mention two of them, because for me, it is these conditions that led me to think about the kind of scarf that I will create.
 
 
# While crocheted and knitted scarves are wonderful, they will not permitted as
entries.
# You must try something new when making your scarf
 and be specific about what you tried.
 
From here I tried to think of something that I have not done until now, I
remembered a technique where we could create a fabric using water soluble
stabilizer, wool, yarn and fabric scraps, and then we can create a scarf.

My project ended well, here I show you the pictures of my finished scarf:


Rikka  has added a variety of links and photos to create scarves, if you look for
inspiration, I invite you to visit her blog, this is the link. Look also in the
previous post, you will be surprised of all the possibilities that exist to make
scarves.
If you still want more inspiration, there is a board  on Pinterest, where you will find all kinds of scarves, this board was created for this challenge, this is the link.
 
If you wish to participate in this challenge there is time until 30th November for
register  and to do the project, here I added the botton for the challenge, you
just have to click on the site and you will go directly.


I took pictures while I was doing this scarf with the idea of creating  a tutorial
for you, maybe someone in this cybernetic world wants to make a scarf like this, I
think that a scarf  can be a nice Christmas present for a loved one.
 
Let's get started, not many materials are required for this scarf, the base is the
water soluble stabilizer, I used Dissolve-A-Way Max, is the one I had on hand and
gave me very good results when it was time to rinse my scarf to dissolve the
stabilizer. We also need thread, yarn, ribbon and wool, in reality you will choose
the materials after you see the technique.

These were my materials to start
;
 
 
To begin I cut 60 "length of water soluble stabilizer and with a fine line
permanent ink marker I drew lines to create a grid in only half of the stabilizer,
in my case the stabilizer is 12 "wide, this means that my grid is 6" wide.  I used
this grid as a guide for my sewing


I Took the first fiber (do not know what to call it, it is not wool), I used the 
Cord foot, using the same color thread in the bobbin as on top, I scheduled my
running stitch to a length of 2.0 and started sewing. The first thing I did was
leave  a length of about 6 "away from the edge and start sewing the fiber along the
 grid, alternating materials, sometimes a fiber, sometimes the ribbon.

I forgot to tell you that I used a universal sewing needle, number 80.


Then I started to sew the ribbon widthwise, I did one side and always leaving the
needle down, I was turning the stabilizer to go from side to side always following
the grid.


Now I fold the water soluble stabilizer in half  and place it over the scarf.


Then, I turned my scarf to keep in front of me, the side that has the stitching.
 
Always using the same color thread in the bobbin as on top, I added decorative
stitches, you can include several lines of sewing, it is important to fill in your
grid squares. You have to overlap the stitches to hold them together.
 

added more yarn at the end, trying to fill all the spaces

 
finally place the scarf  in water to dissolve the stabilizer,
 
 
then set it to dry, I place it on a towel to let it dry overnight. Here it is ready to be used
 
 
The result will vary from one scarf to another, depending on
 the variety of colors, textures, thicknesses of the yarn that we will use that we use,  there is an expression that I really
like and it is, what if? and in this project I asked myself that question all the
time.
 
I hope you have enjoyed this project and I also hope to receive your comments, if
you liked this tutorial, I invite you to become a follower of this blog, and for
those who already are following me, I say thank you for following me on my
adventure.
 
Have a happy sewing day!
Marisa :)


I'm linking this project to Threading My Way, Creating my way to Succes, Skip to My Lou, Sew Chatty , delicate CONSTRUCTION, Mine for the Making, Make It War It, The Chicken Chick( Clever Chicks Blog Hop #15) and  Trendy Treehouse.

LinkWithin

Related Posts Plugin for WordPress, Blogger...