Showing posts with label recycling jeans. Show all posts

Thursday, September 11, 2014

Repurposing an old pair of denim to a bag.

With great joy and enthusiasm I am again in this beautiful world of blogger. The summer has gone so fast, I have not had time to do what I like ... share my creations with you  and visit my blogger friends.
I  was knitting, crocheting and sewing. I have several projects in my camera, and I'll upload them to the blog in the coming days
Today I want to show you my new bag, I made ​​it from an old pair of denim.


I did it with the idea of selling it, I always have this dream of opening my Etsy shop, hopefully I can make that dream this year.
At the end of the photos, I'll give the link to a You Tube video that helped me make this beautiful bag. What you will need is a pair of jeans, a shirt and a bit of inspiration.
Here are the photos I  have taken  today to share with you, I hope you like them!


If you want more ideas for recycling jeans, my bloggy friend Pam from Threading my way's blog wrote a post in which there is a beautiful variety of projects, with much honor I can tell you that you will find three of my tutorials.
 
Here is the link to the post.


Con mucha alegría y entusiasmo estoy otra vez en este hermoso mundo de blogger.
El verano ha pasado  muy rápido,  no he tenido tiempo de hacer lo que mas me
gusta...compartir con ustedes mis creaciones y  visitar mis amigos bloggers.

Estuve tejiendo, haciendo crochet y también costura. Tengo varios proyectos en
mi cámara  de fotos,  y los voy a subir al blog en los próximos días.

Hoy les quiero mostrar a ustedes  mi nuevo bolso, lo hice a partir de un viejo par de jeans.


Lo hice con la idea de venderlo , yo siempre tengo ese sueño de abrir mi Etsy
shop,  ojala  ese sueño  lo pueda realizar este año.
Al final de las fotos,  les daré el enlace hacia un video de you tube que me
ayudo a confeccionar este hermoso bolso. Necesite un par de jeans, una camisa y
un poco de inspiración.
Aquí  van  las fotos que tome hoy para compartir con ustedes, ojala les  gusten!
 
Si quieren mas ideas para reciclar jeans, mi amiga Pam del blog Threading my
Way escribió  una publicacion en la  cual hay una hermosa variedad de proyectos, con
mucho honor les puedo decir que ustedes encontraran tres de mis tutorials en su publicacion.
 
El enlace hacia el video en You Tube esta AQUI


Les deseo un hermoso dia, les agradezco por su visita y espero con muchas ganas
sus comentarios.


I wish you a nice day, thank you for your visit and am looking forward to
your comments.
 
Have a happy sewing day!
 
Marisa


I'm linking to Crafty Allie Pinterest Party and Threading My Way( bags and totes link party).
I'm linking also to Patchouli Moon Studio, The button to visit the party is at the end.


Patchouli Moon Studio's Weekend Link Party

Friday, January 24, 2014

The Sling Bag...is a free pattern!

 
I want to show you my new creation!
 
Les quiero mostrar mi nueva creación!


Some elements were necessary in order to make it, a pattern and a designer who 
allow me to change its pattern, a pair of jeans and my imagination.
I was lucky to be part of Samantha's pattern testers because this time Samantha 
gave us freedom to modify her pattern, it was then, that I decided to recycle a 
pair of jeans.
 
Samantha is a wonderful designer; you can find her on her blog At Home with Mrs.  H, where she shares with us interesting articles, sewing tips, and much 
more.
 
Good news!!! The pattern is free and I'll give you the link at the end of my 
post.
 
 
Varios elementos fueron indispensables para hacerla, un patrón  y una diseñadora
 que me permitiera modificar su patrón,   un par de jeans y mi imaginación.
 
 
Estoy contenta de formar parte del grupo de personas que prueban los patrones 
de Samantha en particular esta vez,  pues   Samantha nos dio libertad de 
modificar su  patrón, fue así que yo decidí  transformar un par de jeans en un 
bolso.
 
Samantha es una magnifica diseñadora, ustedes la pueden encontrar  en su blog
At  Home with Mrs H, donde comparte con nosotros artículos interesante, trucos de 
costura,  y muchísimo  más.
 
Este patrón es gratis y les dejare el enlace al final de mi post.

Todo comenzó con este par de jeans.


It all started with this pair of jeans.
 
About the pattern:
I added 2" to the length to  the pattern Top pattern.


Acerca del patron:
 Lo primero que hice fue agregar 2 pulgadas a la parte superior del patrón A.


Then position the pattern on the jeans to determine the length needed to make 
the bag.


Luego posicione el patrón para determinar el largo que necesitaba para hacer el 
bolso.


On the back I drew the cut lines, one in the middle of the leg and another   to 
determine the length I needed.


En la parte de atrás yo dibujé  las líneas de corte, una en el  medio de la 
pierna y la otra linea para determinar  la parte de arriba.


Here I show you pictures of the section I cut and how I have positioned the 
pattern.


Aquí les muestro fotos de la sección que corté y como posicioné el patrón.


Then I followed the instructions of the pattern, up the time when we need to 
attach the side tabs.
 I placed my tab 5 " from the top and I also moved the tab about 3" from the 
side, I hope that with my picture you will understand!


Luego fui siguiendo las instrucciones del patrón, hasta el momento en el cual 
tenemos que colocar las pestañas de los costados ( the side tabs) yo las 
desplace y las coloque a 5 pulgadas del borde superior y las corrí hacia el
frente del 
bolso, más o menos 3 pulgadas de las costuras laterales. Espero que con la foto 
lo vean todo más claro.


Then I followed all instructions to the end.


Luego seguí con todas las instrucciones hasta el final.
 
 
 In the end I decided to make a flower to give a focal point, I used the same 
fabric as the inner lining to keep the same theme in the colors.


 Al final decidí hacer una flor para dar un punto focal, usé la misma tela que el
 forro interior  para guardar el mismo tema en los colores.


Here is the final result!
Aquí está el resultado final!


Make this bag was an experience that gives me a great pleasure.
Something else... this pattern is free, Samantha generously shares it with us 
and it's available for download now, only from Craftsy. Here is the link.
 
It is a pattern created for beginners, where you can learn various sewing 
techniques, how to create a zipped pocket, how to sew a slip pocket, how to 
install a magnetic snap and how to do an adjustable strap.
I would advise you to visit Samantha's blog, here is the link, and you will be
able  to see the creations that has been made by other testers and also my bag.
 
I hope you have enjoyed this post and that you liked my recycling project,
transforming old jeans in an original bag.


Otra cosa este patrón es gratis, Samantha lo comparte generosamente con nosotros
 y lo pueden obtener aquí en su Cratsy store.
Se trata de un modelo creado para los principiantes, donde se puede aprender 
diversas técnicas de costura, cómo crear un bolsillo con cremallera, cómo coser 
un bolsillo, cómo instalar un broche magnético y cómo hacer una correa 
ajustable.
Yo les aconsejo visitar el blog de Samantha, aquí queda el enlace, allí podrán 
ver las creaciones que han hecho los otros testers.
 
 
Espero que hayan disfrutado de este post y que les haya gustado mi proyecto de
reciclaje,  transformando viejos jeans en  un bolso original.


Nos vemos pronto.
 
See you soon!!!
 
 
Marisa :)
(One day I will create a beautiful signature to my posts)
(Un dia voy a crear una linda firma para mis publicaciones)


 I'm linking this bag to Fluster Buster and Crafty Allie .


Fluster Buster

Wednesday, January 9, 2013

Let's sew a needle case using recycled jeans!

Happy 2013, one year that begins and many projects that I have in mind for this year. My list of things I want to  do keep growing and growing and those who will follow me along this new year will see the variety of projects that I will make.

My first project this year, is this needle case that actually I started last year . I think actually the name would have to be a needle book, you will see why, when you will see the photos
This is the front
 
This is the back
 
The inside of my needle case


It all started with the idea of ​​recycling this pair of jeans, when my daughter gave them to me because they did not fit, the first thing I noted was the beautiful pockets, and I have kept them with the idea of creating something whenever inspiration would come. 
 
Look that beautiful pockets!!!!
Analyzing the various parts of this short I found the pieces I wanted to use
 
First stage disassemble all the parties I will be able to use later.
 
 
First, I used the back pockets to create a piece of fabric,  that will become the front and the back side of my needle case.
 The measures do not matter as it depends on the design of the pants,  you can cut a  bigger or smaller piece or just cut two squares. Just to give you an idea, my pieces  are 8 "x9".
 
I cut the two pieces  and between them I sew  a strip of fabric 2.5 "wide.
 
 
Then I started to embellish my project, I used my embellisher machine to add some  roving wool and I also added some scraps of fabric.
 
 
To make the inside of the needle book, I took the measure of my external part already finished, and cut a piece of red fabric with the same measures. I think the contrast of colors is nice. On one side of the needle case I decided to make a pocket, with, what  it was before, the zipper of the pants, and added another pocket I had from another pair of jeans.
 
 
 Now I have the outside and the inside  ready to sew them together .
 
 
Before sewing them together, I cut a piece of interfacing, because I wanted to give a little stiffness to the outside of the needle case and  also sew a button .
 
 
Take the two pieces, place right sides together, aligning the row edges, added a
hair elastic in between the outside and inside of the opposite side to where I
added the button and sew, leaving 4" or 5" of the bottom open.


Turn right side out by pulling the fabric through the opening , and sew the
opening, I did with my sewing machine.

For the inside I just added two sheets of felt I had, cut them to fit the measure of
my book and sewed with the machine.


I have sewn them in the center, in the place that would be the spine of a book, simply by using a running stitch.


Everything is now ready to fill it with  needles and other sewing accessories,
I show you the final photos.


If any of you makes this project I would like you to share it with me, and if you
publish your creation on your blog I would appreciate if you can add a link back to this article.


I hope you enjoyed this post, for my part, I enjoyed it immensely while I was creating this needle case, the beauty of these projects is the improvisation, everything can be used and I guess you will agree with me, recycle, reuse and repurposing is the best gift we can give to our planet!

Have a nice day!!!!!
Marisa :)


These project was featured at Craft Gossip
 
They are talking about me at CraftGossip.com
 
 
and also at Totally Tutorials !!!
  
Totally Tutorials Blog

Monday, September 17, 2012

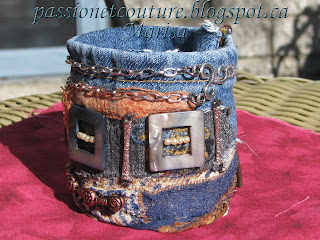
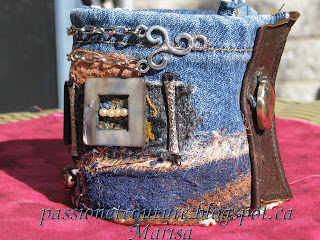
Let's sew a textile cuff using a pair of old jeans.


Whenever I do the sewing hems of the jeans for me or for my family, I have the habit of saving those snippets, always with the idea that I'll use them for something. This time I decided to turn them into a textile cuff.


With this project we can use every little scrap of fabric that we have saved and do not really know what to do with, I think you already know me, so you know that I am able to use up the little ones to create something. This is a confession, yes! I love using scraps,  but I think you already  know that.

I found these pieces of hem jeans and decided to give them another life
 
I also decided to get my embellisher machine out of the closet and putting it to work.
The first thing I did was remove the side seam.
 
 
Right now I take my wrist measures, I add two inches and cut the ends.
If you are going to make one for you, you have to  decide whether you want a closed cuff or a loose cuff. You have to think what kind of closure will be placed and from there cut the required length
 
I chose two different pieces, I put up the smallest piece,  and I sat in front of my embellisher machine to start my creation.
 
I decided to add threads
 
Before starting the felting, I placed a small piece of watersoluble stabilizer above the threads
 
I started using my embellisher machine
 
I added other pieces of fabric on top and sides and continue felting
 
I started auditioning decorative elements, once I decided, which one I liked more, I've sewn in place
 
At the extremes of the cuff I decided to put a few pieces of leather scraps, leftovers that I have from an old coat .... I recycle everything
On those pieces of leather I'll add a button and a buttonhole and that will make my closure, but you could use snaps,a button and a loop, it is your choice.
 
I kept adding decorative elements


You can add what you want, beads, chains...,the secret is to auditioning the different materials,  one trick I have is that I select some elements and take a photo, change for others and took another shot, and finally, looking at the photos I took, I made ​​the decision to which of them  I like more.


To make the back side, I use the other half of the jeans, and I hand-stitched.


And here's my completed piece!! I'll show you some close up, I love the result and I'm ready to start making a few more!


I hope you've enjoyed these explanations and hopefully you will be encouraged to make one.
I would love to see your photos.
 
In the meantime I am finishing the pillowcase for my bedroom, I can not wait to finish them and share them with you, my only problem is time. Where does the time go?
 
I hope you enjoyed this tutorial, I always appreciate your comments and I always hope that this blog continues to grow with new followers, do not hesitate, you are welcome!!
 
I'm linking this textile cuff to Skip To My Lou , to Positively Splendid, Five Days...5 Ways, Threading My Way,  and to Creating my way to Succes, Link party.

Have a happy sewing day!!!!!
Marisa


LinkWithin

Related Posts Plugin for WordPress, Blogger...