Showing posts with label yarn couching tutorial. Show all posts

Wednesday, February 29, 2012

An embroidery using Angelina fibers

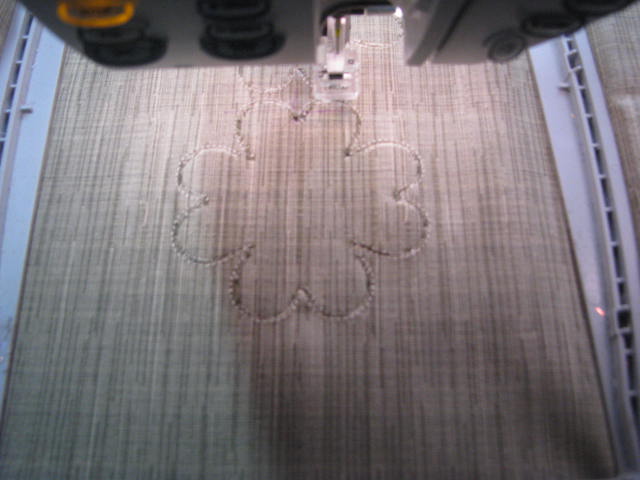
As promised in my previous post here are the photos I took while I was doing the embroidery of the cover for my Brittany bag. I used the 235 disc from Husqvarna, yes again!!!  I have to admit that I love using this disc because it has so beautiful embroidery designs, but this time I wanted to go a little further and I used the yarn couching feet and some Angelina fibers, I have to say that everything was sew on vinyl, and fortunately the couching foot has not caused me  problems.
The Angelina that I have used is from Embellishments Galore. Genene owns that site and she  is the moderator of another yahoo group I belong and whom I adore, this is the link if you want to join the embellishment galore yahoo group click here .
Comme promis dans mon précédent post voici  les photos prises pendant que je faisais la broderie pour mon sac. J'ai utilisé le disque 235 de Husqvarna, oui, encore! Je dois admettre que j'aime utiliser ce disque parce qu'il a des de si beaux motifs de broderie , mais cette fois je voulais aller un peu plus loin et j'ai utilisé le yarn couching et quelques fibres d' Angelina, je dois dire que tout a été cousus sur vinyle, et heureusement le yarn couching feet ne m'a pas causé aucun problème.
L'Angelina que j'ai utilisée est de  EmbellissementsGaloreGenene possède ce site et elle est le modérateur d'un autre Yahoo groupe  que je fais partie et que j'adore, si vous voulez rejoindre le Yahoo groupe  Embellissement Galore  cliquez ici
Je vais vous montrer comment j'ai fait pour utiliser les fibres d'Angelina, mais gardez à l'esprit qu'il existe de nombreux tutoriels sur le web qui expliquent comment l'utiliser, il vous suffit d'écrire Angelina Fibers tutorial dans Google bar et vos aller trouver d'excellents renseignements.Un site que je conseille est Embellishment Village, ils ont plusieurs vidéos très intéressantes.


I'm just going to show you how I did to use the Angelina fibers, but keep in mind that there are many tutorials on the web that explain how to use it, you just have to write Angelina Fibers tutorials in Google bar and go to some great information. One site that I would advise is EmbellishmentVillage, they have some very interesting videos.
 I started using a Teflon sheet, inside I put some Angelina fibers, and then I used the iron at low temperature to merge all, for this embroidery design you need to create a piece of 20x10 cm with the Angelina.


J'ai commencé avec une feuille de téflon, à l'intérieur j'ai mis quelques fibres d' Angelina, puis j'ai utilisé le fer a repasser à basse température pour fusionner tout, pour ce motif de broderie vous avez besoin de créer un morceau de 20x10 cm avec les fibres Angelina.
Ici sont mes fibres de Angelina fusionnées et prêt à être utilisés comme un appliqué
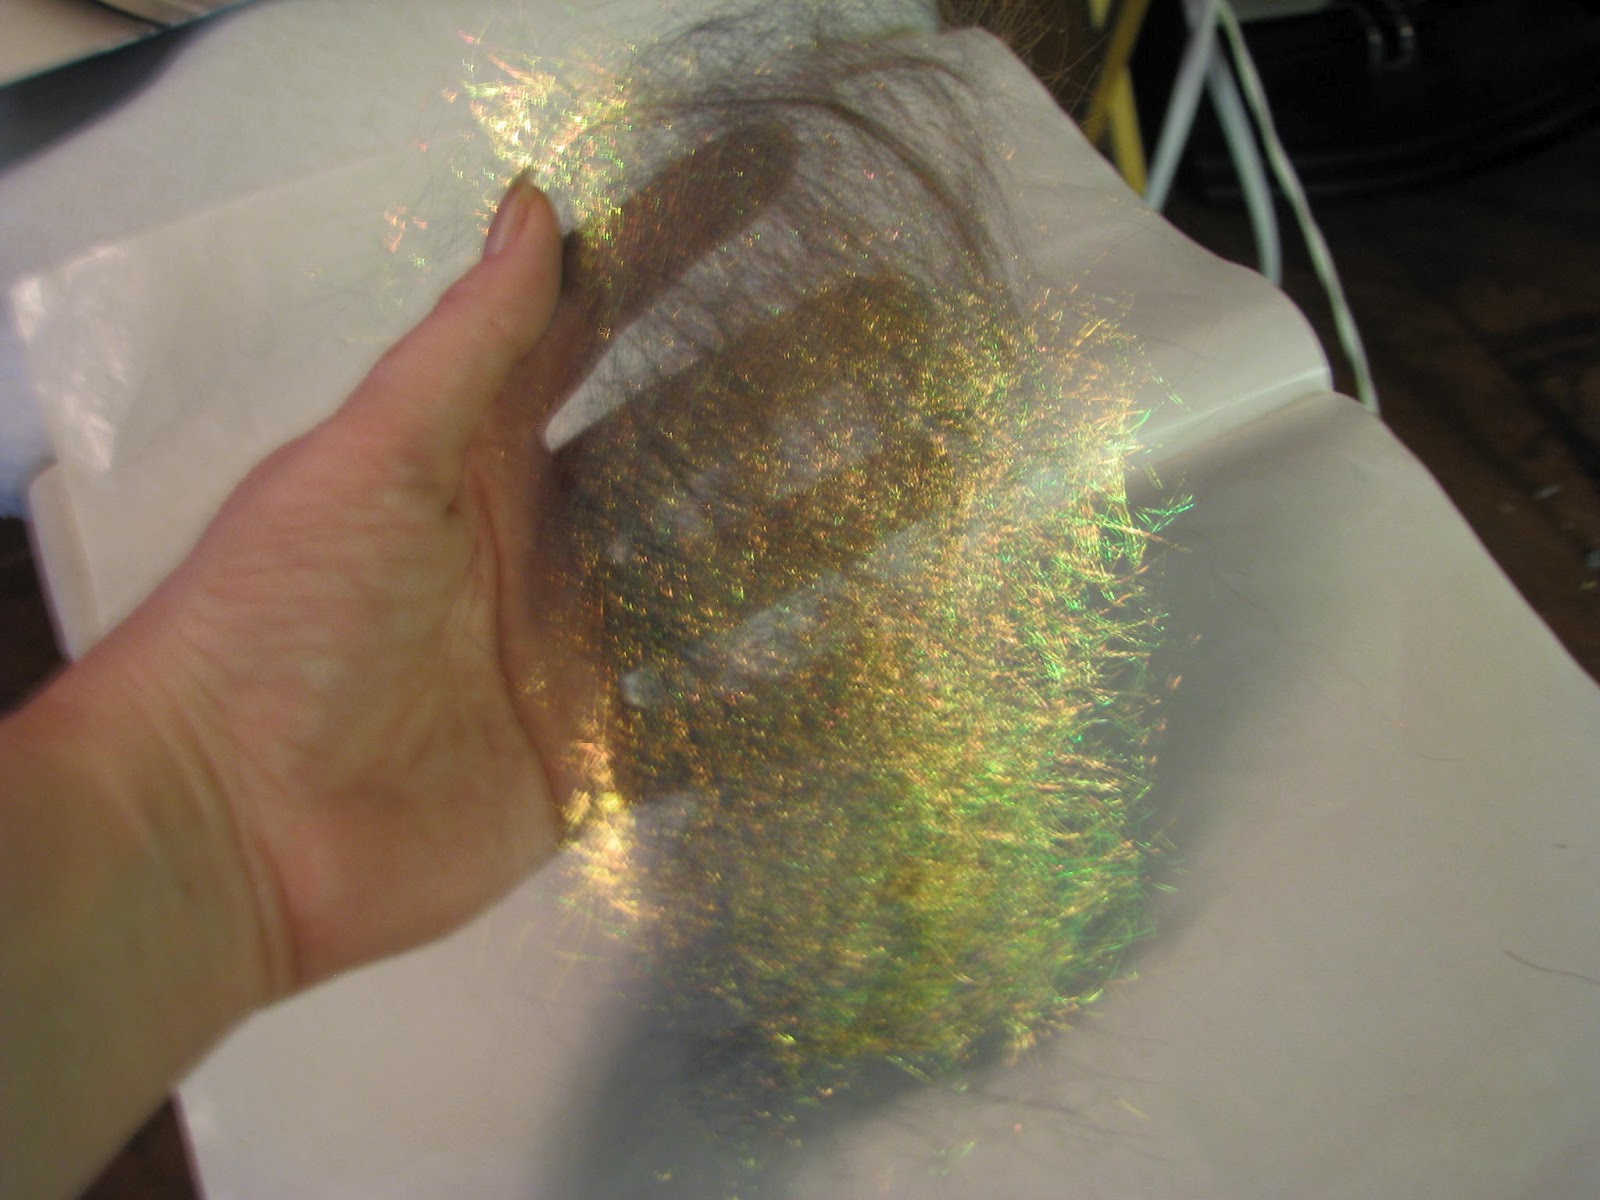
Here are my Angelina fibers, ready to be used as an appliqué.
 What I find when I work with  the  Angelina is that according to the temperature of the iron and according to the time that we are ironing, is going to be the end result. I discovered that the longer we stay with the iron on the Angelina  , is going to be brighter. I encourage you to looking inside the Teflon sheets often to see how everything is merging and stopping as soon as we like the result.
Ce que je trouve quand je travaille avec l'Angelina, c'est que selon la température du fer a repasser et en fonction du temps, ça va être le résultat final. J'ai découvert que plus longtemps nous restons avec le fer sur le Angelina, plus elle va devenir brillant. Je vous encourage à regarder à l'intérieur des feuilles en téflon souvent pour voir  la fusion des fibres et arrêter dès que nous aimons le résultat.

Let's start
 First I Hoop 1 layer of tear away stabilizer and then to attach the vinyl to the stabilizer I used a   temporary spray adhesive (I always use the 505 Temporary fabric adhesive, I like it because the needle is not sticky when I use this type of adhesive), then I put the hoop in the machine and I'm ready to star.

Commençons
Pour commencer mettre un entoilage de type cut away  dans le cerceau  et puis pour attacher le vinyle au entoilage j'ai utilisé un adhésif temporaire (j'ai toujours utiliser la colle 505 , je l'aime parce que l'aiguille n'est reste pas collante quand j'utilise ce type de colle) , puis j'ai mis le cerceau dans la machine et je suis prêt à commencer.
Color 1
Skip it. L'ignorer, nous passons à la couleur  2
Color 2
I started my embroidery by skipping the first point, a matter of avoiding holes in the vinyl. When the machine finishes this color, we will have a guide that will tell us where to position the fabric, in our case the Angelina.


J'ai commencé ma broderie en sautant le premier point, une question d'éviter les trous dans le vinyle. Lorsque la machine termine cette couleur, nous aurons un guide qui nous dira où positionner le tissu, dans notre cas, la Angelina.


 Now remove the hoop from the machine. Let's put the  Angelina ( a piece of 20x10 cm ) on the hoop (to hold the Angelina in place I use some tape).


Maintenant retirez le cerceau de la machine. Nous allons mettre l'Angelina (un morceau de 20x10 cm) sur le cerceau, pour maintenir le Angelina en place-je utilisé du ruban adhésif.


Color 3
The machine will return to do a running stitch. When the embroidery with this color   is finished, remove the hoop and trim the excess of Angelina as close as possible to the line you just created .


La machine va faire une autre fois le  point droite. Quand le couleur 3 est terminé, retirez le cerceau et coupez l'excédent d'Angelina aussi près que possible de la ligne que  vous venez de créer avec la machine.


Color 4
It will repeat the same steps but on the other side, first the machine will create a guide with the running stitch and then we remove the hoop to trim the excess


permettra de créer un guide avec le point droite, puis on enlève le cerceau pour couper l'excédent. Il répète les mêmes étapes, mais de l'autre côté, tout d'abord la machine


Color 5
At this stage the machine will fix the angelina on vinyl, remove the hoop and then trim the excess .


A ce stade, la machine va fixer le angelina sur le vinyle, retirer le cercle, puis coupez l'excédent.


Color 6

                                                It does all the rest of the embroidery.
                              
                                            La machine  fait tout le reste de la broderie.
Color 7
It's time to install the accessories to use the  yarn couching feet. To know something more about this feet I invite you to look at my previous publication, click  here

Il est temps d'installer les accessoires pour utiliser le yarn couching feet. Pour en savoir quelque chose de plus à propos de cette pieds je vous invità regarder ma publication précédente, cliquez sur ici.


The embroidery is already finished, I hope you liked the tutorial. I always try to make it as clear as possible. I make my tutorials in English and French since I live in Montreal,  Quebec and our language is French and I want to share my blog with  many people as possible. When I started using my embroidery machine  I was fortunate to have classes with my dealer and over the years I took more classes to be able to learn different techniques, I learned from a lot of people around me, and that is why I decided to create this blog, because I thought that I received so much that  now it is my turn to give and share what I have learn.

Thanks for visiting my blog, I hope you liked the tutorial.
Do not forget to leave comments, I love receiving them!!!!!
I wish you all a happy sewing day!!!!!


La broderie est déjà fini, j'espère que vous avez aimé le tutoriel. J'essaie toujours de la rendre aussi claire que possible. Je fais mes tutoriels en anglais et en français puisque je vis à Montréal, au Québec et notre langue est le français et je veux partager mon blog avec beaucoup de gens que possible. Lorsque j'ai commencé à utiliser ma machine à broder j'ai eu la chance d'avoir des classes avec mon vendeur et au fil des ans j'ai pris plus de classes pour pouvoir apprendre différents techniques , j'ai appris à partir d'un grand nombre de gens autour de moi, et c'est pourquoi j'ai décidé de créer ce blog parce que je pensais que j'ai reçu tellement que c'était maintenant mon tour de donner et de partager avec vous.
Merci pour avoir visité mon blog, j'espère que vous avez aimé ce tutorial .
Je vous souhaite de passer une belle journée et à la prochaine.

Friday, November 18, 2011

The Embroidery Cutwork Needle Kit and the Yarn Couching Feet set


THE BRITTANY BAG

Aujourd'hui, je vais partager avec vous un autre sac que j'ai fait avec plusieurs caractéristiques intéressantes. Le concept de ce sac a été créé par Carolyn, la propriétaire du site  anembroideredaffair, a l'interieure du  sac on a 12 poches et une poche avec zipper, en plus  il a une  particularité, nous pouvons changer sa couverture, quelque chose de vraiment pratique.


Today I going to share with you another bag that I did with several interesting features. The concept of this bag was created by Carolyn, the owner of the site anembroideredaffair, this bag not only  have 12 pockets and a zipper pocket inside, it has the distinction of being able to change the cover, something really practical.


Si vous êtes intéressé, et vous voulais acheter le patron, cliquez ici pour aller directement au site  anembroideredaffair, le patron est tres  facile a suivre et il y a beaucoup de photos, ce qui m'a permis de faire le sac sans aucun problème, Carolyn a dans son site de jolis sacs, de nombreux produits et de très bon service. Je n'ai aucune affiliation avec elle, je suis juste une cliente très satisfaite. Elle est également le moderateur du anemboderedaffair yahoo groupe,  j'appartiens à ce groupe et tiens a vous dire que dans le group il y a des membres actifs et tres généreux.


If you are interested in the pattern click here to go direct to the site anembroideredaffair, the pattern have very clear explanations and a lot of pictures, which allowed me to make the bag without any problem, Carolyn has several beautiful bags, many products and a very good service. I have no affiliation with her, I'm just a very satisfied customer. She  is also the moderator of the anemboderedaffair yahoo group , a group that I belong and where we found active and generous members.


En ce moment je seulement pu finir un cuverture pour le sac, et je veux partager avec vous les étapes que j'ai effectué pour réaliser la broderie.


At this moment I've only finish one cover for the bag, today I want to share with you the steps I performed to achive the embroidery.


  The Embroidery  Cutwork Needle Kit   and  the  Yarn Couching Feet set
                                                   The couching feet set


The set comes with two embroidery feet, we  will going to choose one of them depending on the thickness of the wool( small and large ),the kit also has a yarn threader,2 sets of yarn guides, yarn samples and a cd with a free design.

This is a link ( click here),  that will lead to a you tube video where you may see this kit in action with a husqvarna machine and this is another one (click here ) to see the kit on a pfaff machine.If you want a  pdf tutorial , click here
                                                   
L'ensemble est livré avec deux pieds de broderie, nous allons choisir l'un d'eux en fonction de l'épaisseur de la laine (petites et grandes), le kit a également un enfileur de fil, 2 jeux de guide-fils, des échantillons de fils et un CD avec un motif de broderie pour vous pratiquer.

  Ceci est un lien(cliquez ici), qui va conduire à une vidéo sur You Tube où vouspouvez voir ce kit en action avec une machine Husqvarna, et un autre ( cliquez ici)i pour voir le kit sur une machine Pfaff. Voici un autre tutorial mais une version pdf, cliquez ici 

Let's start... The embroidery design that I used  in this  project is the number 7 from the Husqvarna 235 disc.
We also need some water soluble stabilizer (Aqua-magic and Ultra solvy,  I used both), an embroidery needle #75, an embroidery foot, the couching feet set, the Embroidery Cutwork Needle Kit and wool.


Ici commence le  plaisir ... Le motif de broderie que j'ai utilisé dans ce projet est le numéro 7 du disque.235  de Husqvarna .
Nous avons également besoin d'un entoilage soluble dans l'eau (Aqua-Magic  et Ultra solvy, j'ai utilisé les deux), une aiguille à broder n ° 75, un pied à broder, le couching feet set , le kit de Cutwork needle  et de la laine.

J'ai préparé le cerceau avec une couche d'entoilage  soluble dans l'eau (Aqua-Magic) et le tissu à broder. J'ai également préparé deux  bobines avec le même fil que je vais utiliser pour la broderie.


I prepared the hoop with 1 layer of water soluble stabilizer ( Aqua-magic ) and the fabric to be embroidered. I have also prepare   2 bobbins cases with the same thread that I will use for the embroidery.


COLOR 1
skip it, when  I began the embroidery I went directly to the color 2 since the first color
is for the positioning of the embroidery if we want to use the endless hoop.
l'ignorer, quand j'ai commencé la broderie je suis allé directement à la couleur 2, la première couleur est pour le positionnement de la broderie, si nous voulons utiliser le endless hoop.


COLOR 2
The embroidery really begins, and now we must be sure that it is the same thread that we're using to embroider than the one in the bobbin case. When we end to embroider with the color 2, the machine is going to stop and is going to warn us that there is a change of color, at this moment we have to change the embroidery needle for the first needle of the  cutwork needle kit which is the red needle.


La broderie commence vraiment, et maintenant nous devons être sûrs que c'est le même fil que nous utilisons  pour réaliser la broderie  que celui de la canette. Lorsque nous finissons de  broder avec la couleur 2, la machine va s'arrêter et va nous avertir qu'il ya un changement de couleur, ce à  moment que nous allons  changer l'aiguille à broder pour la première aiguille du kit de Cutwork , nous allons installer l'aiguille rouge du kit.

COLOR 3
 Before starting this color you should not forget to remove the thread completely because we going to use the cutwork needles. Take the thread away from the machine (do not ask me how I know it). Right now, we must check that we have  changed the embroidery needle for the first needle of the  Cutwork kit,  is the red needle (the needle is going to start cutting the fabric).


Avant de commencer cette couleur vous ne devriez pas oublier d'enlever complètement le fil a broder,  parce que nous allons utiliser les aiguilles de Cutwork.  Laisser  le fil loin de la machine (ne me demandez pas comment je le sais). En ce moment, nous devons vérifier qu'on a changé  l'aiguille à broder pour la première aiguille du kit  de Cutwork  qui est de l'aiguille rouge (c'est l'aiguille qui va commencer à couper le tissu).


COLOR 4

We have to change the needle one more time, it is the moment to insert the  yellow needle from the cutwork kit. At the end of this color and before to start the next  we  going to slide a soluble stabilizer  underneath the hoop, I used ULTRA SOLVY.

Nous devons changer l'aiguille une fois de plus, c'est le moment d'insérer l'aiguille jaune du kit de Cutwork. A la fin de cette couleur, et avant de commencer la prochaine, nous allons glisser un stabilisateur soluble sous le cerceau, j'ai utilisé ULTRA SOLVY.
COLOR 5
Remove the cutwork needle of  and  insert the  embroidery needle and the thread. At this moment the machine is going to make a fix ( to fix the stabilizer that we just added underneath the hoop). At this point your embroidery should look like this

Retirer l'aiguille du Cutwork  et insérer l'aiguille à broder et le fil. A cet instant la machine va faire un fix (pour fixer l'entoilage  que nous venons d'ajouter sous le cerceau). A ce moment  votre broderie devrait ressembler à ceci.

COLOR 6
The embroidery continues...When the machine is going to stop it is the moment to remove the hoop  and  remove the fabric that  was cut with the cutwork needles. The fabric  will be only fixed by some fabric fibers. You can cut only the fabric or the fabric and the aqua magic stabiliser, I removed the fabric and the stabiliser (the aqua magic only, not the ultra solvy )


La broderie continue ... Quand la machine va s'arrêter, c'est le moment d'enlever le cerceau et retirer le tissu qui a été coupé avec les aiguilles de Cutwork. Le tissu sera seulement fixé par quelques fibres du tissu. Vous pouvez couper uniquement le tissu ou le tissu et l'Aqua Magic stabilisateur, j'ai enlevé le tissu et l'entoilage (l'Aqua-magic  uniquement, pas le ultra solvy)


When all the tissue has been removed we will insert the hoop into the machine and continue embroidering.
Lorsque tous les tissus ont été retirés, nous allons insérer le cerceau dans la machine et continuer la broderie.


COLOR 7
The embroidery continues at this time,  the machine will do all the satin stitch.

La broderie se poursuit en ce moment, la machine va faire tout le satin et se terminera la broderie , on va commencer la prochaine étape avec le couching feet.


COLOR 8

We going to use now the Yarn Couching feet set, we have to install the yarn guides in the back of the machine,

Nous allons utiliser maintenant le couching feet set , pour commencer nous devons installer le guide-fils à l'arrière de la machine,


choose and install the foot  depending on the wool, threading the yarn (top-down threading) .


choisir et installer les pieds en fonction de la laine, enfiler la laine  (top-down threading).

Les liens que j'ai ajouté au début de cette publication (pour les vidéos You tube) vont maintenant être pratiques!!!.


This is the beginning, I decided to lower a little the speed of the machine while I was  embroidering  the wool, is not really necessary but I felt safer doing it this way.

The links  I added at the beginning of this publication( for the you tube videos)will now be practical!!!!


La prochaine photo c'est le début de la broderie avec la laine, j'ai décidé de baisser un peu la vitesse de la machine pendant la broderie, n'est pas vraiment nécessaire mais je me sentais plus sûr de le  faire de cette façon.


...and  this is at the end...  
                        
et a la fin vous devriez avoir une broderie qui ressemble a ça
 
COLOR 9
I skip it ,is for the positioning.

l'ignorer, c` est pour le positionnement de la broderie, si nous voulons utiliser le endless hoop.


If you want to print or download this tutorial in English click here.

If you want my first tutorial Embroidery Cutwork Needle click here.
 
Vous pouvez me laisser des commentaires, j'adore les recevoir!!!


You can leave comments, I love receiving them !!!
I hope that you have enjoy the tutorial and  thanks for your visit!!!!!!!!!


LinkWithin

Related Posts Plugin for WordPress, Blogger...