Showing posts with label scraps. Show all posts

Friday, October 4, 2013

Today I want to share with you a beautiful and fast project, also the result of the giveaway...

 
And  the winner of the little bow pleat pattern is...
 
 
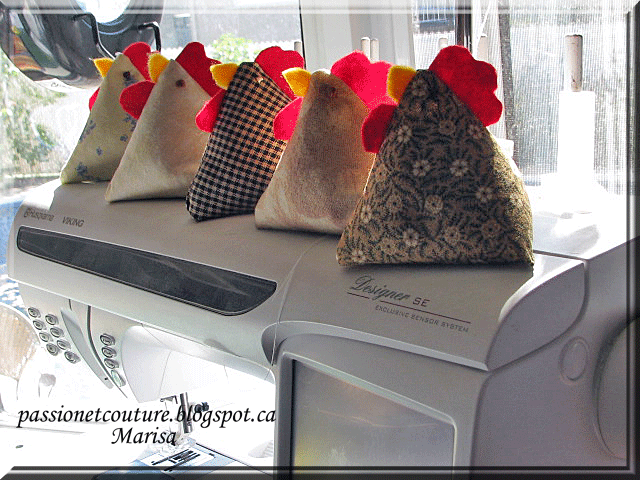
But before giving the result I want to show the little chickens I've been doing.
Actually they are juggling chooks, but I
want to use them  as decoration in my sewing room. 
I filled them with  oat seeds, so as the cooler days begin, I'm going to heat
them  in the microwave and warm my hands with them.
Here I show the pictures I've taken.


Un proyecto hermoso y rapido, tambien  comparto con ustedes el resultado del
sorteo, el ganador del patron de el bolso "the  little bow pleat"  es..

Un momento por favor, antes de darles el resultado del sorteo, quiero mostrarles las gallinitas que he estado  haciendo.
En realidad son para jugar y hacer malavarismo , pero yo las quiero usar como decoración en mi sala de costura. Yo las rellené con semillas de avena, de esta manera cuando los dias frios comiencen, las voy a calentar en el microondas y podré calentar mis manos con ellas.
 Aqui les muestro las fotos que he tomado.


This project is not my idea, I found this project  when I visited
 
As I said earlier is a project that is done very fast, is a way to use fabric
scraps, you only need a rectangle of 10 x 20 cm of fabric ( 4"x8"inches)
The tutorial is well explained, with many pictures that facilitate the
realization of the project, the link to the Red Ted Art's blog is here.
  Here I leave you with more pictures and with the draw.


Este proyecto no es una idea mia, la inspiracion la encontré mientras estaba
visitando el  sitio Red Ted Art's blog 
Como dije anteriormente es un proyecto que se realiza muy rápido, es una manera
de usar restos de tela, solo se necesita un rectangulo de 10 x 20 cm de tela o
4"x8" pulgadas .
El tutorial esta muy bien  explicado, con muchas fotos que facilitan la
realización del proyecto, el enlace hacia the Red Ted Art's blog, esta aqui. 
Aqui los dejo con mas fotos y con el resultado del sorteo.


The winner of the beautiful little bow pleat pattern is...

El ganador de este hermoso patron es ...


I have the honor to congratulate Julie Corbisiero , you are the one who left the comment number 2  !!!!!

"CONGRATULATIONS "

 Julie I will get in contact with you via email, congratulations again!


La ganadora de este sorteo es Julie Corbisiero, tu has sido la persona que dejo el comentario numero dos.
FELICITACIONES
 
Julie voy a entrar en contacto contigo via email !


I want to say thanks again to everyone who participated!!
Gracias a todos aquellos que han participado, les deseo a todos un hermoso dia!!!
Have a nice day!

Marisa:)


Monday, September 17, 2012

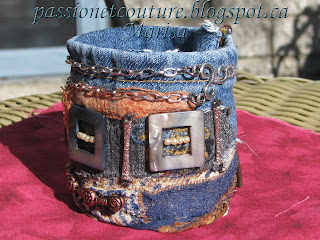
Let's sew a textile cuff using a pair of old jeans.


Whenever I do the sewing hems of the jeans for me or for my family, I have the habit of saving those snippets, always with the idea that I'll use them for something. This time I decided to turn them into a textile cuff.


With this project we can use every little scrap of fabric that we have saved and do not really know what to do with, I think you already know me, so you know that I am able to use up the little ones to create something. This is a confession, yes! I love using scraps,  but I think you already  know that.

I found these pieces of hem jeans and decided to give them another life
 
I also decided to get my embellisher machine out of the closet and putting it to work.
The first thing I did was remove the side seam.
 
 
Right now I take my wrist measures, I add two inches and cut the ends.
If you are going to make one for you, you have to  decide whether you want a closed cuff or a loose cuff. You have to think what kind of closure will be placed and from there cut the required length
 
I chose two different pieces, I put up the smallest piece,  and I sat in front of my embellisher machine to start my creation.
 
I decided to add threads
 
Before starting the felting, I placed a small piece of watersoluble stabilizer above the threads
 
I started using my embellisher machine
 
I added other pieces of fabric on top and sides and continue felting
 
I started auditioning decorative elements, once I decided, which one I liked more, I've sewn in place
 
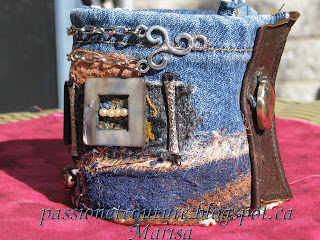
At the extremes of the cuff I decided to put a few pieces of leather scraps, leftovers that I have from an old coat .... I recycle everything
On those pieces of leather I'll add a button and a buttonhole and that will make my closure, but you could use snaps,a button and a loop, it is your choice.
 
I kept adding decorative elements


You can add what you want, beads, chains...,the secret is to auditioning the different materials,  one trick I have is that I select some elements and take a photo, change for others and took another shot, and finally, looking at the photos I took, I made ​​the decision to which of them  I like more.


To make the back side, I use the other half of the jeans, and I hand-stitched.


And here's my completed piece!! I'll show you some close up, I love the result and I'm ready to start making a few more!


I hope you've enjoyed these explanations and hopefully you will be encouraged to make one.
I would love to see your photos.
 
In the meantime I am finishing the pillowcase for my bedroom, I can not wait to finish them and share them with you, my only problem is time. Where does the time go?
 
I hope you enjoyed this tutorial, I always appreciate your comments and I always hope that this blog continues to grow with new followers, do not hesitate, you are welcome!!
 
I'm linking this textile cuff to Skip To My Lou , to Positively Splendid, Five Days...5 Ways, Threading My Way,  and to Creating my way to Succes, Link party.

Have a happy sewing day!!!!!
Marisa


Tuesday, August 7, 2012

How to sew a crazy quilt clothespin bag.

Finally I can share photos of my clothespin bag with all of you, I just want advise you that the clothespin that you see in the pictures is longer than the previous one I showed in my previous publication.


I will upload pictures of the two for you to understand. What happened was that
when I finished sewing the first time the clothespin, I found that it was not long
enough, here are the photos:

This is before

This is after

It was at  the end that I decided to do it longer so,  it took me a few more days to finish this
project, now the clothespin measures 16.5 "and is large enough for all my
chopsticks.

Now that this is explained, I can start with the tutorial
In my previous post I shared with you all the steps that I did before starting to
sew my project. Click Here for the first part of the tutorial. Today I will share with you some photos I took during the creation of my project.

Once I finished drawing my pattern, I began to create my crazy quilt,
and I used the technique which I explained in this tutorial, but I'll show some
stages that I did.

To begin  I cut a 5 sided piece of fabric, and a piece of lace, put one over the
other.


Then I used my technique, SEW, FLIP, IRON and CUT the surplus of fabrics.
I'll show what I mean, I cut a second piece of fabric and I will place this piece
on top of the first piece, wrong sides togheter.


sew using 1/4" seam allowance and trim to obtein a straight edge

Flip the second piece of fabric over to conceal the seam and expose the right side
of the fabrics, and iron.

cut another piece of fabric and repeat the same steps, if you want to add a piece
of trim, what we do is position the trim and match the edges


add another piece of fabric on top of the trim, match the edges one more time

and sew, flip, iron and cut the excess of fabric.
For questions about this technique I invite you to read the tutorial with every
step that I published previously and that is *here*

I put together my crazy quilt in this way, adding pieces of fabric each time and
sometimes adding a piece of lace or trim


Every so often you have to go checking the form that is taking this crazy quilt, to
see how it's going on, to do this I will  put the crazy quilt fabric, on my
pattern, this allows me to see where I have to keep adding fabric.


I created several pieces of crazy quilt and I'm going to put them together later.


When all the pieces are joined, it will look something like this


I put the  pattern paper on the fabric and cut, the center and the outer edge.


Now I have a more nice pattern to work on.

I started to make the embellishment, to do that I made a sandwich with a layer of
stabilizer first, then a layer of batting and finally the fabric, I added decorative stitches,
crochet flowers and buttons.


To finish the front, I cut a piece of lining with the shape of the pattern, I put
the wrong side in front of me, put the crazy quilt on the lining and I finished the
part where the hole is, using a piece of trim that I sewed all around it.


The back side of the front panel it looks like this


Then I prepared the back side of the clothespin bag, I placed a piece of backing
fabric, batting and the outer fabric,


and sewed together using a running stitch

I added a bit of trim on the top of both sides to hide the hole where it will come
out the hanger
                                       

To continue I placed the front and back, right sides together and sew the two
pieces together using a ¼” seam allowance, leaving about 8 "unstitch  at the
bottom, to leave enough room to get through that space the hanger,


and I also leave without sewing the upper side where I added the trim.


Then slide the hanger through the space we had left open

What remains now is to hand sew the bottom

So I ended my first version of this project

Then, I lengthen as I told you in the beginning, because I did not have much room
for my sticks!!!


Here I'll  share with you more pictures I took, I liked this project so much that I've
taken a few pictures from all sides, top, bottom, middle, if there are many I
apologize, I could not resist!!!


Here ends this tutorial, I had great pleasure in creating this clothespin and also
in creating this tutorial to share with you all. I hope you liked it, if there were
spelling mistakes, I apologize, I tried to do the best I could.

I hope you enjoyed this tutorial, I always appreciate your comments and I always hope that this blog continues to grow with new followers, do  not hesitate, you are welcome!!
 
I'm linking this project to Positively Splendid , Creating my way to Succes, and to Threading My Way, Quilting and Patchwork ~ Link Party.
 
Have a happy sewing day!!!!!
Marisa


LinkWithin

Related Posts Plugin for WordPress, Blogger...