
After my previous publication, many of you let me know that wanted a tutorial on
how to make an iPod case, I was happy to receive many personal messages with this
request and that is why I am here with you today to share my first tutorial about
sewing.
I have to admit that I started this tutorial several times, always trying to be
clear, I discovered that it is not easy to put into words the actions we take
almost automatically, but I will try to do it the best way that I can.
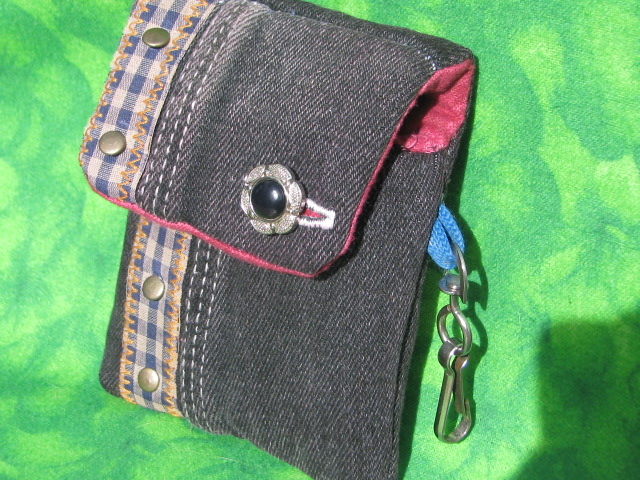
This time I decided to make a case for my phone and since I had a pair of jeans I
wanted to recycle , I did it and the result is in the picture. In this tutorial I
will show you the steps that I did to sew this cell case.
1) The first thing to do is take the measures and draft a pattern.
We have to create tree patterns, one for the front,one for the back and one for the
flap.
In order to create the patterns we must take the following measures of our device
-with
-length
-thickness of our device ( cell, ipod or iphone or.....)
In order to create the patterns we must take the following measures of our device
-with
-length
-thickness of our device ( cell, ipod or iphone or.....)
If you want a page with the measures to create the case, click here
Let's start by creating the pattern of the back side (pattern A). Let's draw a
rectangle, to determine the width of the rectangle, we just add the following
measures witdth + thickness + 1''.
To determine the height of the pattern, measure the height and
add 1''.

To create the pattern of the front (pattern B), we will draw another rectangle
where the width will be the same as in the back pattern (width + thickness + 1'') and the
height will be the high + 1/2''.

Now we still have to draw the last pattern, the flap ( pattern C). Let's draw
another rectangle the width will be the same as used for the back, the high will be
3''. If you look at my picture you will see that in the corners of my rectangle I measuring a 1/2''
in and I traced lines to draw the sides of the flap.

2) Now that we have the patterns ready, let's cut the pieces.
from the pattern A( back) :
-one outside fabric
-one piece of pellon or timtex (something stiffener)
- one piece of lining fabric
from the pattern B ( front)
-one outside fabric
-one piece of pellon or timtex (something stiffener)
- one piece of lining fabric
from de pattern C ( flap)
-one outside fabric
-one piece of pellon or timtex (something stiffener)
- one piece of lining fabric
We also need a piece of velcro for the closure of the case, a snap hook and a strip
of cloth to hold the hook.
3)Preparing the outside fabrics
I started here, I wanted to recycle an old pair of jeans that I had ,in this photo you see my three pieces of fabric to make the outside of my case.

I wanted to recycle this part of the jean, I do not know the name but is at the waist
where the belt is passed. I thought it would be perfect to put my case with a belt.


Here are my three pieces of fabric ready to start sewing my case.
The case will close with velcro, but I wanted to decorate my flap with a button and
The case will close with velcro, but I wanted to decorate my flap with a button and
a buttonhole, to give an accent to the flap.

4) Create the strap for the snap hook .
Looking at the photos I took, I think you will understand how to prepare the strap
to hold the hook. The pictures belong to another case I've done, but the steps are
the same.
I cut a strip of fabric: 1.5'' x2.5'' and a band of Pellon 1.5'.
The width of my snap hook is 3/4''.
I cut a strip of fabric: 1.5'' x2.5'' and a band of Pellon 1.5'.
The width of my snap hook is 3/4''.
Put a strip of Pellon, in the center of the band of fabric. Fold one side of the
fabric towards the middle, double the other side of the fabric to 1/8'' and then
folded towards the center of the band and sew both sides of the strap. Slide the
clasp onto the strap, fold in half and stitch close to clasp as possible.


5) Sew the velcro in place
We are going to sew the velcro in the lining of the pattern C (flap) 1 "from the
edge

and on the outside fabric pattern B (front) also 1" from the edge

6) We began to put all the pieces together ( sewing)
Pin the flap( outside fabric) and the back ( outside fabric) right sides together,

aligning the row edges and sew together


Now with the right side facing you , we going to place the strap with the hook, you
have to decide now how long you want your strap, place the front fabric right side
down (do not forget to check the strap with the hook is well centered ), and sew
all around the edges leaving the top open


clip the corners

align the side seam with the seam of the base and sew


turn right side out

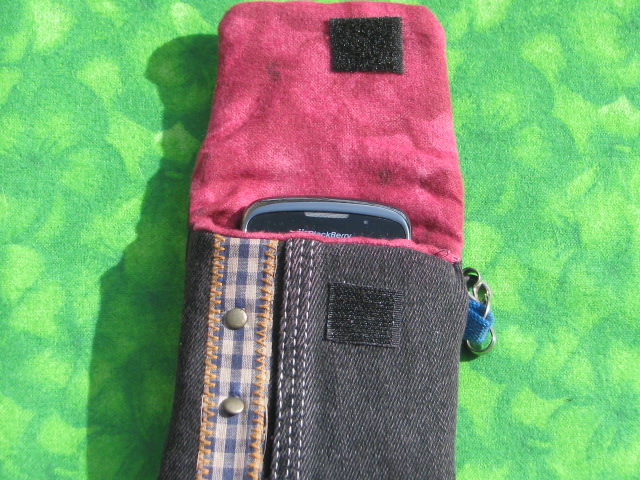
We ended up with the outside of the case, we will continue with the inside
7) Make the lining
-Pin the flap( lining) and the back (lining) right sides together, aligning the row
edges and sew together
- place the back right side facing you and place the front piece right sides
- place the back right side facing you and place the front piece right sides
together, aligning the row edges and sew together, leaving 2" of the bottom open.


8) Attach the lining to the exterior fabric
With right sides together, place the exterior fabric inside the lining


Now we have to sew along the top and the flap.
There are places where I could not sew with the machine then I finished sewing by
hand


Turn right side out by pulling the exterior fabric through the opening


Now we sew the opening with the machine and push the lining inside of the the case.

Now is the time to enjoy our new case


case was made with these patterns, what I did was create the pieces of fabric with
the technique of crazy quilt and then, the sewing was done following the steps I just showed
you. If this is your first time coming to my blog, the tutorial to create the crazy
quilt is here.
I used this patterns

to create this crazy quilt ipod case


I hope you liked this tutorial, I did it gladly. I wait for your comments and
hopefully you try to sew one for you and maybe more to give to your family or
friends. What I think is good in my tutorial, is that no matter what the size of
your device, you can adapt the pattern and create a case with your measurement.
In my next publication I will show you how I did to create the fabric for this
cell case, I give you an idea...I use scraps again.


If you have any problem to download it, I would appreciate you let me know. This tutorial is for personal use,you can create the case for you or to sell, if you do one of my projects I only ask you to do a link to my blog for the tutorial.
I'm linking this project to Positively Splendid, Creating my way to Success, Sew Many Ways , The Pin Junkie and to Threading My Way.
I also linking to Hogar-Mujer this is a Spanish blog that I love!
I also linking to Hogar-Mujer this is a Spanish blog that I love!
Do not forget comments and followers are welcome, see you in my next tutorial.
Have a nice day and enjoy!!!
Marisa.
This project was featured at :


