Thursday, June 7, 2012

How to Sew a gift bag

Do you remember the bibs that I made some time ago? My mother in law asked me if I could make one but adding the name of the baby. Obviously she only asked me one and I end up doing two bibs. I also decided to make a gift bag where she could put these bibs in, and that gave me the idea to create this tutorial.This was the result.


The finished dimension of the gift bag is 8" wide x 11" tall.


If you want more information on the bibs,I invite you to visit my publication HERE.


Now let's start with the different steps that will lead to the accomplishment of
this gift bag. This is how I did it:

First step, cut the fabric :
for the outer fabric:
   - cut 10" x 8 1/2 " (front)
   - cut 11 1/2 " x 8 1/2"  ( back)

Tip: I cut the fabric for the exterior 2 "longer than the final measure, I did the
buttonholes and the embroidery  and then I cut to the measures that I have just
given you.

for the lining:
   -11 1/2" x 8 1/2" ( cut 2 )
  (I cut these pieces of fabric   with the measures listed )

for the patchwork:
   - cut two strips of fabric 1 1/4 " x 12"(one white and one blue )

You will need also a bias tape or a ribbon  that you will thread through the buttonholes, I used  36" and the wide of the bias tape is up to you.

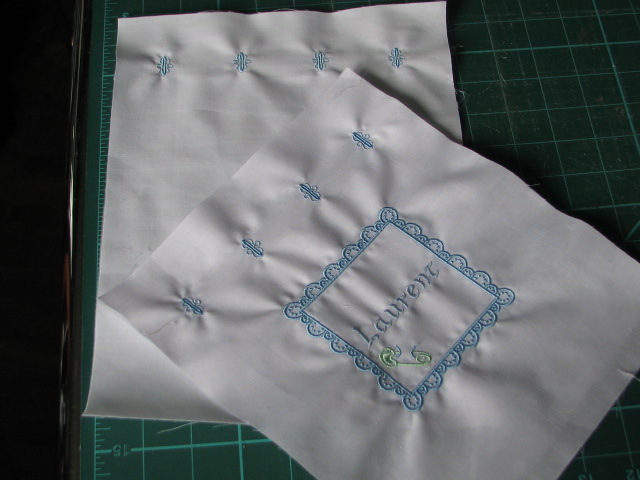
The second step is preparing the exterior of the bag, the buttonholes and the embroidery design.


I started with the front fabric, I decided to sew a few  buttonholes and use them to thread a rubban. The buttonholes can be made either by hand or by sewing machine, I wanted to do it  using my 4D software and my embroidery machine. The lenght of the buttonhole is determined by the wide of the ribbon, in my case the ribbon mesures 2/8" (0.5 cm) so my buttonholes mesures 5/8" ( 15mm )
Whatever the way you want to do it, the distance between the buttonholes is 2 "(5 cm) and they are located 1 1/4" from the top edge. I did the embroidered design with the baby's name, 2 1/2 "away from the buttonholes.

If you do click  HERE you will find a sheet with the drawing that I did, you can download the pattern to your computer, is not the exact pattern but just gives you an idea of how I have positioned my items (buttonholes, embroidery, patchwork).

If you have a digitizing software read this, if not you can skip this and go to the next step. I know there are readers of my blog that have the 3D, or 4D or 5D software, so I will share with you what I used to program my embroidery ( I have the 4D Pro software).


I opened my 4D software, I started by choosing a hoop of 240 x 150 mm, for the buttoholes, I used the buttonholes that come with the 4D, after choose the one that I liked, I just copy and paste the buttonhole and I place them at a distance of 50mm between each one.

The embroidery design that  I used is from Husqvarna, Labels and Frames ( disk 76) 
and I use the design number 17.
To create the name, first I cilck on the letter tab,

I used the letters Script / ADINA.


My software is in French but I think the names of the fonts is the same or very
similar.
Here is the front of my gift bag with the embroidery


To the back side, I made the buttonholes, always at a distance of 1 1/4" from the
edge.
This is a picture that I want to show you, you can see I cut the piece of fabric larger
than the final measures.


 After I finished my embroidery, I cut the front and back with the measures that  I have
given at first.

Now let's make the patchwork (not sure if you call it so). First cut two strips
 of fabric 1 1/4 " x 12"(one white and one blue )


Place them with the right sides together, aligning the row edges and sew.
                                                     ( I always use a 1/4 seam allowance)


expose the right side and press


Now let's cut bands of 1 1/4 "

When you are ready to sew, flip each band, so that it looks this way .

Place the bands rigth side together and sew.


We will continue joining bands  until we reach more than 11 1/2"


Now, put togther the rigth sides of the front and the patchwork, aligning the row
edges and sew

To finish sewing the outside of the bag, place the front and back fabrics right
sides together and sew all arround the edges leaving the top open.

I align the side seam with the seam of the base and sew (I used also 1/4 seam
allowance),

so the corners are more beautiful.

Turn right side out, now is time to thread the rubban.
 We are going to sew the lining in the same way. Place the front  and the back with
right sides facing, sew the sides and base, but this time we will allow an opening
of 3 "on the base.
 

Next step,  attach the lining to the exterior fabric.
                       To do this we are going to slide the exterior of the gift bag towards the inside of
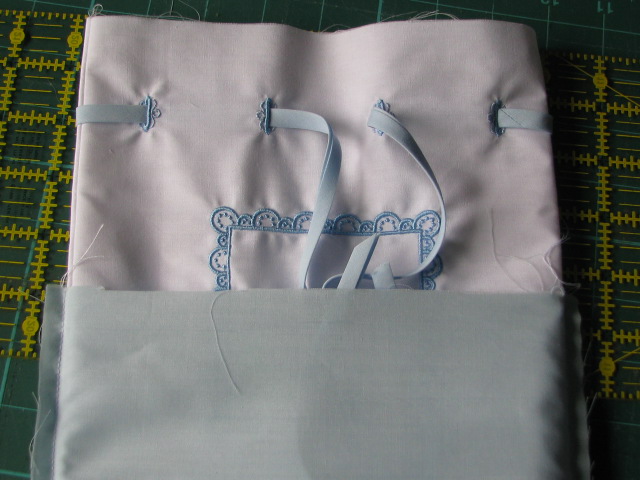
the lining, so that both right sides are facing each other.
Now we have to sew the top, aligning the row edges of the outside and lining and
sew together.

Pulling the exterior fabric through the opening

Now we are going to sew the opening that we leave earlier in the lining.


When you are ready, push the lining inside of the gift bag...now is time to enjoy
our gift bag.


I hope you liked this tutorial, I wish I would have given you some inspiration. I used my embroidery machine and my 4D software to create this gift bag, but from here you can create a gift bag, adding an applique or doing embroidery by hand. The buttonholes can be done by hand or using the buttonholes that come with the sewing machines.

I love it when you leave me messages, remember that I always hope to have new followers. I wish to take this post to say thanks to the new followers who have joined my blog, for me to have followers is a way to give me motivation to create more and more projects. I am currently working on a quilt that will probably be the topic of my next post.

Have a nice day!
ENJOY!!!!
Marisa.

Friday, June 1, 2012

The Wavy Bag

Hello to all the readers of my blog, I could not do an update until now for several reasons. One is that I had a cataract surgery   in my right eye, which  not allow me to  continue with the tutorial that I am preparing (I made a gift bag and I'm writing the tutorial), second in my sewing tote bags and purses yahoo group we did a sew alone, as we had a month to finish the stitching of the bag, these days I
dedicated myself to finish it and now I want to share photos of my bag with all of you.


Bonjour à tous les lecteurs de mon blog, je n'ai pas pu faire une mise à jour jusqu'à présent pour plusieurs raisons. Une est que j'ai eu une chirurgie de  cataracte dans l'œil droit, qui ne m'a pas permis de continuer avec un tutoriel que je suis en train de préparer (j'ai fait un sac-cadeau pour un bébé, ok en réalité est pour la maman ), deuxième, dans mon sewing tote bags and purses yahoo groupe nous avons fait un sew along, comme nous avions un mois pour terminer la couture du sac, ces jours, je consacre tout mon temps  pour le terminer et maintenant je veux partager avec vous des photos de mon sac.


This is a free pattern, if you are interested in making this bag, here and here you will find
the direct link for the tutorial.
It was rewarding to do this bag, all the explanations are clear, in the tutorial
she showing us a lot of pictures making it much easier sewing this bag.This time I 
learned how to  insert a zipper closure , something that until now,  I always had
some adversity to try.


Il s'agit d'un patron gratuit, si vous êtes intéressé à faire ce sac, vous trouverez ici et  ici le lien direct pour le tutoriel. C'était gratifiant de faire ce sac, toutes les explications sont claires, dans le tutoriel, elle nous montre une grand nombre de photos qui rend beaucoup plus facile la couture de cet sac. J'ai appris à insérer une fermeture à glissière comme fermeture du sac, quelque chose qui jusqu'à présent, j'ai toujours eu l'adversité pour essayer.
These pictures are to show you the inside of the bag, in the tutorial she showing
us how to insert a zippered  pocket, I decided to add another pocket, you know ...
a bag never have too many pockets for me.

Ces images sont pour vous montrer l'intérieur du sac, dans le tutoriel, elle nous
montre  comment coudre une poche intérieur avec une fermeture à glissière, j'ai
décidé d'ajouter une autre poche, vous savez.... les  sacs a main n'ont jamais
trop de poches pour moi


I want to share with you  more photos I've taken from this bag, I hope you like
them. Sorry if I add many pictures, but I love how it turned out this bag ...


Je veux partager avec vous  plus des photos que j'ai prises de ce sac, j'espère que vous allez les aimer.Ce sac est déjà pris .. ce beau sac a main a fini par être un cadeau pour ma mère.
I hope you enjoyed this post, see you soon with a tutorial that I am preparing on
how to make a fabric gift bag, to give a gift, to a baby (ok ,I have to say...is 
for the mother of the baby..LOL).

J'espère que vous avez aimé cette publication, nous allons nous voir sous peu avec un
autre poste que je suis en train d'écrire  où j'explique comment créer un sac
cadeau pour un bébé (ok une fois de plus je dois le dire... en réalité pour sa
maman LOL)

Tuesday, April 24, 2012

Creating with fabric scraps

Today I'll share with you another technique that  I used to create the fabric  for
this cell phone case.


The first step is obviously to put together pieces of fabric that combine well with
each other. One way I found to organize my small pieces of fabric, is put all this
scraps of fabric in bottles according to color shades.


Here are my scraps of fabric that I will use, now we can begin...

What we will do is sew these pieces, right sides together, no matter at first the
different widths of fabric. To begin let's cut the edges so they are straight


put the fabrics right sides together, match the edges and sew using 1/4" allowance
from the edge


The amount of fabric I'm going to join depends on the size of the pattern, for a
cell phone case I do not need much.
I sewed a few pieces, right side together,  without consider whether the width of
the fabrics matches or not, because I will fix it in the next stage.


Here are my strips fabric, once completed this stage, I'm going to cut them so that
all edges are straight

Now we have to start sewing all these bands of fabric together, to do that, we will
place right sides together, matching the edges and sew using 1/4" allowance from the
edge, if the band is narrow we can sew  1/8" from the edge.


Flip this piece over to conceal the seam and expose the right side and press.

Cut the ends

 the pieces are ready and we can start to decorate the fabric

Before I started to sew with my decorative stitches  I made a sandwich with a
layer of stabilizer first, then a layer of batting and finally I center the piece of fabric on top and then I started doing the embellishment .We are going to decorate the fabric, using the  decorative stitches of  our sewing machines...

Here I'll show some close-up pictures that I took. If you look at the photos, you will see that I also
used the straight stitch to draw triangles, lines, you can actually create what you
want. If you feel comfortable using the free motion, this is the time to do it, in
my case the free motion is something I have to practice. Choose a thread color to
highlight, because this is what will give a nice touch of personality to your
creation


When I finished the embellishment I cut my pieces according to the measure of my
patterns and then I started to sew my iPod case.
I used the same patterns that I shared with you in the previous tutorial, the only
difference was, that when I was drawing the pattern to the back side I've put together the
patterns A and C to create a single pattern. Here is the link to these patterns.
Only remove 1/4 "of each pattern , join them and draw it again.

(you can click on the image to enlarge)

Now you are ready to sew another case, the steps are the same as in the previous
tutorial, here is the direct link to the tutorial. I hope that you liked this new
technique to create a piece of fabric . If you sew a case, I would like to
encourage you to share it with me, if you have a blog, you can leave your link and
I would love to visit you.


I hope you enjoyed this tutorial, I always appreciate your comments and new
followers.


Enjoy and have a nice day!!1
Marisa

LinkWithin

Related Posts Plugin for WordPress, Blogger...