Wednesday, January 9, 2013

Let's sew a needle case using recycled jeans!

Happy 2013, one year that begins and many projects that I have in mind for this year. My list of things I want to  do keep growing and growing and those who will follow me along this new year will see the variety of projects that I will make.

My first project this year, is this needle case that actually I started last year . I think actually the name would have to be a needle book, you will see why, when you will see the photos
This is the front
 
This is the back
 
The inside of my needle case


It all started with the idea of ​​recycling this pair of jeans, when my daughter gave them to me because they did not fit, the first thing I noted was the beautiful pockets, and I have kept them with the idea of creating something whenever inspiration would come. 
 
Look that beautiful pockets!!!!
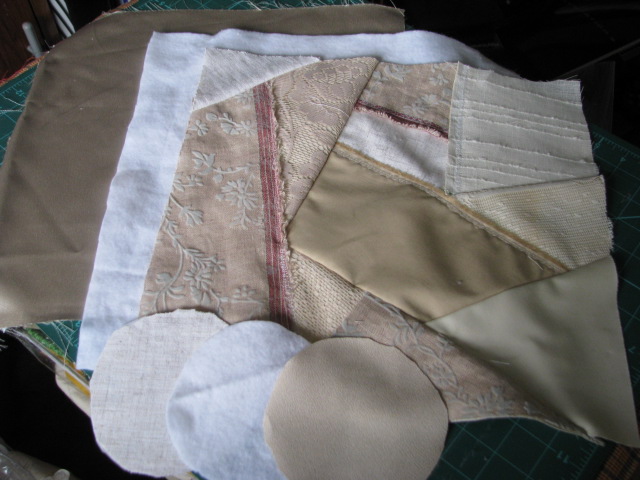
Analyzing the various parts of this short I found the pieces I wanted to use
 
First stage disassemble all the parties I will be able to use later.
 
 
First, I used the back pockets to create a piece of fabric,  that will become the front and the back side of my needle case.
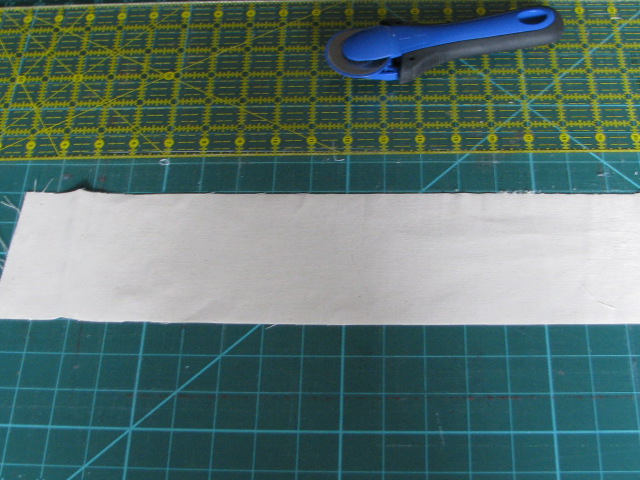
 The measures do not matter as it depends on the design of the pants,  you can cut a  bigger or smaller piece or just cut two squares. Just to give you an idea, my pieces  are 8 "x9".
 
I cut the two pieces  and between them I sew  a strip of fabric 2.5 "wide.
 
 
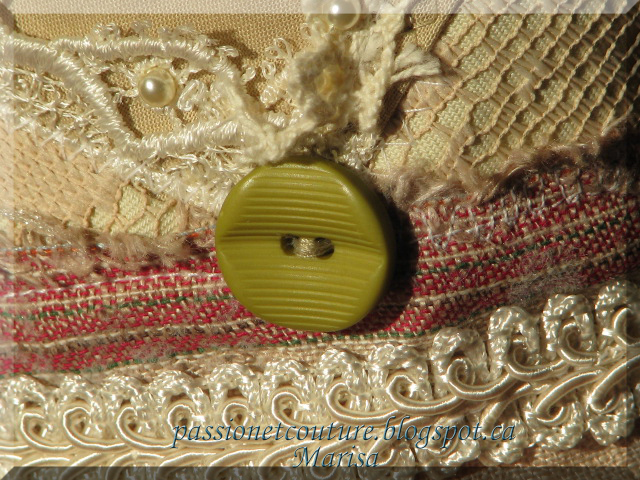
Then I started to embellish my project, I used my embellisher machine to add some  roving wool and I also added some scraps of fabric.
 
 
To make the inside of the needle book, I took the measure of my external part already finished, and cut a piece of red fabric with the same measures. I think the contrast of colors is nice. On one side of the needle case I decided to make a pocket, with, what  it was before, the zipper of the pants, and added another pocket I had from another pair of jeans.
 
 
 Now I have the outside and the inside  ready to sew them together .
 
 
Before sewing them together, I cut a piece of interfacing, because I wanted to give a little stiffness to the outside of the needle case and  also sew a button .
 
 
Take the two pieces, place right sides together, aligning the row edges, added a
hair elastic in between the outside and inside of the opposite side to where I
added the button and sew, leaving 4" or 5" of the bottom open.


Turn right side out by pulling the fabric through the opening , and sew the
opening, I did with my sewing machine.

For the inside I just added two sheets of felt I had, cut them to fit the measure of
my book and sewed with the machine.


I have sewn them in the center, in the place that would be the spine of a book, simply by using a running stitch.


Everything is now ready to fill it with  needles and other sewing accessories,
I show you the final photos.


If any of you makes this project I would like you to share it with me, and if you
publish your creation on your blog I would appreciate if you can add a link back to this article.


I hope you enjoyed this post, for my part, I enjoyed it immensely while I was creating this needle case, the beauty of these projects is the improvisation, everything can be used and I guess you will agree with me, recycle, reuse and repurposing is the best gift we can give to our planet!

Have a nice day!!!!!
Marisa :)


These project was featured at Craft Gossip
 
They are talking about me at CraftGossip.com
 
 
and also at Totally Tutorials !!!
  
Totally Tutorials Blog

Thursday, January 3, 2013

Some beautiful news to begin this new year!

My first post of the year begins on a note of happiness. I have two nice news to share with you. One is that the scarf that I made in November last year to participate at the Ring Your Neck Scarf Challenge, was the most voted scarf! and that allowed me to winning the first place! 
 
I want to say thanks to  Rikka for hosting this challenge, all the scarves that
have been created for this challenge are beautiful. Congratulations to Linda and
Fiona, your scarves are terrific, and also to everyone who participated, because
each one of us has tried a new technique, we have learned something new and created
something unique.If you want to see the photos of the other winners are here. I
feel honored to have the first prize, thanks to all of you who voted for my scarf.
Here is the beautiful new badge I received


These are the pictures of the scarf that allowed me to take the first place in the
challenge:


This scarf is made out by using water soluble stabilizer, yarns and threads and the
tutorial where I show how to make this scarf is here.
 
If you want to find more inspiration I encourage you to visit Ricochet and Away is
another blog I visit regularly and where I find inspiration in every visit I make
The second good news is that my wine gift bag was featured on Threading My Way,
thanks Pam for giving me the honor of place my wine bag with such beautiful
creations. I invite you to visit her blog,here is the link, if you look for inspiration, ideas for new projects, I give you the guarantee that you are going to find all what you are
looking for there!
 

Here is my other badge:


This is the wine gift bag I made, and the tutorial is here.
 
If you have projects that you want to share in Threading My Way, this is the link,
all  the link parties at Threading Your Way are themed and ongoing. You can add as
many projects as you like throughout the year.

I wish you all a beautiful and creative 2013, I have many ideas of projects I want
to do, I am currently working on a tutorial for a needle case I made using an old
pair of jeans, the year will begin with the topic recycling and reuse, something we
all love, as we return to give life to something that is no longer useful to us and
we make a nice gesture for our planet and our wallet ...
 
See you soon
Marisa.

Monday, December 24, 2012

Happy Holidays!!

Another year ends, and for me is the time to give thanks.

Thanks to all of you  who take the time to visit my blog. Thanks to every one of my followers, the fact that you are here with me is what makes me want to create new projects, I also want to say thanks to  all of you for  the nice comments you have left me over this year, this year was beautiful, he allowed me to discover new

friends and especially several bloggy friends who bring me inspiration in each of

their post .


Thanks to all of you, who follow me by email and let me come into your homes

 with my posts, thanks!


To all of you, I want to wish  a wonderful holiday time with family and friends.

I hope  that peace reign in your homes throughout the year 2013
I have created this postcard for you, hope you like it.


Thank you for being here with me  along this year, and Happy Holidays!!


Marisa :)

Friday, December 14, 2012

A wine gift bag for every occasion.

Each time I am invited to lunch or dinner at friends or my family, I always take with me  a bottle of wine as a gift, I think here in Quebec is the tradition (I do not know if I ever told you that my country of origin is Uruguay, I'm living in this beautiful country for the last 23 years). Returning to my theme, whenever I have the opportunity I will sew a gift bag, and each time the recipient of my bottle of wine left in admiration with the bag (do not even look at the bottle of wine) the truth is that  over the years I have made wine gift bags for all occasions, I'll just adjust my fabric selection by the event and the imagination does the rest. I thought it might interest you to see how I make my wine gift bags and here is the tutorial.


This is an easy project to do, you can do it in an afternoon and the possibilities are endless. Everything will depend on the fabric used for the outside of the bag, you can do something simple by using a print fabric or make something more elaborate such as adding an applique, an embroidery, buttons, eventually all your ideas can be used to decorate the fabric.


What we need is:
Cut:   13.5 x 13.5 from main fabric, lining and batting

Base: the pattern is here, you will cut, 1 from fabric, one from batting and one from lining. ( When you print the pattern, verify that the diameter of the circle is 4 ")
Handle: Cut a piece of 4" x 17".

I decided to make the outer fabric using fabric scraps, I think you are getting to know me better, I have to admit...  when I use my scraps, I feel happy :)
To create my piece of fabric I follow the same steps I did when I made my crazy quilt clothespin bag, here is the tutorial,


All started this way


From here I started to add more details,  add buttons, beads, lace and decorative stitches...


Once I finished all the embellishment of my piece of fabric I did the handles.
If you do not want to sew handles another possibility would be to make buttonholes,


Once the piece of fabric cut to 4 "x 17"
 
Fold in half lengthwise with wrong sides together
 

Open and fold again each long edge in, to meet the center and press


fold again, press and edge stitch both edges


Pin the handle to the right side of the fabric ( I put the handle 3 "from the
edge), align the row edges of the handle with the row edges of the fabric.


With right sides together, fold the exterior fabric lengthwise in half and  sew.
 
 
before adding the base, place the base batting and the  wrong side of the


This is a photo of another gift bag I made, here you can see better the stitching I did
to attach the batting to the outer fabric
 
 
Now let's sew the exterior fabric  to  the circular base. With right sides together
pin the base to the exterior fabric and sew, using a 1/4" seam allowance.


Turn right side out


Now let's do the lining, we will follow the same steps as we did for the entire
exterior of our bag, but this time leaving 4" of the side open.


 Let's join the exterior and the lining, with right sides together, aligning the row
edges, the handle will be sandwiched between the exterior and the lining, pin and
stitch around the top edge.


Now is time to  pulling the exterior fabric through the opening
 
 
Now we sew the opening  and push the lining inside of the  wine bag.


The wine gift bag is finished, now we just have to go and buy a bottle of wine, to
fill our wine gift bag and give it to a loved one, it is certain that this will be
an appreciated gift.
"Please do not count all the times that I wrote the word "wine" in this tutorial"
 

I want to  share with you some extra photos


More wine gift bags I made


I hope you enjoyed this tutorial and  don't forget to leave me comments, you know
that your comments feed my desire to create.
 
If you are reading this post and you're not a follower, why not consider to join
us? I'm sure you will spend some  beautiful moments with us on the blog. I'm always
looking forward to making new bloggy friends!
Have a happy sewing day!
 
Marisa
I'm linking this project to Creating my way to Succes(A Round Tuit 132) , Threading My Way, Petals to Picots, Skip To My Lou, Freemotion by the River, A Quilter's Table, and to Fabric Bows and More
I'm also linking this project to The Creative Blog Hop ( dolly's designs).

Friday, December 7, 2012

My recent crochet scarves.

From all evidence the winter makes me stay in touch with the yarn and crochet
needles. In these last days I finished a scarf to give to my mom
 
 
The colors in the photo came out bluer than it really is , I don't know why.
 
This view is more closely and you can see a little more the details and the actual
colors of this scarf.
 

If you want to make this scarf,  you're going to find the printable instructions
here, and good news, the pattern is free.
 
This is another scarf I've done, I just use two crochet stitches, the chain stitch
and the double crochet stitch.
 

On the other hand, speaking of scarves, Rikka has created a page on her blog  Ricochet and Away with
all the beautiful scarves that the participants from the challenge have created.
I invite you to visit  Rikka's blog, there you will have, some beautiful scarves that will give you inspiration,
and also the links to visit the participating blogs and  free tutorials to
create these scarves, is a worthwhile visit.
 
 
This button I add here, is to take you directly to the site where  to find the scarves.  If you want to  vote for the scarf that you like more, continue
down the page  and there you will find the place to vote.
 
Thanks for visiting my blog, I wish you all to spend a beautiful day, don't forget
to leave me comments, you know that your comments feed my desire to create.

If you are reading this post and you're not a follower, why not consider to join
us? I'm sure you will spend beautiful moments with us on the blog. I'm always
looking forward to making new bloggy friends!
Have a happy sewing day! 
 
 
Marisa :)


I'm linking this project to Threading My Way  and to Creating my way to Succes( A Round Tuit 131)

Monday, December 3, 2012

My Christmas table runner.

We are in the month of December and I started to prepare my home for Christmas.
I want to show you this table runner that I made a couple of years ago and that
decorates my table every December since.


 To make this table runner I used my embroidery machine and the embroidery card
"Crazy Patch Embroidery" from Husqvarna ( Embroidery disk number 130).
To do it, I chose one of the pictures of the card and I embroidered several times, always repeating the same pattern and
using the same colors of fabrics. Then what's left to do is sew them together to
create the design.


Hope you like it and that I have given you the inspiration to create one like this
for your home, or maybe make one to give to a loved one.


Have a happy sewing day!
 
Marisa.

I'm linking this project to Creating my way to Succes(A Round Tuit 130), Sew Chatty, and to  Skip To My Lou

LinkWithin

Related Posts Plugin for WordPress, Blogger...