Tuesday, October 29, 2013

Fabric Pumpkins

This weekend I started to make fabric pumpkins.
I did some of them with a shabby chic style and the others with a more rustic
style. Here I show you some of the photos I took, I hope you like them.


Este fin de semana me puse a hacer estas calabazas en tela, unas con estilo 
Shabby chic y otras con un  estilo más rustico. Aquí  les muestro algunas de las
fotos que yo tomé, ojala les gusten. 


I found many tutorials online, all very good, but the tutorial I liked most was
on the blog Happier Than A Pig In Mud, and here is the link.
These pumpkins are done very fast and the originality of this tutorial is the
way in which she uses jute, to knot, and create as a stalk at the top of the
pumpkin.
I hope you liked my pumpkins!


Encontré muchos tutoriales online, todos muy buenos, pero el tutorial  que mas 
me gusto  fue en el blog Happier Than A Pig In Mud , si hacen click aquí serán 
dirigidos al sitio donde está el tutorial.
Estas calabazas se hacen muy rápido y lo original de este tutorial es la manera 
en la cual ella usa el jute para hacer los nudos y crear como un tallo en la 
parte de arriba de la calabaza.
Espero que les hayan gustado mis calabazas !


Have a happy sewing day :)
Marisa. 
 
 
I'm linking this project to Pins and Needles, Crafting Along   and  Fluster Buster .

Wednesday, October 16, 2013

Let's do some fabric flowers!

As I promised in my last posting, here I bring the tutorial showing you how to 
make these fabric flowers, as I did for my necklace. 
I made them, recycling one t-shirt I had in my pile of clothes to recycle, I 
found that the jersey fabric gives a nice effect to the flower, now we have to 
try to make them with other fabrics.
Let's start with the tutorial.


Como Les he prometido en mi ultima publicación, aquí les traigo el tutorial 
mostrando a ustedes  cómo hacer estas flores en tela, como la que hice para mi 
collar.
Yo las hice, reciclando un t-shirt que tenía en mi pila de ropa a reciclar, 
encontré que la tela de jersey le da un lindo efecto a esta flor, ahora nos 
queda intentar de hacerlas con otras telas.
Bueno, aquí va el tutorial.
 
 
Cut a strip of fabric 1.5 inches wide from the bottom of the t-shirt.
 

Cortar una franja de tela de 1.5 pulgadas de ancho de la parte de abajo del t-
shirt.
 
 
I folded it in half, and made a straight seam.
The important thing for me is to keep the same width between the place where is 
the fold of the fabric, and where I do the stitching line. To achieve this I put
attention to the left side of the fabric. The left side of the fabric is always 
at the same height as the left side of the foot.
I'll adjust the needle position to the right. If you do not have the ability to 
move the needle to the right, you can move the fabric strip to the left, so you 
get 1 inch or 3/8 inch between the edge and the seam line.


La doblé al medio  y hice una costura en línea recta todo a lo largo de la 
banda.
Lo importante para mí, es guardar el mismo ancho entre el lugar donde se 
encuentra el doblez de la tela  y el lugar donde hago la costura. Para lograr 
ello pongo atención a que el lado izquierdo  de la tela se encuentre  siempre a 
la misma altura que el lado izquierdo del pie  de la máquina de coser. De esa 
manera tendré el mismo ancho todo a lo largo de la banda de tela. Ajusto la 
posición de la aguja hacia la derecha. Si usted no tienen la  posibilidad de 
desplazar la aguja de su máquina de coser hacia la derecha, usted puede   mover 
la  banda de tela hacia la izquierda, de manera a  obtener 1 cm, o 3/8 de 
pulgadas entre el borde y la línea de costura.


Then we need a pair of scissors.


Luego necesitamos un par de tijeras.
 
 
We're going to cut along the edge, making a fringed strip like this. According 
to the distance at which you cut the fringes, will give different look to the 
flower.


Nosotros vamos a cortar a lo largo del borde, haciendo como una franja con 
flecos, como ven en esta foto. Según la distancia a la cual ustedes cortan los 
flecos, le dará una apariencia distinta a la flor.


At this moment we need to cut a circle of cloth, on which we will paste, our
band fabric, I use a piece of denim. My circle is almost 2 inches (is 5 cm) in
diameter, you will choose the measure that best suit you, according to your
project.


Luego necesitamos  cortar un círculo de tela, sobre la cual  pegaremos, nuestra 
banda de tela, yo use un pedazo de tela de jeans. Mi círculo mide casi 2 
pulgadas (son 5 cm) de diámetro,  usted elegirá la medida que más  le 
conviene, según su proyecto.


Now, begin to glue the strip of fabric along the edge of the circle here I put
some pictures. I  using a hot glue gun to do this.


Ahora, empezamos a pegar la franja de tela siguiendo el borde del círculo aquí 
les pongo unas fotos. Yo lo pegué usando una pistola de silicona caliente.


Last detail, add a decorative element in the center, in my case I added a
button.


Ultimo detalle, agregar un elemento decorativo en el centro, en mi caso le 
agregué un botón.


Here I show you another flower I made.


Aquí les muestro otra flor que hice. 
 
 
I hope you have enjoyed this tutorial and if you do some flowers following my
explanation, I'd love to see photos. Thanks for your visit, as always, I am
looking forward to read your comments.
 
 
Espero que les haya gustado este tutorial y si ustedes hacen flores siguiendo 
mis explicaciones, me encantaría  ver sus fotos. Gracias por vuestra visita y 
como siempre espero con muchas ganas  leer  vuestros comentarios.
 
 
Cheers and see you soon!
Saludos y nos vemos pronto!
 
Marisa:)
 
http://passionetcouture.blogspot.ca/2013/10/thinking-of-making-necklace.html


Thursday, October 10, 2013

Thinking of making a necklace.

I have long been thinking of making a necklace, in which one of the decorative
elements can be interchangeable and ended up making this necklace.
I wanted to use metal chains, as is the style that I like, also wanted it to be
asymmetric and that I could add a fabric flower. I finished making this
necklace.


Durante mucho tiempo he estado pensando en hacer un collar, en el que uno de los
elementos decorativos pudiera ser intercambiable y acabé haciendo  este collar.
 También quería utilizar cadenas de metal, ya que es el estilo que me gusta, que
fuera asimétrico y queria usar  una flor de tela. Terminé haciendo  este collar.
 
 
I decided to sew on the back of my fabric flower, two rings, in which they will
grab the necklace hooks, I hope it's clear what I mean. As a picture is worth a
thousand words, here are the examples


Me decidí a coser en la parte posterior de mi flor, dos anillos, en el que se
agarran los ganchos collar, espero que sea claro lo que quiero decir. Como una
imagen vale más  que mil palabras, aquí arriba y abajo están los ejemplos. 
 
Here I show the second flower I made for use with the same necklace, we could
make several flowers of different colors according to the clothes that we will
use.


Esta es la segunda flor que he hecho, solo para darles una idea. Podriamos hacer de distintos colores segun como nos vamos a vestir cambiamos la flor.


I took pictures of how I made the blue flower and  I'm preparing the tutorial,
it will be my next post, now you know the reason! little and often and hoping everything go solved.
Tomé fotos de cómo hice la flor azul y estoy preparando el tutorial, ese será mi
próximo post, ahora saben la razón! poco y seguido y esperando que todo se vaya solucionando.
 
 
Thanks for your visit!
See you soon:)
 
Marisa:)


My blog not appearing on feeds.

Hello everyone today I'll do two posts, I'll explain to you why.
I know many of you have signed up to receive my posts by email, however my posts
stopped going out since last July, after a few hours of suffering inquiring why:
I found three answers online.
First, Feed burner will not accept feeds that are larger than 512K.
Second, when there is much formatting on a post, on the boards that I read many say not to
use Microsoft word to write the post.
They say the size of the photos is not the most important, so this time I'll
try to make this post with less formatting and links and only  pictures, and
hopefully will work better and reach all your houses by email.
 
This is my first post, and as I finished, I go to the main post ... a bit like a
movie that starts and we have to see what will come after.


Meanwhile here I show one of the pictures I took this summer of the flowers from
my garden, I love this photo !


Hola a todos hoy voy a hacer dos publicaciones, les explico a ustedes él porque
Sé que muchos de ustedes se han inscrito para recibir mis mensajes de correo 
electrónico, sin embargo mis mensajes dejaron de salir desde el pasado julio, 
les cuento que después de unas largas horas de sufrimiento y tratando de 
descubrir, preguntando por qué sucedía esto, me encontré con tres respuestas en 
línea.
En primer lugar, Feed burner no aceptará feeds que son más grandes que 512K.
En segundo lugar, cuando hay mucho formateo, entre los consejos que he leído 
muchos no aconsejan de no  usar Microsoft Word para redactar el post.
 
Dicen que el  tamaño de las fotos no es la más importante, esta vez voy a tratar de hacer
este post con menos formateo, menos enlaces y subiendo solamente una foto, y espero que todos 
los que se han subscripto a mis email esta vez los van a recibir!
Este post es como un anuncio antes de empezar a ver una pelicula en el cine, luego viene el post principal.
 
La foto que ven aqui arriba fue tomada en mi jardin este verano, ojala les guste y sobre todo ojala la lleguen a recibir por mail .
 
Thank you for your visit!
Marisa :)


Friday, October 4, 2013

Today I want to share with you a beautiful and fast project, also the result of the giveaway...

 
And  the winner of the little bow pleat pattern is...
 
 
But before giving the result I want to show the little chickens I've been doing.
Actually they are juggling chooks, but I
want to use them  as decoration in my sewing room. 
I filled them with  oat seeds, so as the cooler days begin, I'm going to heat
them  in the microwave and warm my hands with them.
Here I show the pictures I've taken.


Un proyecto hermoso y rapido, tambien  comparto con ustedes el resultado del
sorteo, el ganador del patron de el bolso "the  little bow pleat"  es..

Un momento por favor, antes de darles el resultado del sorteo, quiero mostrarles las gallinitas que he estado  haciendo.
En realidad son para jugar y hacer malavarismo , pero yo las quiero usar como decoración en mi sala de costura. Yo las rellené con semillas de avena, de esta manera cuando los dias frios comiencen, las voy a calentar en el microondas y podré calentar mis manos con ellas.
 Aqui les muestro las fotos que he tomado.


This project is not my idea, I found this project  when I visited
 
As I said earlier is a project that is done very fast, is a way to use fabric
scraps, you only need a rectangle of 10 x 20 cm of fabric ( 4"x8"inches)
The tutorial is well explained, with many pictures that facilitate the
realization of the project, the link to the Red Ted Art's blog is here.
  Here I leave you with more pictures and with the draw.


Este proyecto no es una idea mia, la inspiracion la encontré mientras estaba
visitando el  sitio Red Ted Art's blog 
Como dije anteriormente es un proyecto que se realiza muy rápido, es una manera
de usar restos de tela, solo se necesita un rectangulo de 10 x 20 cm de tela o
4"x8" pulgadas .
El tutorial esta muy bien  explicado, con muchas fotos que facilitan la
realización del proyecto, el enlace hacia the Red Ted Art's blog, esta aqui. 
Aqui los dejo con mas fotos y con el resultado del sorteo.


The winner of the beautiful little bow pleat pattern is...

El ganador de este hermoso patron es ...


I have the honor to congratulate Julie Corbisiero , you are the one who left the comment number 2  !!!!!

"CONGRATULATIONS "

 Julie I will get in contact with you via email, congratulations again!


La ganadora de este sorteo es Julie Corbisiero, tu has sido la persona que dejo el comentario numero dos.
FELICITACIONES
 
Julie voy a entrar en contacto contigo via email !


I want to say thanks again to everyone who participated!!
Gracias a todos aquellos que han participado, les deseo a todos un hermoso dia!!!
Have a nice day!

Marisa:)


Friday, September 27, 2013

The Little Bow Pleat Clutch and a pattern giveaway !

Some time ago I discovered a beautiful designer, her name is Samantha , from the
blog "At home with Mrs H", I discovered her blog through a dear bloggy friend
Maria from Mia's Creations and since then I always wanted to be a tester for
Samantha!!!
 
 
Today I'm writing a special post,because
I had the joy of being accepted into her group of testers and here I show you  
the new model just released by At home with Mrs H.... this one, was tested by me.


Hace algún tiempo descubrí una hermosa diseñadora de carteras, su nombre es
Samantha, del blog "At home with Mrs  H", descubrí su blog a través de una gran
amiga, su nombre es Maria del  blog  Mia's creations y desde entonces siempre
quise ser tester de los bolsos de  Samantha!
Hoy voy a escribir un post especial, les quiero contar que he tenido la alegría de ser aceptado en su grupo de testers y aquí os muestro el nuevo modelo que acaba de publicar "At home with Mrs  H" ... éste es el que yo hice.


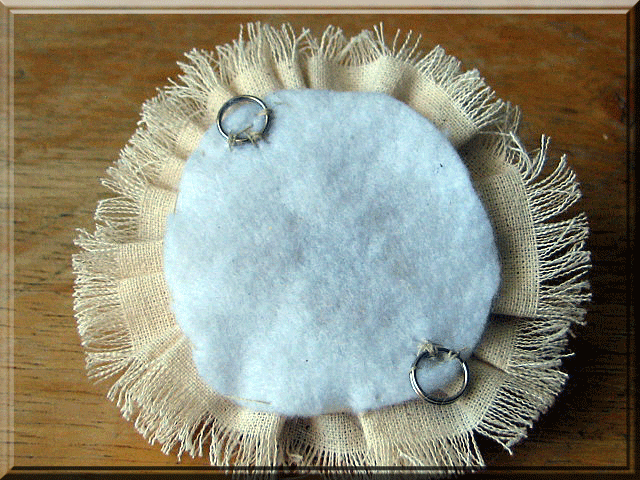
This little bow pleat pattern is beautiful, Samantha explains very well the
different steps to make this bag, inside this little bag there is a pocket with
a zipper. And while I  haven't added handles, in the pattern you will find the 
explanations for those wanting to add handles. Everything is there.
 
 
The finished bag measures approximately 8.5" x 6.5" (21cm x 16.5cm) and features mitred corners, a cute bow with a pleat cascading down from the centre and a magnetic clasp closure.


Este  patrón es simplemente  hermoso, Samantha explica muy bien los
diferentes pasos para hacer este bolso, dentro de este pequeño bolso hay un bolsillo con una cremallera. Y aunque yo no he añadido asas en mi bolso, en el patron ustedes encontraran las explicaciones  para aquellos que estem interesados en  añadir asas. 
 
La bolsa terminada mide aproximadamente 8.5 "x 6.5" (21 cm x 16,5 cm) y cuenta con esquinas cuadradas,  un pliegue en cascada desde el centro y cierre magnético.


I have to thanks Samantha  because of her  generosity, she has allowed me and
her testers to do a giveaway of her new pattern, after having chosen a winner, she's going to send the pattern for free.
 
Tengo que agradecer a Samantha por su generosidad, ella me ha permitido a mi y a todos
sus testers de hacer un sorteo para ganar  su nuevo patrón, una vez elegido el ganador  ella les va a enviar el patron  sin costo.


....surely you are wondering
Seguramente ustedes se estan preguntando
 
 
1)Who can participate?
Quien puede participar?
 
All people around the world who come to my blog, can participate. No need to be
a follower of my blog, but if you are a follower, or if you follow me by email
you  will have an extra entry.
 
Todas las personas de todo el mundo que vienen a mi blog, pueden participar. No hay necesidad de ser un seguidor de mi blog, pero si usted es un seguidor, o si me sigues por correo electrónico usted tendrá una oportunidad  adicional.
 
 
2) How to enter:
Como participar
 
In order to enter the giveaway I'll ask you to leave me  a comment, here comes
the interesting part, if you are a follower, let me another comment to let me
know that you are a follower of this blog, this gives a second entry, and if you
follow me by email, leave another comment for a 3rd entry.
Only 3 entries per person
 
For those of you who don't know how to comment, please click where it says
comments at the end of this page. It will open a window, then  in the lower part
of this window, you will find the space where you can leave the message.
 After writing your message you must "Choose an identity" and then you will be
able to "Publish your comment".
 
 
Contact info:Please make sure that I can contact you if you win, if you are not
a follower, leave your email with your comment!If you are a blogger, please
check that you are a reply blogger. If  I can't  contact you, I will have to
choose another winner.


Para entrar en el sorteo yo voy a pedir que me deje un comentario, aquí viene
la parte interesante, si usted es un seguidor, me puede dejar otro comentario para dejarme saber que usted es un seguidor de este blog y  esto le da una segunda entrada al sorteo, y si me sigue por correo electrónico, me puede dejar otro comentario para una  tercera entrada.
 Sólo 3 entradas por persona
 Para aquellos de ustedes que no saben cómo hacer comentarios, por favor haga clic en donde dice "comments" al final de esta página. Se abrirá una ventana, y luego en la parte inferiorde esta ventana, se encuentra el espacio donde se puede dejar el mensaje.
 Después de escribir su mensaje debe "Elegir una identidad" y entonces será capaz de "Publicar un comentario".
 
Datos de contacto: Por favor, asegúrate de que yo pueda ponerme en contacto contigo  si ganas, si no eres un seguidor, deja tu correo electrónico con tu comentario! Si eres un blogger, por favor comprueba que te puedo responder. Si no puedo contactar la persona ganadora, tendré que elegir otro ganador.


3) When does it end?
Cuando se termina ?
 
You can participate until Thursday October 3 and I will announce the winner on
Friday, October 4.
 
Se puede participar hasta el jueves 03 de octubre y voy a anunciar el ganador en
Viernes, 04 de octubre.


Wait a minute, please do not go yet I have still more things to tell you. If you
have interest in this pattern, you still can visit the other testers as they are
also doing the giveaway of this pattern, you will find all the testers that have
participated at Samantha's blog, click here
 
 
If you've already purchased the "Bow Pleat Pattern" tote before and you are
interested now in this pattern "The little Bow Pleat", Samantha is offering this
pattern as part of a discounted price 2 pack with the regular bow pleat tote.
 The link for the 2 pack is here
 
"IF ANYONE HAS ALREADY BOUGHT THE BOW PLEAT TOTE,  YOU CAN CONTACT SAMANTHA  VIA
Her  ETSY STORE FOR A DISCOUNT CODE TO GET THE LITTLE BOW PLEAT AT THE REDUCED
PRICE SO YOU DON'T MISS OUT ON THE 2 PACK PRICE"


Un momento, por favor no te vayas todavía.... tengo todavía más cosas que
decirte. Si tienes interés en este patrón, y quieres tener mas oportunidades para  ganar,   puede visitar los otros testers, ya que ellos
 también hacen un giveaway  de este patron, para encontrar todos los testers que
estan participando haz  click aqui

Si ya has comprado el patron Bow Pleat Pattern  antes y a ti te
interesa ahora  este patrón de The Little Bow Pleat, Samantha está ofreciendo
este
patrón como parte de un precio de paquete con descuento , tienes que visitar su
etsy shop y dejarle un mensaje para que te de un codigo de reduccion del
precio....espero que esto este claro...es para aquellos que han comprado
anteriormente el primer patron.
El enlace hacia el etsy
 
 
For those of you who can't wait to win the giveaway and want to buy it to begin
this beautiful clutch bag today, the pattern is listed and up for sale here.
shop esta aqui.
 
Para aquellos de ustedes que no pueden esperar a ganar el sorteo y quieren comprarlo para ya empezar a hacer esta hermosa bolsa hoy mismo, el patrón está en venta aquí


Good luck to all ... I look forward to your comments!!!
 
Marisa :)

Friday, September 20, 2013

Are you a No-Reply Blogger?

 
Every so often I receive a message from a bloggy friend to tell me that I am a
no reply blogger. The most unbelievable is that I have to check my status at
least once a month, because since I switched to Google+, my status changed
without warning.
 
 
The first thing you have to do is verify if you are a reply or no reply blogger,
to know this,is simple, visit your blog and leave a comment on one of your post
( you will delete later). Then when you receive the comment in your mail, find
your comment notification and look for the sender address . If you see the
return address as “noreply@blogger.com”, you have to change your status!


The necessary changes are not the same depending whether you have  a
Blogger Profile or Google+ Profile
but  don't worry.....the solution is here!
 
 
The good news is that many bloggers have created tutorials to help correct this
problem, although there are many online tutorials, today I want to share with
you a link to the blog of "Fluster Buster" her tutorial is very well explained,
and is the I blog I visit every time I have to correct my situation.
I leave the link for you HERE
 
 
Do not forget to check your status every so often, I now do it once a month and when a good bloggy friend tells me!
 
Marisa :)

LinkWithin

Related Posts Plugin for WordPress, Blogger...