
This month Rikka from Ricochet and Away is hosting another challenge, this time the challenge is to make a scarf. There are several guide lines to respect in order to participate in this challenge, that's what I like!
One thing is certain again: in this challenge I will be out of my comfort zone, I love this!
While there are several guide lines to respect, I'll just mention two of them, because for me, it is these conditions that led me to think about the kind of scarf that I will create.
# While crocheted and knitted scarves are wonderful, they will not permitted as
entries.
# You must try something new when making your scarf
and be specific about what you tried.
and be specific about what you tried.
From here I tried to think of something that I have not done until now, I
remembered a technique where we could create a fabric using water soluble
stabilizer, wool, yarn and fabric scraps, and then we can create a scarf.
My project ended well, here I show you the pictures of my finished scarf:


Rikka has added a variety of links and photos to create scarves, if you look for
inspiration, I invite you to visit her blog, this is the link. Look also in the
previous post, you will be surprised of all the possibilities that exist to make
scarves.
If you still want more inspiration, there is a board on Pinterest, where you will find all kinds of scarves, this board was created for this challenge, this is the link.
If you still want more inspiration, there is a board on Pinterest, where you will find all kinds of scarves, this board was created for this challenge, this is the link.
If you wish to participate in this challenge there is time until 30th November for
register and to do the project, here I added the botton for the challenge, you
just have to click on the site and you will go directly.

I took pictures while I was doing this scarf with the idea of creating a tutorial
for you, maybe someone in this cybernetic world wants to make a scarf like this, I
think that a scarf can be a nice Christmas present for a loved one.
Let's get started, not many materials are required for this scarf, the base is the
water soluble stabilizer, I used Dissolve-A-Way Max, is the one I had on hand and
gave me very good results when it was time to rinse my scarf to dissolve the
stabilizer. We also need thread, yarn, ribbon and wool, in reality you will choose
the materials after you see the technique.
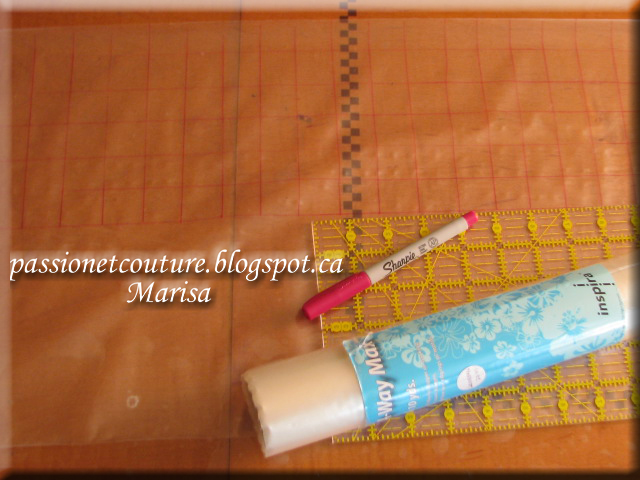
These were my materials to start;


To begin I cut 60 "length of water soluble stabilizer and with a fine line
permanent ink marker I drew lines to create a grid in only half of the stabilizer,
in my case the stabilizer is 12 "wide, this means that my grid is 6" wide. I used
this grid as a guide for my sewing
I Took the first fiber (do not know what to call it, it is not wool), I used the
Cord foot, using the same color thread in the bobbin as on top, I scheduled my
running stitch to a length of 2.0 and started sewing. The first thing I did was
leave a length of about 6 "away from the edge and start sewing the fiber along the
grid, alternating materials, sometimes a fiber, sometimes the ribbon.
I forgot to tell you that I used a universal sewing needle, number 80.


needle down, I was turning the stabilizer to go from side to side always following
the grid.


Now I fold the water soluble stabilizer in half and place it over the scarf.


Then, I turned my scarf to keep in front of me, the side that has the stitching.

Always using the same color thread in the bobbin as on top, I added decorative
stitches, you can include several lines of sewing, it is important to fill in your
grid squares. You have to overlap the stitches to hold them together.

added more yarn at the end, trying to fill all the spaces

finally place the scarf in water to dissolve the stabilizer,

then set it to dry, I place it on a towel to let it dry overnight. Here it is ready to be used

The result will vary from one scarf to another, depending on
the variety of colors, textures, thicknesses of the yarn that we will use that we use, there is an expression that I really
like and it is, what if? and in this project I asked myself that question all the
time.
I hope you have enjoyed this project and I also hope to receive your comments, if
you liked this tutorial, I invite you to become a follower of this blog, and for
those who already are following me, I say thank you for following me on my
adventure.
Have a happy sewing day!
Marisa :)
I'm linking this project to Threading My Way, Creating my way to Succes, Skip to My Lou, Sew Chatty , delicate CONSTRUCTION, Mine for the Making, Make It War It, The Chicken Chick( Clever Chicks Blog Hop #15) and Trendy Treehouse.
13 comments:
Very nice Marisa! I have seen this technique before, but I hadn't tried it because I would rather knit my scarves. This is a great tehnique for those who do not knit or crochet. It's easy to get great results like yours. Plus I know you use a lot less yarn with this method as opposed to knitting or crocheting. Thanks for sharing your beautiful scarf.
I love this! what a great way to make a really airy scarf without lace knitting! so cute!
Fabulous scarf Marisa.
What a neat process! I have seen this style before and had no idea how it was accomplished. Great job!
My goodness - what a truly wonderful scarf.
I like that you have used all the specialty feet that are available and makes such a valuable contribution to this project. Well done Marisa
Lotta
I love your scarf Marisa. Thanks for the tutorial. Looks like an easy and quick project to make.
I love it! Consider your challenge met! This technique reminds me of nuno felting where the result is both furry and wispy. I'm going to pick up some soluble stabilizer next time I see it on sale.... Thanks for participating in the challenge.
Best,
Rikka
This is so interesting! And a lovely end result.
Amazing, Marisa!!! I LOVE your scarf!!! I have never seen this method of making a scarf, but it's one I am definitely going to try next year when it cools down a little. There are so many possibilities of varying the texture, depending on the ribbons and yarn used. Hope you don't mind, but I'm pinning this.
Wow! That looks hard!
And such a pretty result!
What a lovely technique! I love it although it looks a little difficult to execute. Bravo! for your results, the scarf is beautiful.
Gosh!! It looks readymade:) My vote for yours..
Marisa, how neat to be featured and to win first place. Congrats on all your latest success. As always I enjoy visiting your blog to be inspired.
Heather
"Heather's Haven"
Post a Comment